Advanced Features
PostMessage Events
PostMessage events enable seamless real-time communication between your website and the chatbot, enhancing the user experience. This guide will cover bidirectional information flow: sending user data from your website to the chatbot and receiving user actions from the chatbot. To help you get started, we'll provide a live demo website and a GitHub repository containing an example implementation.
PostMessage Events
While both webhooks and postMessages can send events in real-time, there are some advantages unique to postMessages. For instance, because postMessages are sent directly from the chatbot to your website, they eliminate the need for network requests and allow your website to respond immediately based on each user's activity. For example, you can display your customer's name on your website after they have entered their name in the chatbot widget, which is impossible with webhooks.
Send User Information From Website to Chatbot
Consider a scenario where your website implements user authentication. Upon successful login, you can leverage the postMessage API to transmit user information to the chatbot, eliminating the need for redundant data collection. Furthermore, if your website offers diagnostic tools that generate user-specific metrics, you may want the chatbot to address follow-up inquiries about these metrics. This seamless data transfer can be achieved by utilizing the postMessage API with the user-info event type. This method allows you to send both user's personalized information to the chatbot, enhancing the user experience and enabling more personalized interactions. The following payload structure can be used to accomplish this:
{
    "event": "user-info",
    "payload": {
        "name": "Customer",
        "email": "[email protected]",
        "phone": "1234567890",
        "info": "The user's lucky numbre is 654321"
    }
}
For guidance on sending user information to the chatbot, refer to this code snippet.
If you want to remove the user's information from the chatbot, you can send a postMessage with the user-info event type and an null payload, like this code snippet.
{
    "event": "user-info",
    "payload": null
}
Website Demo
To experience this functionality, visit our Demo Website and input user information as shown below: 
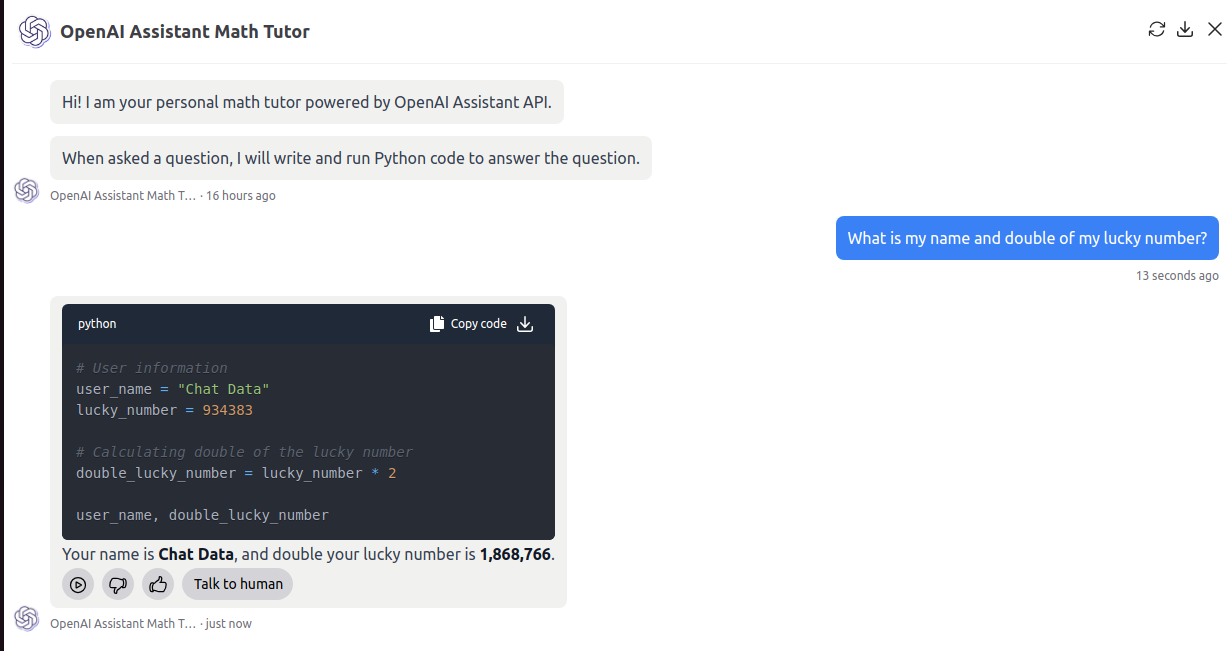
In this demonstration, the website communicates to the chatbot that the user's lucky number is 934383 - a randomly chosen number. Subsequently, users can pose questions like What is my name and double of my lucky number?. This query necessitates the chatbot to access the user's information for an accurate response. As evidenced by the screenshot below, the chatbot successfully recognizes the user's lucky number and performs the calculation correctly.

This example demonstrate that you can sync the user's information from your website to the chatbot to create a personalized experience.
Receiving PostMessage Events From Chatbot to Website
When embedding our chatbot as a widget bubble or an iframe on your website, you can currently receive four types of events: chat, live-chat-escalation, minimize-widget, and lead-submission. These events allow for seamless communication between the chatbot and your website.
Events Payload
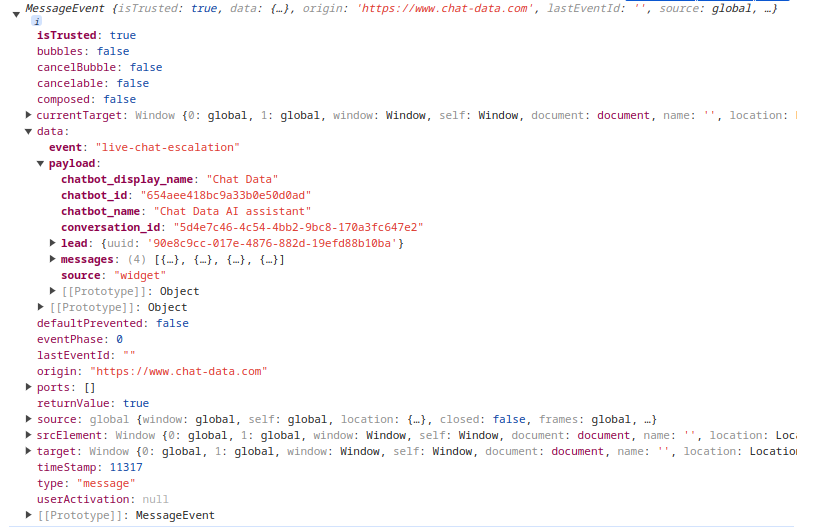
Let's examine each postMessage event one by one. The whole postMessage event looks like the following picture. For simplicity, we will just show the payload in the event.data when we describe each event. 
Chat
All chat conducted in the chatbot will trigger a postMessage with the chat event type. Here is an example of the event's data payload
{
    "event": "chat",
    "payload": {
        "chatbot_id": "654aee418bc9a33b0e50d0ad",
        "chatbot_name": "Chat Data AI assistant",
        "chatbot_display_name": "Chat Data",
        "conversation_id": "5d4e7c46-4c54-4bb2-9bc8-170a3fc647e2",
        "message": "How to resell the chatbot with my own domain?",
        "source": "widget",
        "lead": {
            "uuid": "90e8c9cc-017e-4876-882d-19efd88b10ba",
            "name": "Customer",
            "email": "[email protected]",
            "source": "widget"
        }
    }
}
Live Chat Escalation
When the user clicked the live chat escalation button, a postMessage with the live-chat-escalation event type will be fired out.
{
    "event": "live-chat-escalation",
    "payload": {
        "chatbot_id": "654aee418bc9a33b0e50d0ad",
        "chatbot_name": "Chat Data AI assistant",
        "chatbot_display_name": "Chat Data",
        "conversation_id": "5d4e7c46-4c54-4bb2-9bc8-170a3fc647e2",
        "messages": [
            {
                "role": "assistant",
                "content": "👋 Hello there! I'm Chat Data AI, your go-to source about Chat Data!",
                "timestamp": "2024-08-24T06:10:29.077Z",
                "_id": "66c97975a5f5d4ceebebb86e"
            },
            ...
        ],
        "source": "widget",
        "lead": {
            "uuid": "90e8c9cc-017e-4876-882d-19efd88b10ba"
        }
    }
}
Lead Submission
The lead form submission will trigger a postMessage with the lead-submission event type.
{
    "event": "lead-submission",
    "payload": {
        "uuid": "90e8c9cc-017e-4876-882d-19efd88b10ba",
        "name": "Customer",
        "email": "[email protected]",
        "source": "widget"
    }
}
Minimize Widget
A click on the close icon on the chatbot will trigger a postMessage with the minimize-widget event type. The minimize-widget event doesn't have any payload. You can listen to this event to hide the chatbot if you embed the chatbot as an iframe directly in your own chatbot widget container.
How to handle PostMessage Events
The postMessage events are available in the Standard plan or above. Website owners can listen to these events on their website to respond accordingly.
React Example
Here's a detailed guide on how to implement this in React:
  const appUrl = 'https://www.chat-data.com';
  // This is the embedding domain of the chatbot. You should replace it if you use your own domain.
  useEffect(() => {
    const handleMessage = (event: MessageEvent) => {
      if (event.origin !== appUrl) {
        return;
      }

      const data = event.data;

      switch (data.event) {
        case 'chat':
          console.log('Received chat event:', data.payload);
          // Handle chat event
          break;
        case 'live-chat-escalation':
          console.log('Received live chat escalation:', data.payload);
          // Handle live chat escalation
          break;
        case 'minimize-widget':
          console.log('Minimizing widget');
          // Handle minimizing widget
          break;
        case 'lead-submission':
          console.log('Received lead submission:', data.payload);
          // Handle lead submission
          break;
        default:
          console.log('Unhandled event:', data.event);
      }
    };

    window.addEventListener('message', handleMessage);

    return () => {
      window.removeEventListener('message', handleMessage);
    };
  }, [appUrl]);
JavaScript Example
Here's an implementation using vanilla JavaScript. For a practical application, you can refer to this code snippet, which demonstrates how we capture the lead-submission event from the chatbot in a real-world scenario.
    <script>
        (function() {
            var appUrl = 'https://www.chat-data.com';
            // This is the embedding domain of the chatbot. You should replace it if you use your own domain.
            function handleMessage(event) {
                if (event.origin !== appUrl) {
                    return;
                }

                var data = event.data;

                switch (data.event) {
                    case 'chat':
                        console.log('Received chat event:', data.payload);
                        // Handle chat event
                        break;
                    case 'live-chat-escalation':
                        console.log('Received live chat escalation:', data.payload);
                        // Handle live chat escalation
                        break;
                    case 'minimize-widget':
                        console.log('Minimizing widget');
                        // Handle minimizing widget
                        break;
                    case 'lead-submission':
                        console.log('Received lead submission:', data.payload);
                        // Handle lead submission
                        break;
                    default:
                        console.log('Unhandled event:', data.event);
                }
            }

            window.addEventListener('message', handleMessage);

            // Cleanup function (if needed)
            // window.removeEventListener('message', handleMessage);
        })();
    </script>
Website Demo
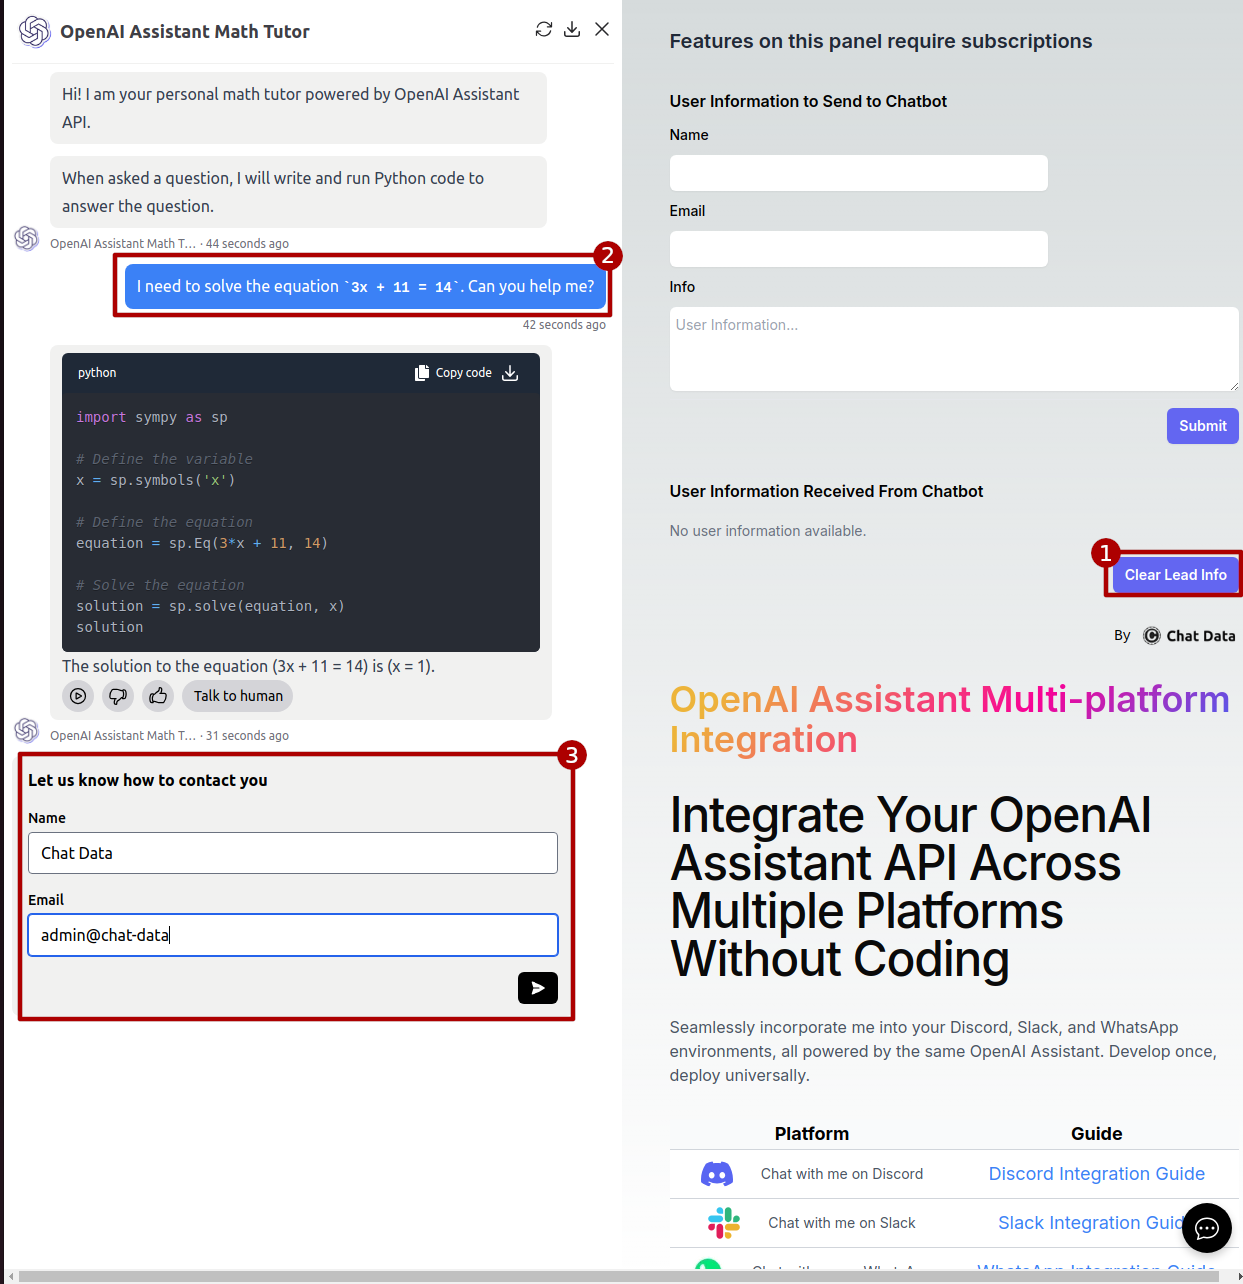
To experience the postMessage events in action, visit our Demo Website. If you've previously entered your information, start by clicking the Clear Lead Info button to reset. Then, initiate a conversation with the chatbot by sending a query. After responding to your initial question, the chatbot will prompt you to provide your contact information.

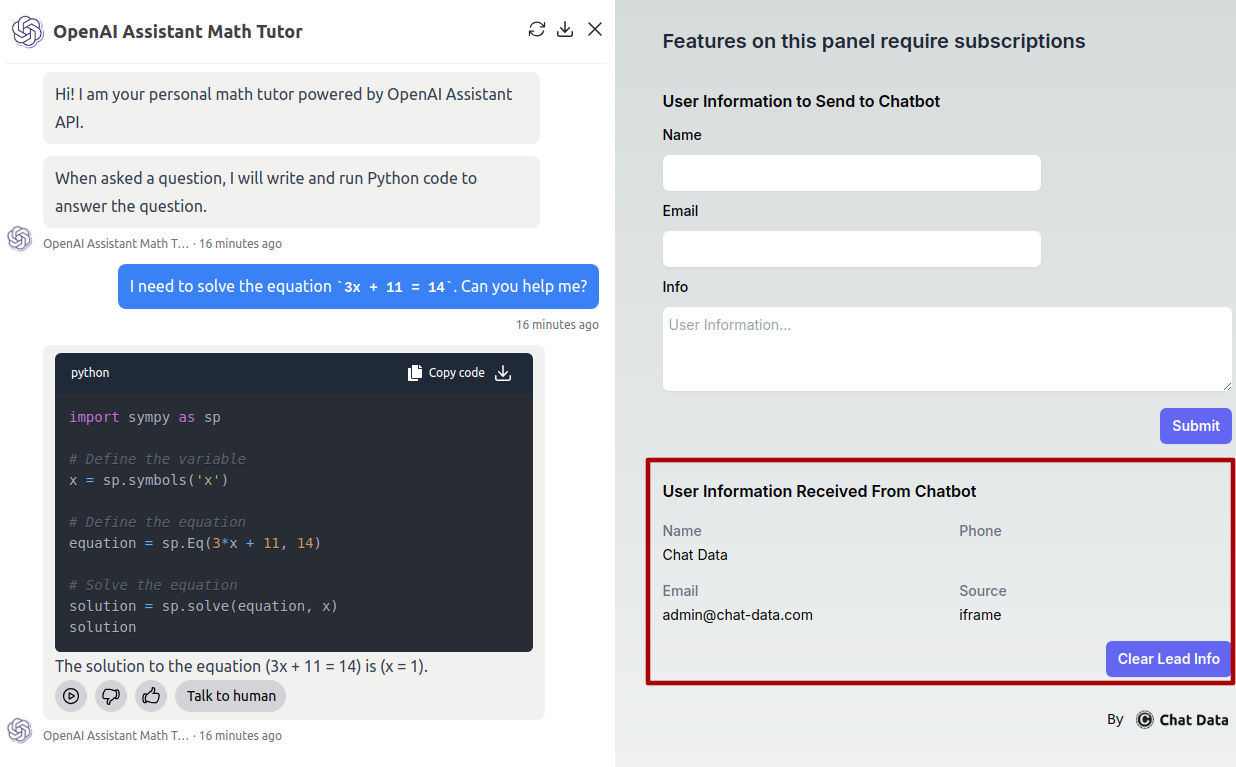
Upon submitting the lead form, you'll see the provided information displayed on the website, as shown in the screenshot below:

This demonstration illustrates how listening to postMessage events enables real-time responses to user actions on your website. For instance, you could create personalized pop-ups featuring the user's name, email, and conversation history. Such implementations can significantly enhance user experience and engagement on your platform.