Chatbot Creation
Train With Your Data
If you expect the agent to introduce your company or website, read your documents, answer queries, or conduct complex logic-based questionnaires to evaluate your users, we recommend using the upload-custom-data backend. Train the agent with your personalized data to achieve these capabilities.
Upload Training Data
The custom-data-upload is designed for training with your own provided data. Upon selecting this option, the agent will employ the default gpt-3.5-turbo model for processing your data through in-context learning. Additionally, you have the choice to opt for the gpt-4-turbo model, which offers more precise responses, albeit at a higher cost of 20 credits per message.
Currently, we support the following types of training data:
- Documents: We extract raw text from various file types including .pdf, .docx, .csv, .html, and .txt.
- Websites: We crawl websites, extracting raw text and anchor links using your preferred crawling method.
- Text: Directly upload plain text for training.
- Q&A: Input question and answer pairs for training. This structured data format is highly recommended as chatbot prioritize these inputs when generating responses.
- Video & Audio: We transcribe raw text from videos and audios, then utilize a traditional Retrieval-Augmented Generation (RAG) workflow to segment the text appropriately for chatbot response generation.
- Product: Import product JSON payloads directly from your WooCommerce or Shopify store. Since product data is structured, we keep it intact. the agent prefer these inputs over unstructured product information extracted from websites by crawling.
Documents
Choose to train your agent with data stored on your local device. Access the file upload tool, select the appropriate file, and use the eye icon to review and modify the text extracted from the file. Make any necessary edits to the extracted text before submitting it for training. 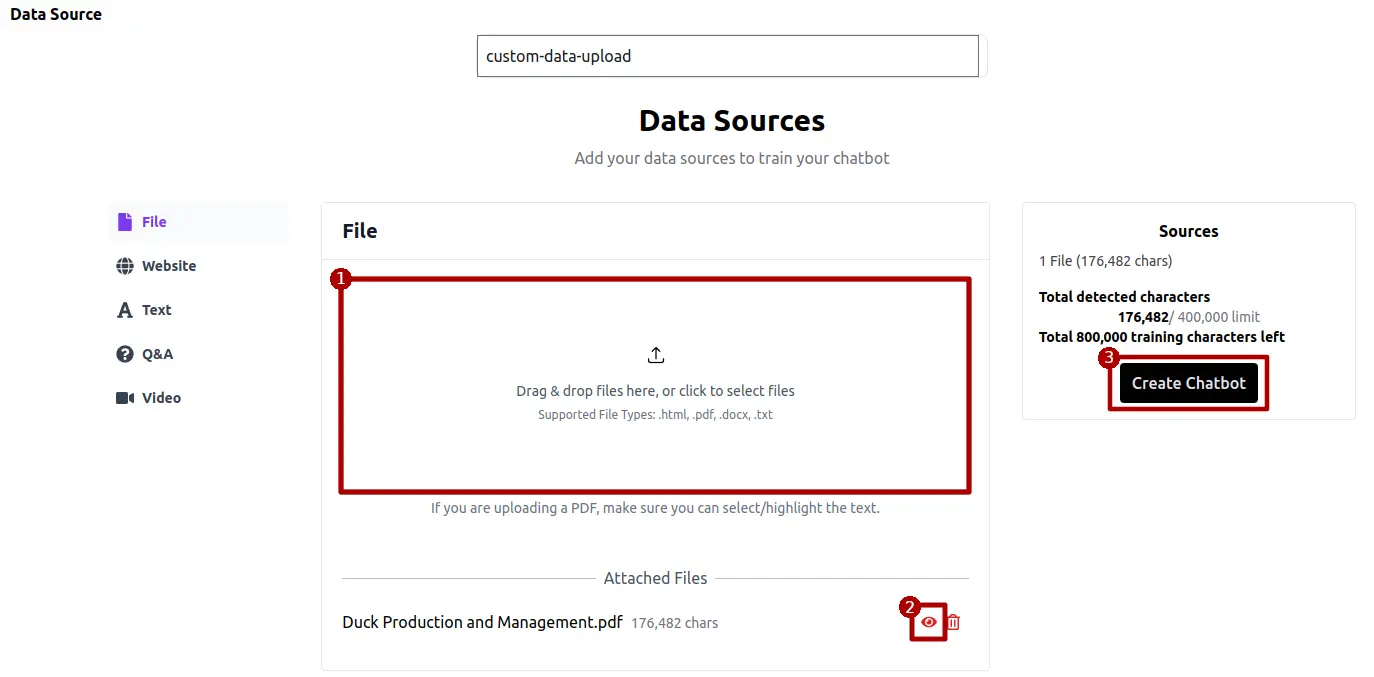
We extract raw text from PDF files page by page, preserving page number information in the extracted text. For PDFs amenable to table extraction, we also retrieve tables. However, due to the unstructured nature of PDFs, table extraction is limited to one table per page.
.docx
Extraction from DOCX files involves retrieving all raw text collectively, without preserving page numbers. Table extraction from DOCX files is not supported.
.csv
CSV files are used to import structured JSON-formatted payloads in batches. The first row defines the schema of the JSON payload, with subsequent rows representing corresponding payload values. Please refrain from requesting the agent to count rows, as the CSV content is converted into JSON payloads row by row for processing. For instance, a CSV file like this:
| user   | expected response |
|--------|-------------------|
| query1 | response1         |
| query2 | response2         |
will be converted into JSON objects as follows:
[
  {"user": "query1", "expected response": "response1"},
  {"user": "query2", "expected response": "response2"}
]
.html
HTML files are utilized to extract text content, tables and anchors from private pages that are inaccessible via public web crawling. First, download the content of the private page into an HTML file, then use this method for content extraction.
.txt
Similar to .docx files, uploading a .txt file involves extracting raw text from the document without regard to tables or page numbers.
Websites
Enhance your website's functionality by utilizing the "Website" option located in the left sidebar. Start by entering the URL of the website and selecting the appropriate crawling method. After the crawling process completes, click the eye icon to inspect and edit the text extracted from the page. Ensure all modifications are made before proceeding to submit the text for training. 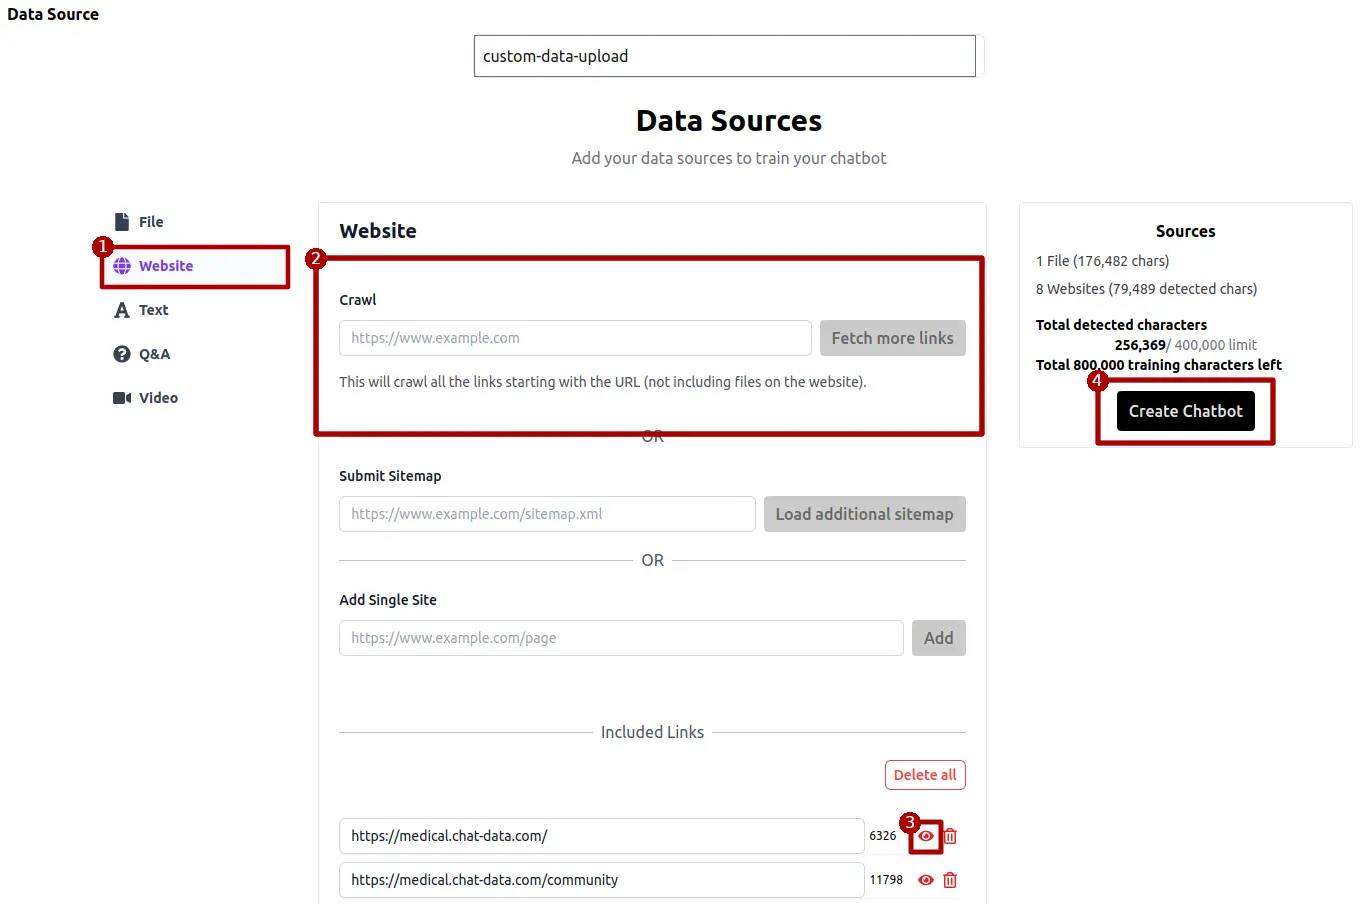
Page Options
The page options provide you with the ability to pinpoint specific sections of a webpage for extraction, while also allowing you to omit irrelevant content. This selective approach ensures that you maximize your agent's training capacity by focusing on pertinent information. Additionally, you have the option to extract only the main content of the page, automatically removing elements such as the header, footer, sidebar, and navbar. For pages requiring authentication, you can utilize cookies to authorize the scraping process, enabling the agent to access content as if you were logged in. Let's examine each of these options in detail. 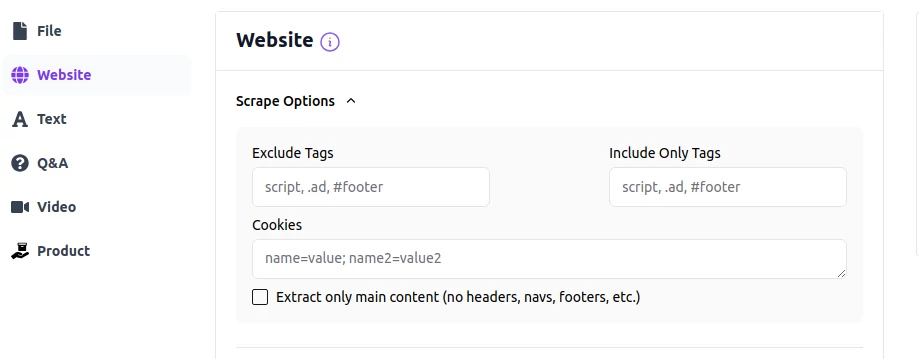
Exclude Tags
You can use a list of selectors strings separated by commas to reprensend the DOM elements that you want to exclude from the scraping result. For example, to exclude all div element with the id=sidebar, you can use div#sidebar as the exclude tags.
Include Only Tags
You can specify a list of selectors strings separated by commas to represend the DOM elements that you only want to extract from the webpage. For example, you can use div.site-content to extract only the content from that specific div.
Cookies
You can use a list of cookies separated by semicolons to authorize the scraping process, enabling the agent to access content as if you were logged in. For example, you can use the following cookies:
cookie1=value1; cookie2=value2; cookie3=value3
To get the cookies for the website, you can use the chrome development tool to inspect the cookies of the website as the following and directly copy the whole cookies string: 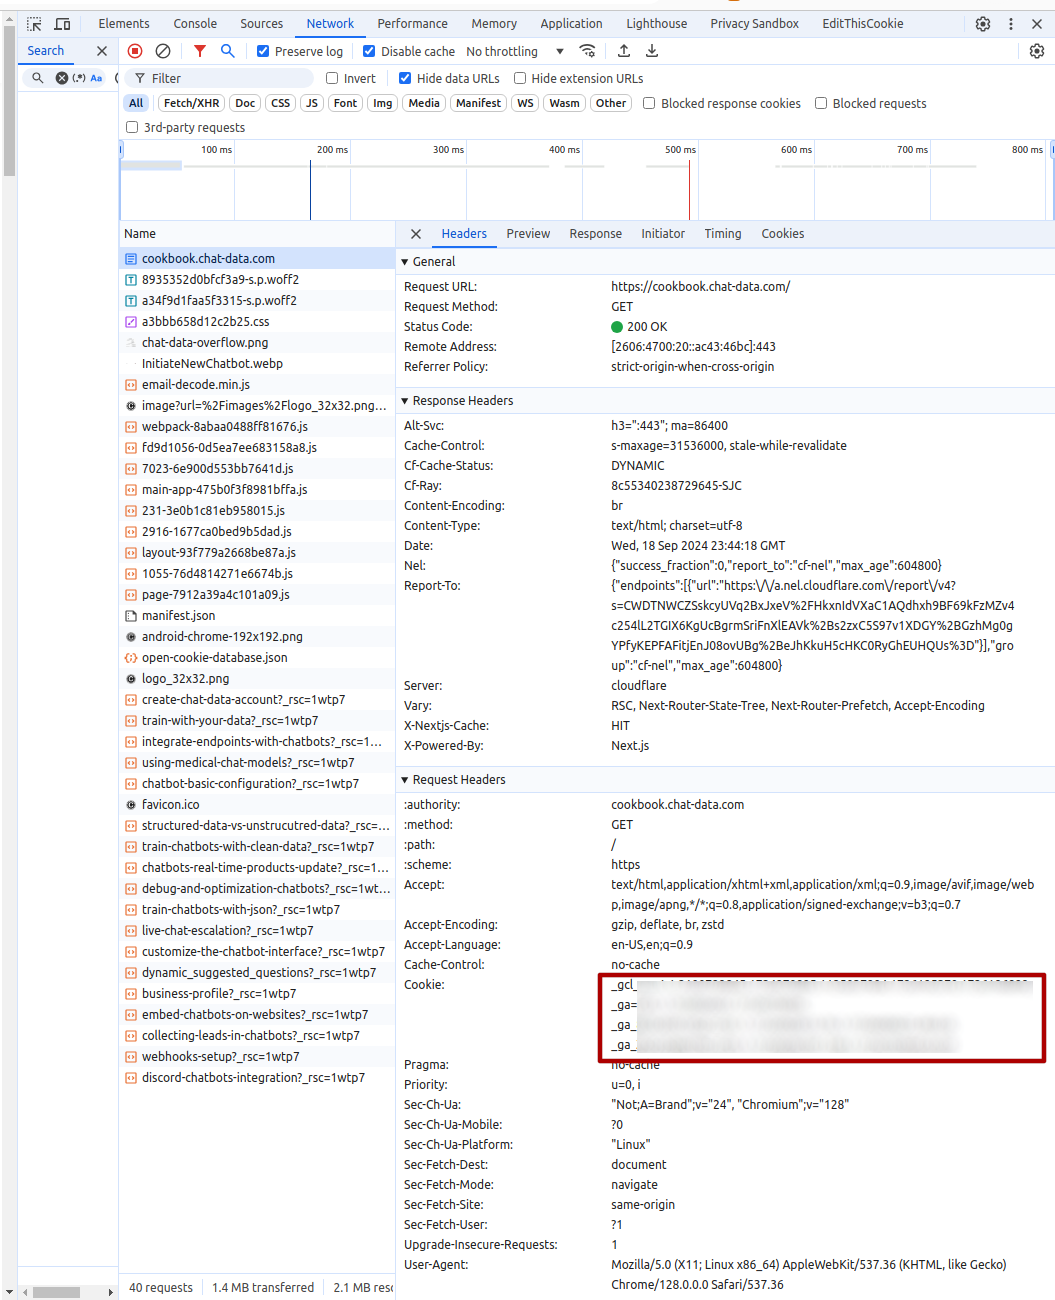
Extract only the main content
This is the shortcut to remove the header, footer, nav, .navbar, .menu, .sidebar, .advertisement, .ad content from the webpage so that you don't have to set up the selectors in the Exclude Tags any more.
The page options are applied to all the following crawling methods:
Add Single Site
Extracts raw text, along with corresponding anchor URLs and tables from a single specified URL. This method excludes images, scripts, media files, and documents. This basic method forms the foundation for the rest.
Submit Sitemap:
After you provide a sitemap URL, our system determines the total URLs listed and extracts the raw text with corresponding anchor URLs and tables from each URL. Please ensure you do not submit a sitemap of sitemaps, as we cannot process multiple layers of complexity.
Crawl a list of websites:
Simply provide a list of URLs; the extraction process mirrors that of the single site method. This method is nearly identical to sitemap crawling, except that the URLs come directly from you rather than a sitemap extraction.
Automatic Crawl:
This method begins with a seed URL you provide and recursively follows the anchor links discovered in the crawled pages. To ensure thorough and relevant crawling:
- We restrict crawling to URLs that share the same prefix. For example, if the seed URL is
https://developers.google.com/google-ads/api/performance-max/getting-started, we will only crawl URLs that begin withhttps://developers.google.com/google-ads/api/performance-max/. - We only include URLs that appear in the pages we've automatically crawled.
- We exclude any documents, images, or media pages.
Positive Filters
You can use positive filters to instruct the crawler to follow URLs that match certain Regex Patterns.
Example:
To crawl all URLs in https://www.homes.com/california/ that have the pattern https://www.homes.com/property/*, set https://www.homes.com/california/ as the starting URL and /property/ as the positive filter. The crawler will collect all URLs with this pattern for the area of California. See the example below: 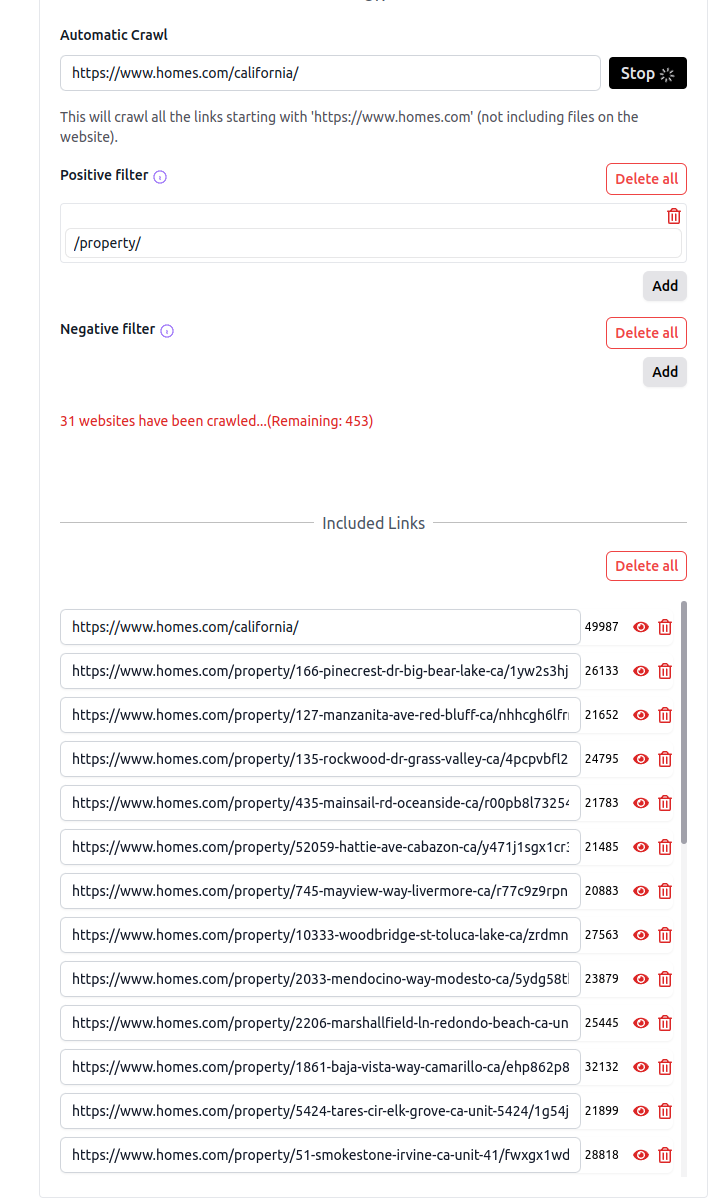
Negative Filters
Negative filters allow you to skip URLs that match specific Regex Patterns.
Example:
To crawl all URLs in https://developers.google.com/google-ads/api/docs/start but exclude pages that are not in English, set https://developers.google.com/google-ads/api/docs/start as the starting URL and ^.*\?hl=[a-zA-Z0-9-]{2,}(?:-[a-zA-Z0-9-]{2,})?$ as the negative filter. The crawler will collect all URLs except those matching the Regex pattern ^.*\?hl=[a-zA-Z0-9-]{2,}(?:-[a-zA-Z0-9-]{2,})?$, as shown below: 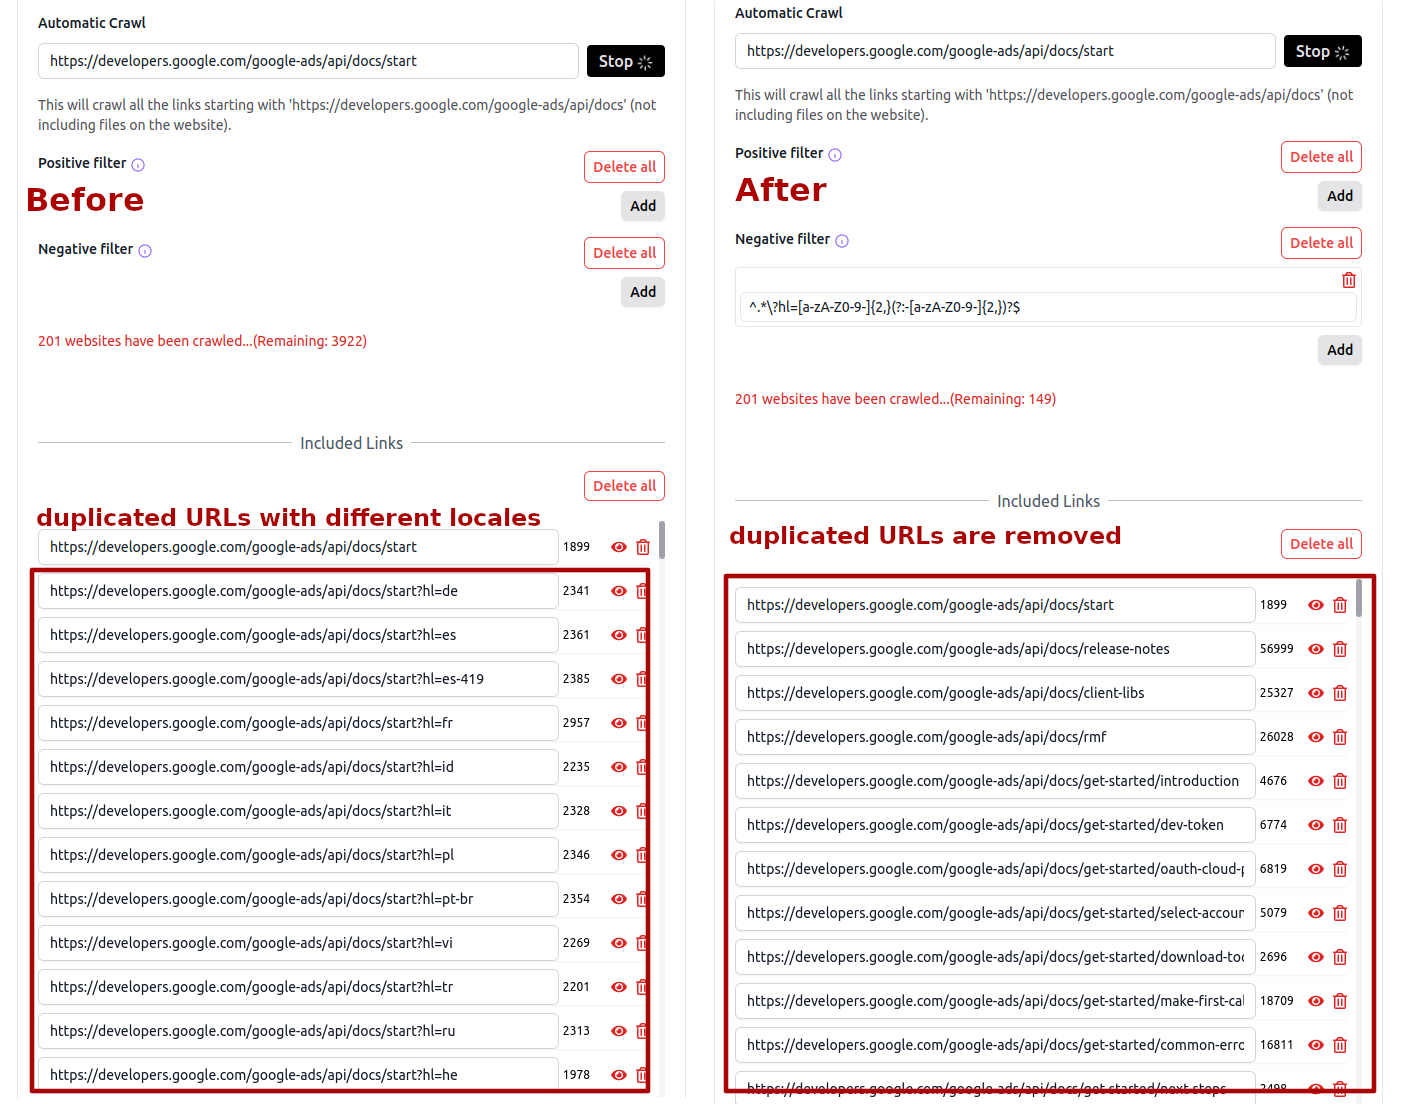
Automated Website Retraining
Once your agent has already been trained with a list of websites URLs, you can set up a cron job to automatically refetch the content of the existing websites URLs of your agent and retraining the agent with the new content. This makes sure that your agent knowledge base is always up to date with the latest information from your websites. Based on your plan, you can:
- set up a monthly cron job for the Entry plan.
- set up a weekly or daily cron job for the Standard plan or above.
Please note that each website retraining through cron jobs requires scraping credits. It's important to allocate your scraping credits wisely to ensure your chatbot doesn't run out of credits during scheduled retraining. Consider the following when planning your cron schedule:
- The number of websites you're monitoring
- The frequency of content updates on your websites
- Your available scraping credits
- The size and complexity of your websites
During cron job configuration, you can specify the appropriate Page Options to ensure the extracted website content contains only the most pertinent information. Additionally, you can select from three crawl types: list, automatic, or sitemap. Both automatic and sitemap modes will identify and remove any undiscovered pages, marking them as obsolete. The list mode maintains the existing page structure without additions or removals.
To ensure enough scraping workers for all our users, the cron job will consume scrape credits for each scraped page url. 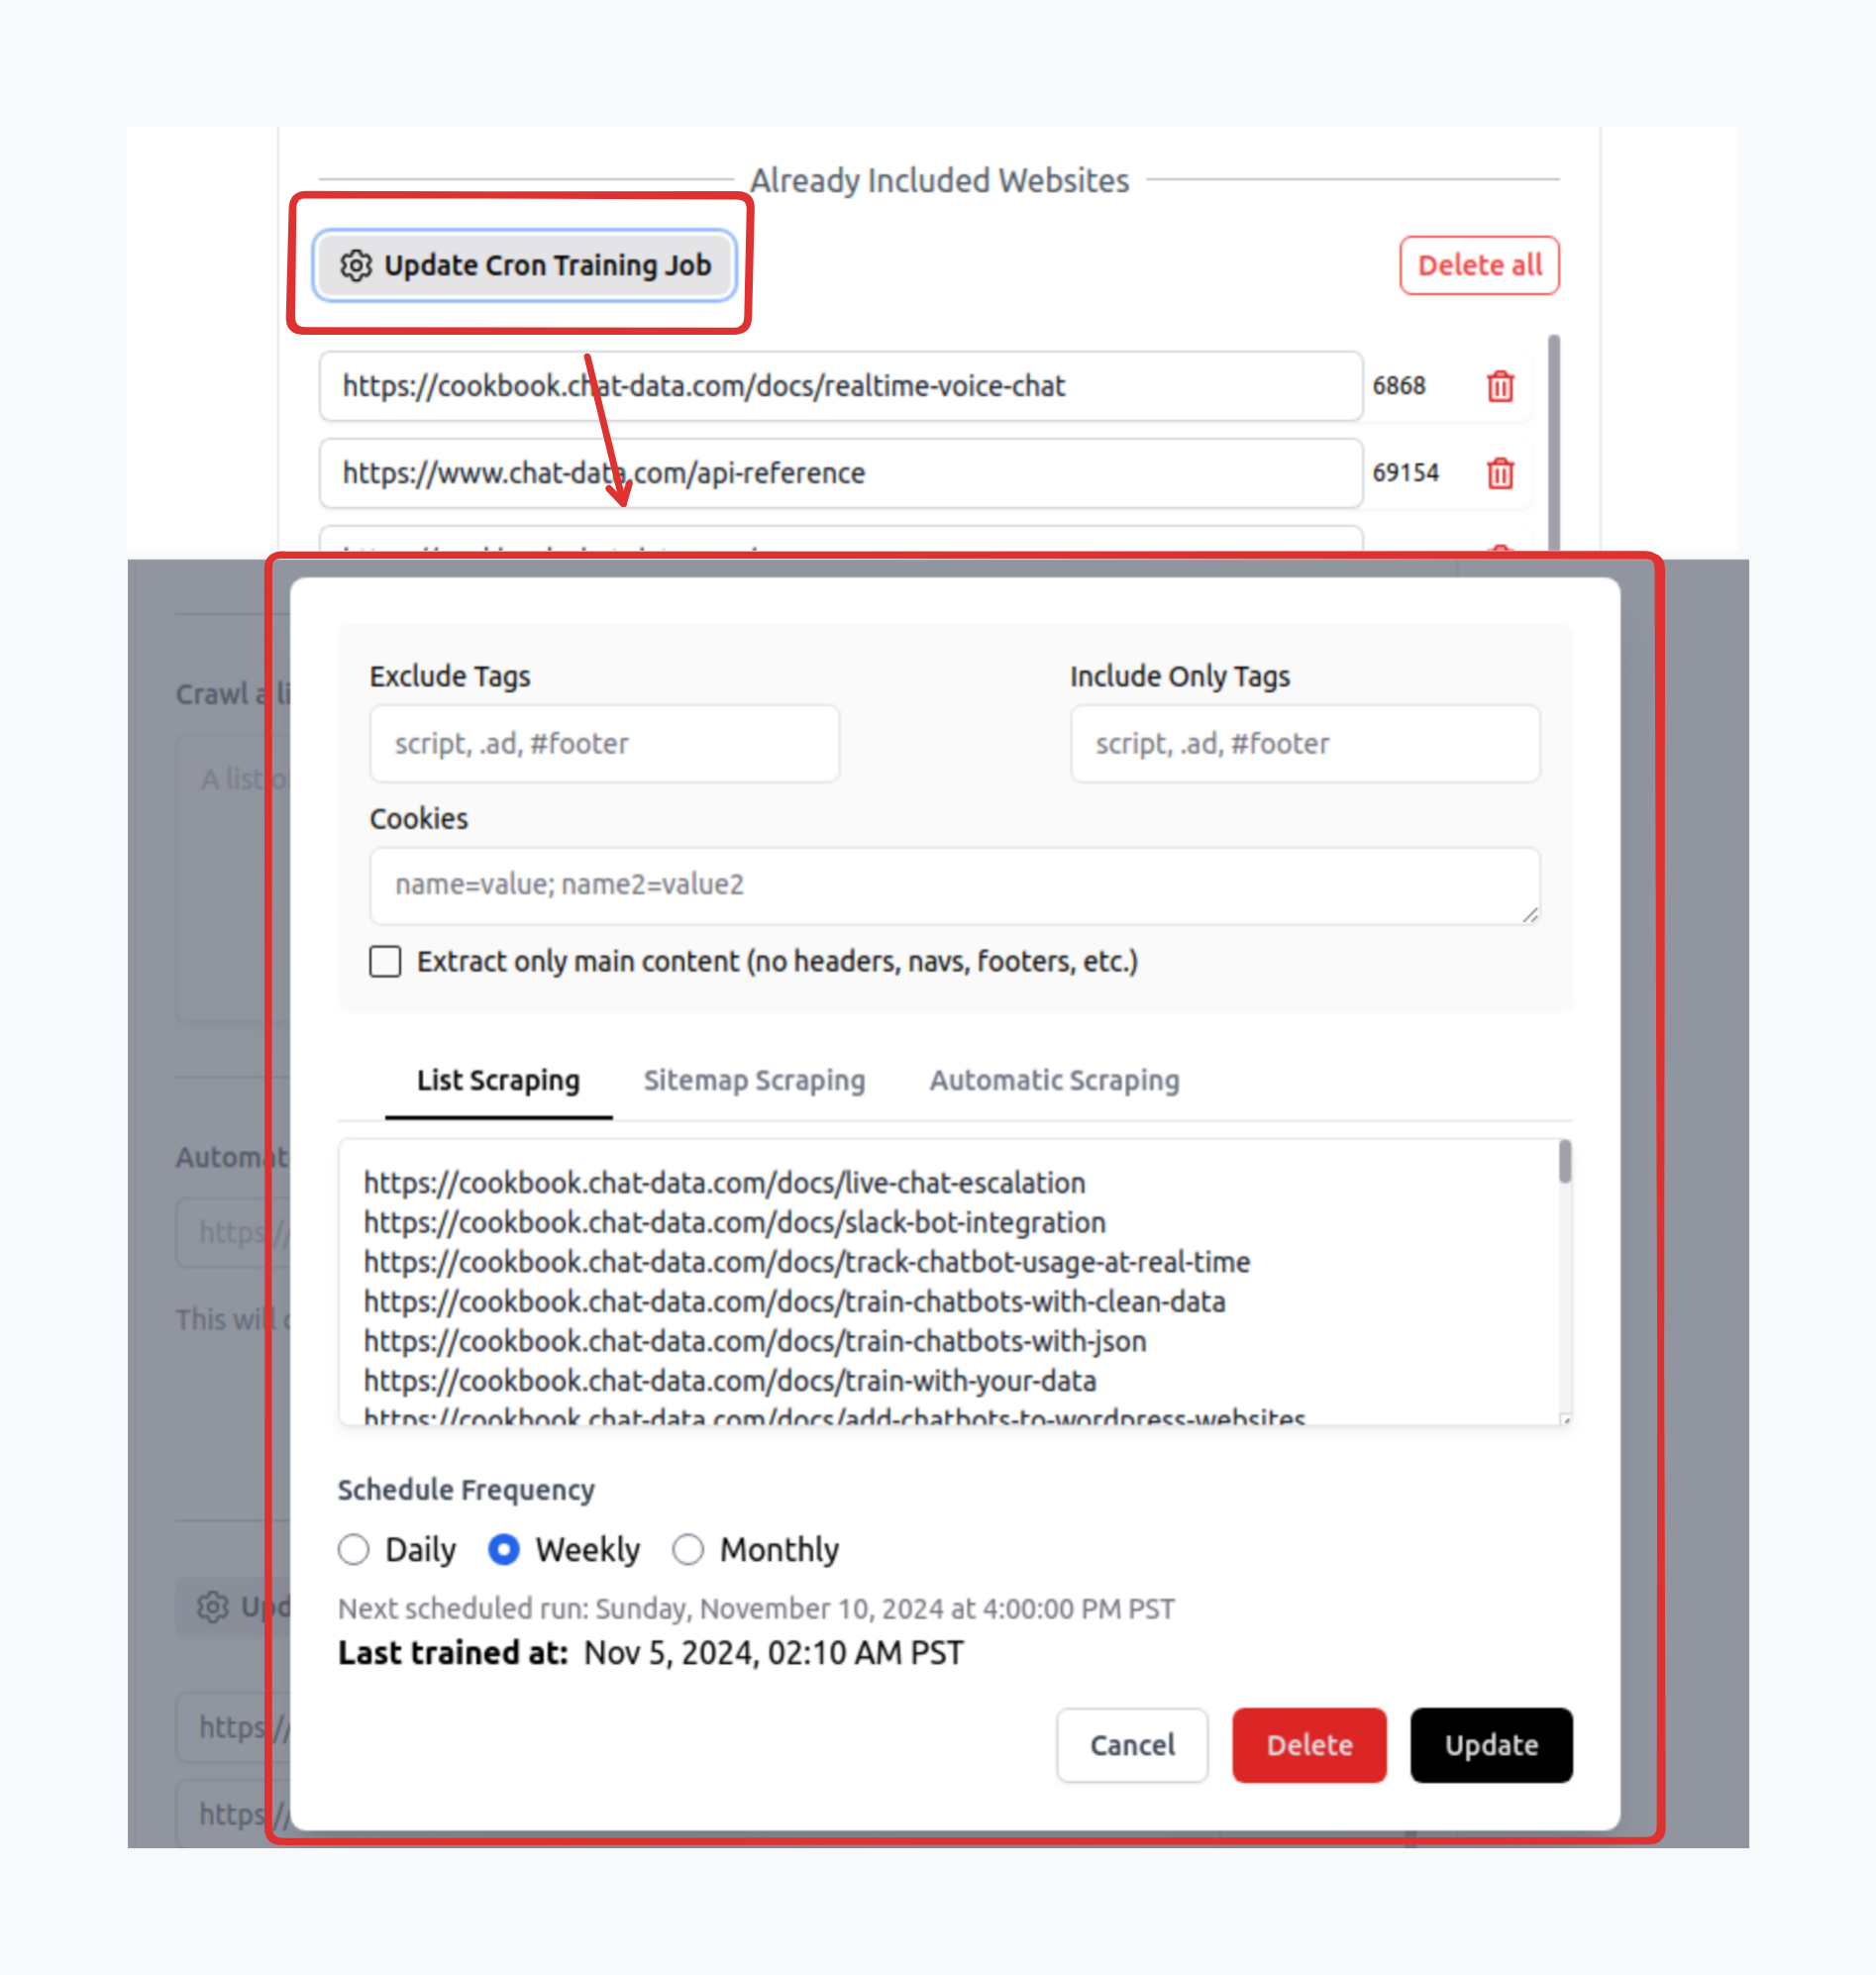
Text
This format is similar to a .txt file for document training, allowing you to directly input relevant plain text information. 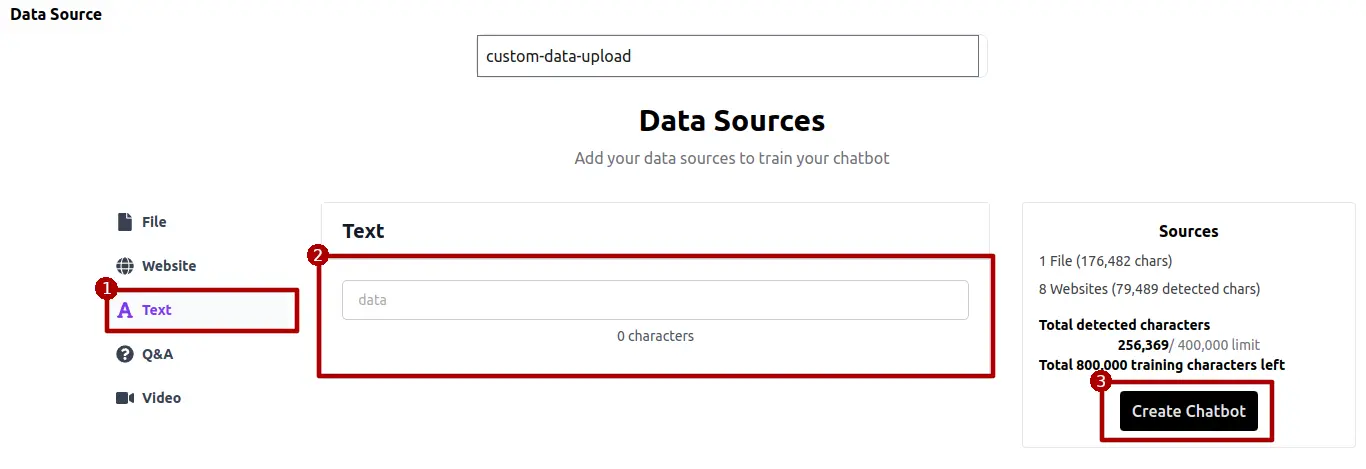 For instance, you can create mappings from Website URLs to Page names as shown below:
https://www.producthunt.com/: Home Page
This main landing page showcases the latest and most popular products featured in ProductHunt

https://www.producthunt.com/marketplace: Discover deals for your next favorite product
List of deals from different startups

https://www.producthunt.com/launch: ProductHunt Launch Guide
This detailed guide covers common questions, dispels myths, and outlines best practices for launching your product. It provides insights into defining "success" and prepares you for a successful launch. Bookmark this page to get started.
Q&A
For customization, you have the option to manually input questions and their corresponding answers. To do this, navigate to the Q&A section via the left sidebar and click on "Add" to access input fields for both questions and answers. Fill these fields as needed. The data entered here is structured and won't be fragmented into separate text chunks. Furthermore, the agent assigns a higher priority to this structured data when generating responses, due to its curated nature. 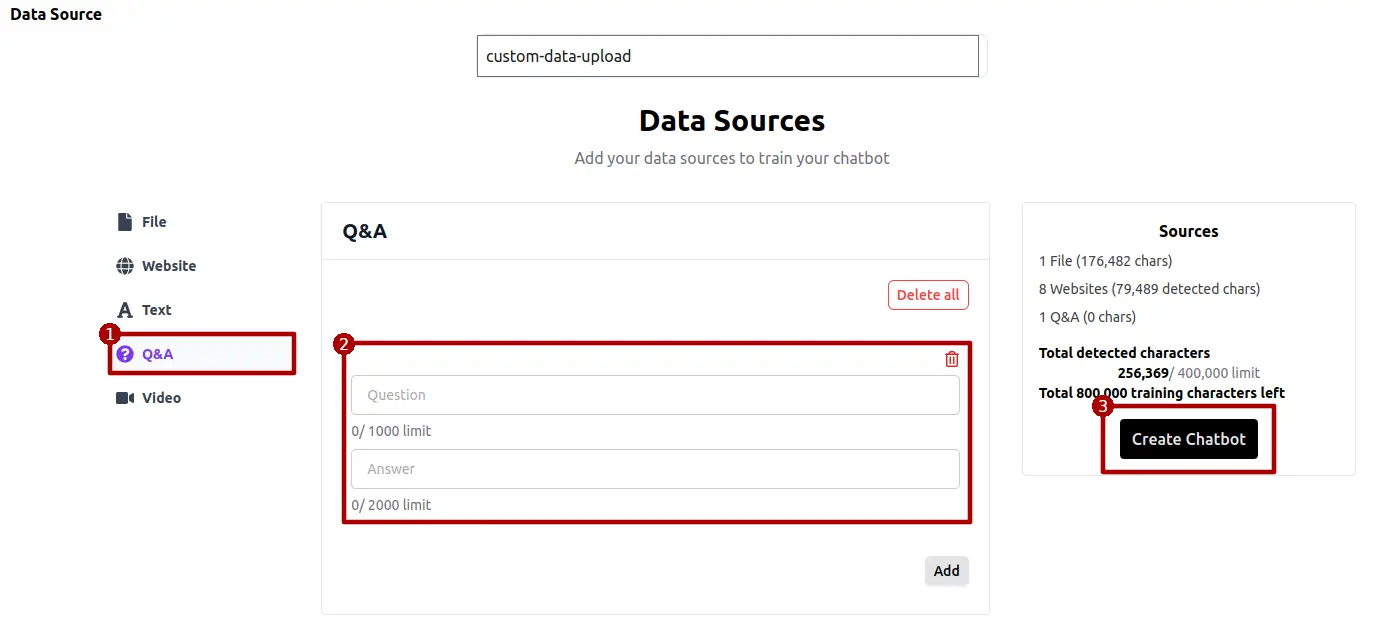
For bulk uploads of Q&As, it is advisable to format your data into CSV files as shown below. This method facilitates the uploading of thousands of Q&As efficiently using the CSV file upload feature.
| user   | expected response |
|--------|-------------------|
| query1 | response1         |
| query2 | response2         |
| ...    | ...               |
| query1000 | response1000   |
Audio or Video
Just as with training using websites or files, you can extract text from the audio streams of videos or audios. Once the texts are extracted, they can be reviewed and edited by clicking the eye icon. 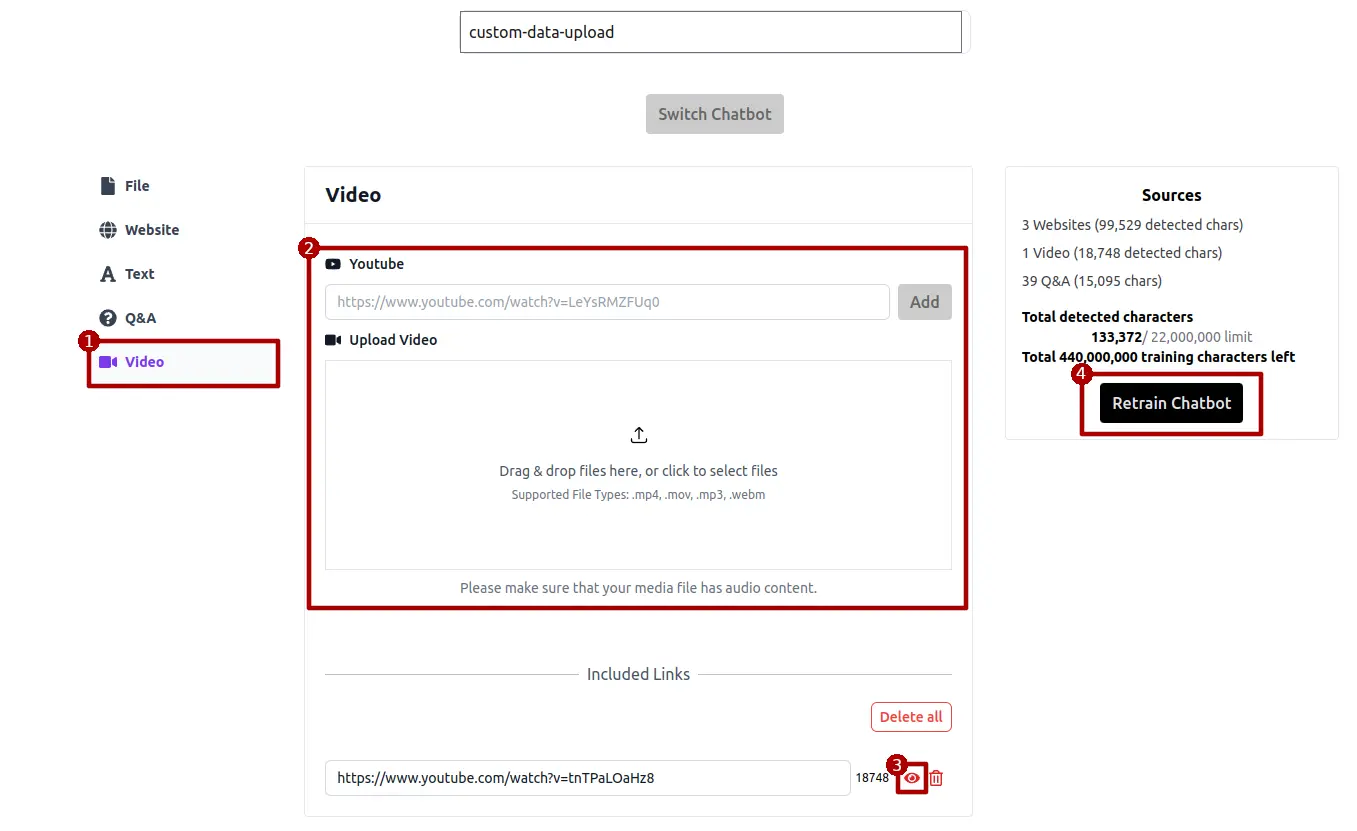
Audio
We directly extract the text from the audio and then segment this text into chunks to serve the RAG (Retrieval-Augmented Generation) workflow.
Video
We do not process the visual frames within videos. Instead, we extract the audio component and use the transcribed text in the RAG (Retrieval-Augmented Generation) workflow
Product
If you have an online store with WooCommerce, Shopify, Prestashop, or Magento and want to train the agents with the prodcut information, this importign method is the pefect tool for you. Compared with website crawling of the product page, this action allows for the direct import of your store's product catalog and inventory details into the agent's knowledge base, offering
- The whole information of the product stayed together without being segmented into different text chunks, which might happen with website crawling.
- Only relavant and clean information of the product is imported into the knowledge base. Whilte website crawling might crawl unuseful data like the head and foot of the website.
- More complete data of the product, some metadata of the products , for example inventory information, might not show up in the website page but can still be imported into the knowledge base with direct products importing.
- Allow for real time sync. After importing the products from your store, you can set up webhooks sync from WooCommerce or Shopify so that all the updates in your store will automaticall be sent to the knowledge base of your agent, allowing your agent to always get updated information of your online store.
WooCommerce
WooCommerce is a flexible, open-source eCommerce plugin designed for WordPress, allowing users to build and manage an online store with ease. Here, we will go through the steps on how to import all products from your WooCommerce store into Chat Data for training your custom chatbot
Step 1: Get Your Consumer Key and Secret
Prior to importing products from your WooCommerce store for training purposes, you'll need to obtain a pair of consumer keys and secrets for making API calls. Please be assured that we utilize your consumer key and secret solely for this purpose, and they will not be retained by our system. Below are the steps to obtain a pair of consumer key and secret:
1.1 Go to your WordPress Admin Page
You can navigate to your WordPress Admin page by appending
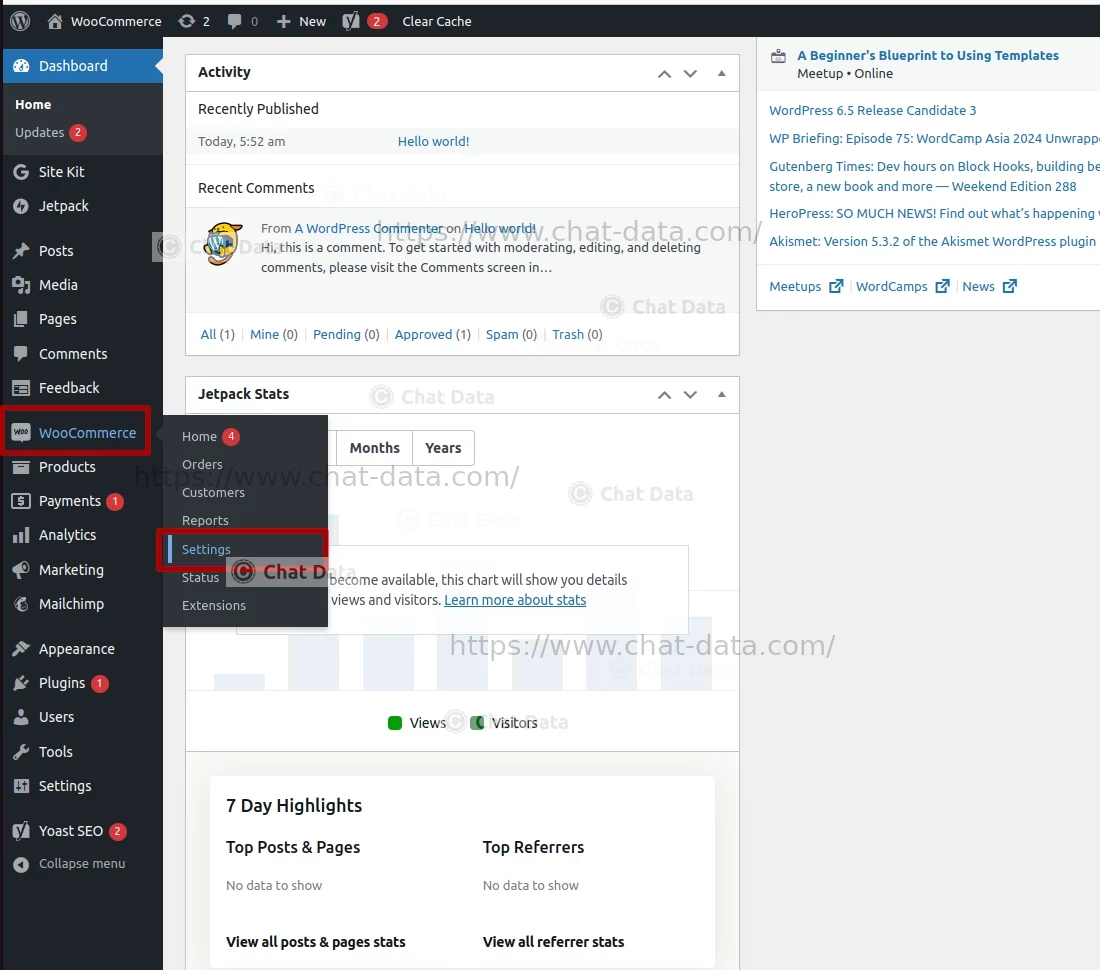
/wp-adminto your WordPress website domain and browsinghttps://example.wordpress,com//wp-admin.1.2 Go to WooCommerce's Advanced Setting
Click WooCommerce on the left sidebar and then click the Setting tab. This will take you to the WooCommerce settings page.
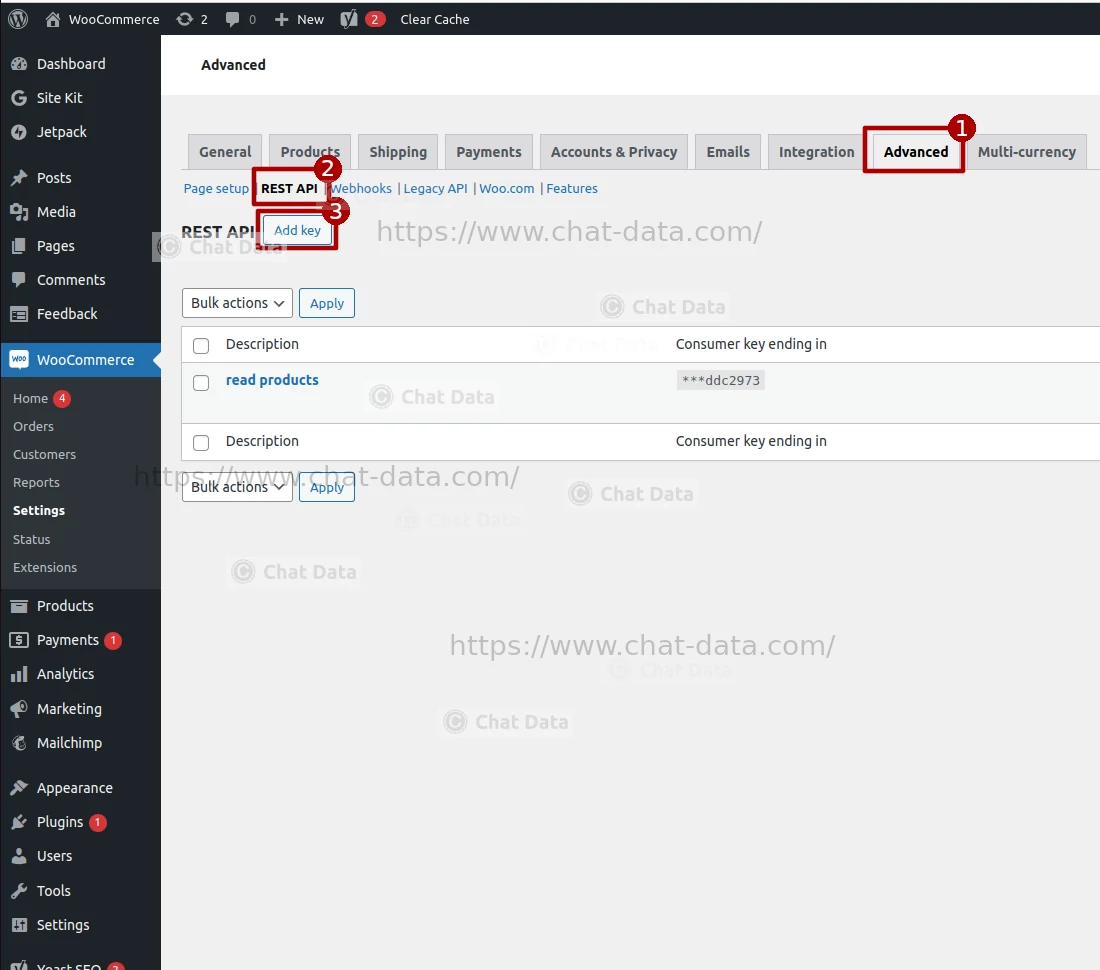
1.3 Add the API Key
After clicking the Add key tab and then the REST API tab, click the Add key button to start the API key creation process.
1.4 Create the API Key
Enter the API key name and select the user account, choose the
readpermission, then click the Generate API key button to create your API key pair.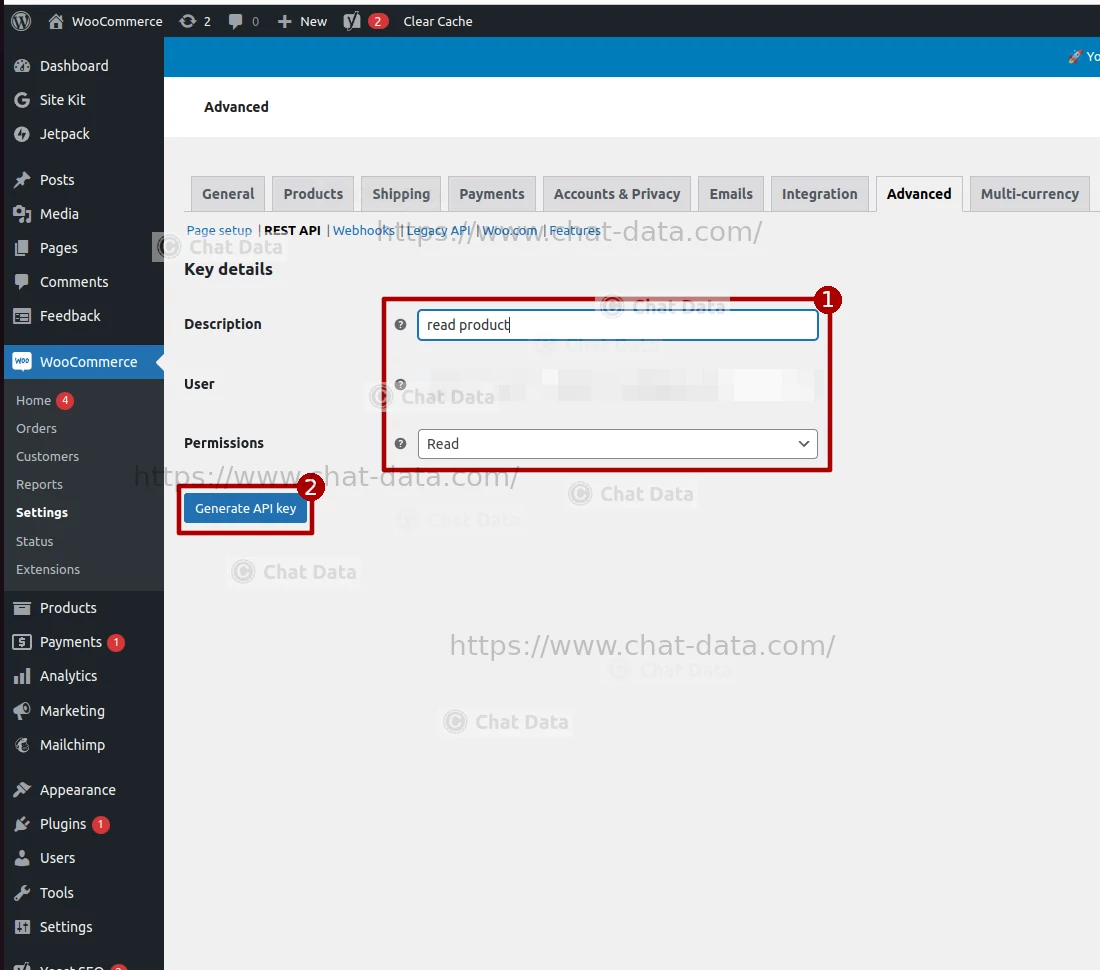
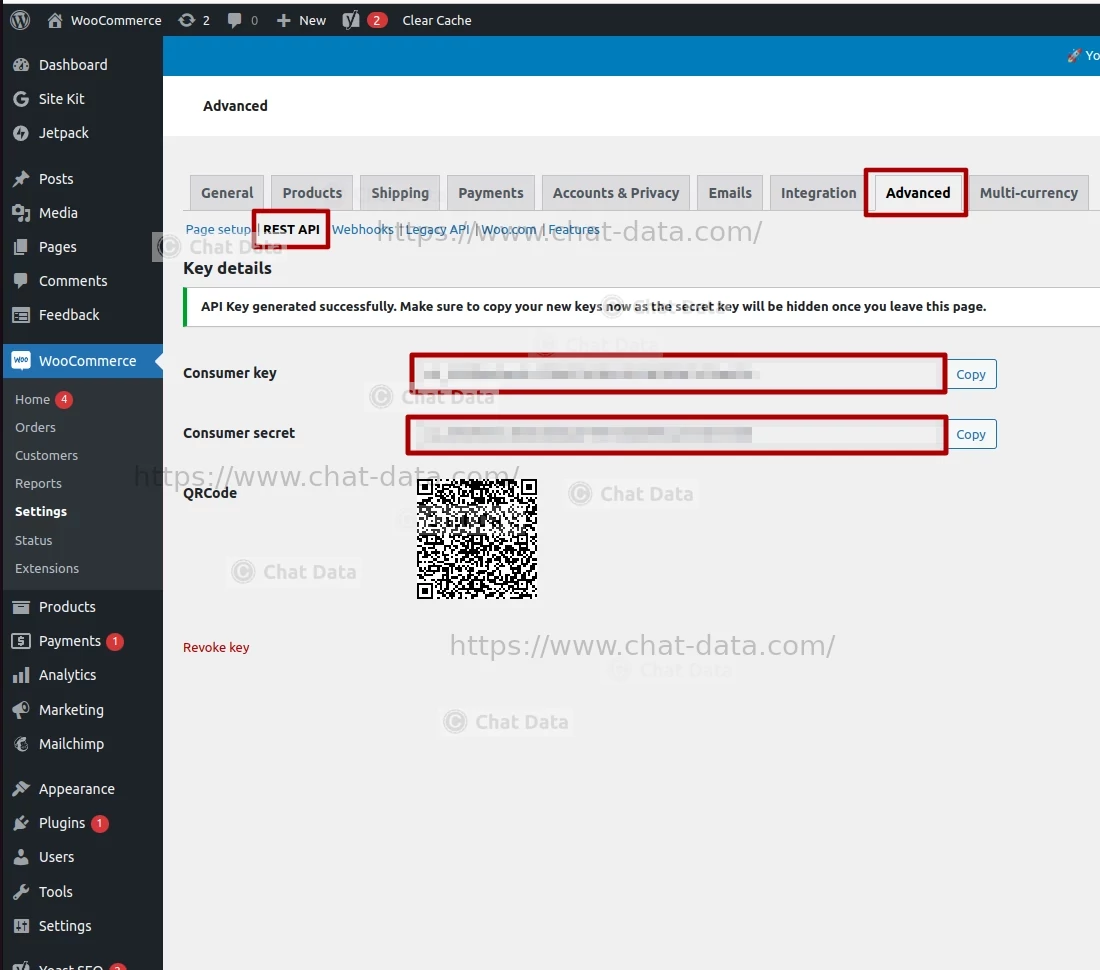
1.5 Save API Key Pair
After creation, your consumer key and consumer secret will be displayed. Make a copy of them to prepare for importing your products into Chat Data.
Step 2: Import Products
In the Sources tab and choose the Product tab as the source, filling in the domain of your WordPress website(Without the http:// prefix), the consumer key and consumer secret obtained from Step 1. Then press the Import button to import products from your WooCommerce Store. By clicking on the eye icon, you can access a detailed view of each product's information. Should you find any discrepancies, kindly correct the product details within your WooCommerce store and proceed to re-import the products. Please note, direct inline modifications of product details within the product modal are not permitted. Additionally, you have the option to remove any undesired products, retaining only those you wish to keep. Once you have verified the accuracy of all product details, you may proceed to click the Create/Retrain Chatbot button to initiate the agent training process. 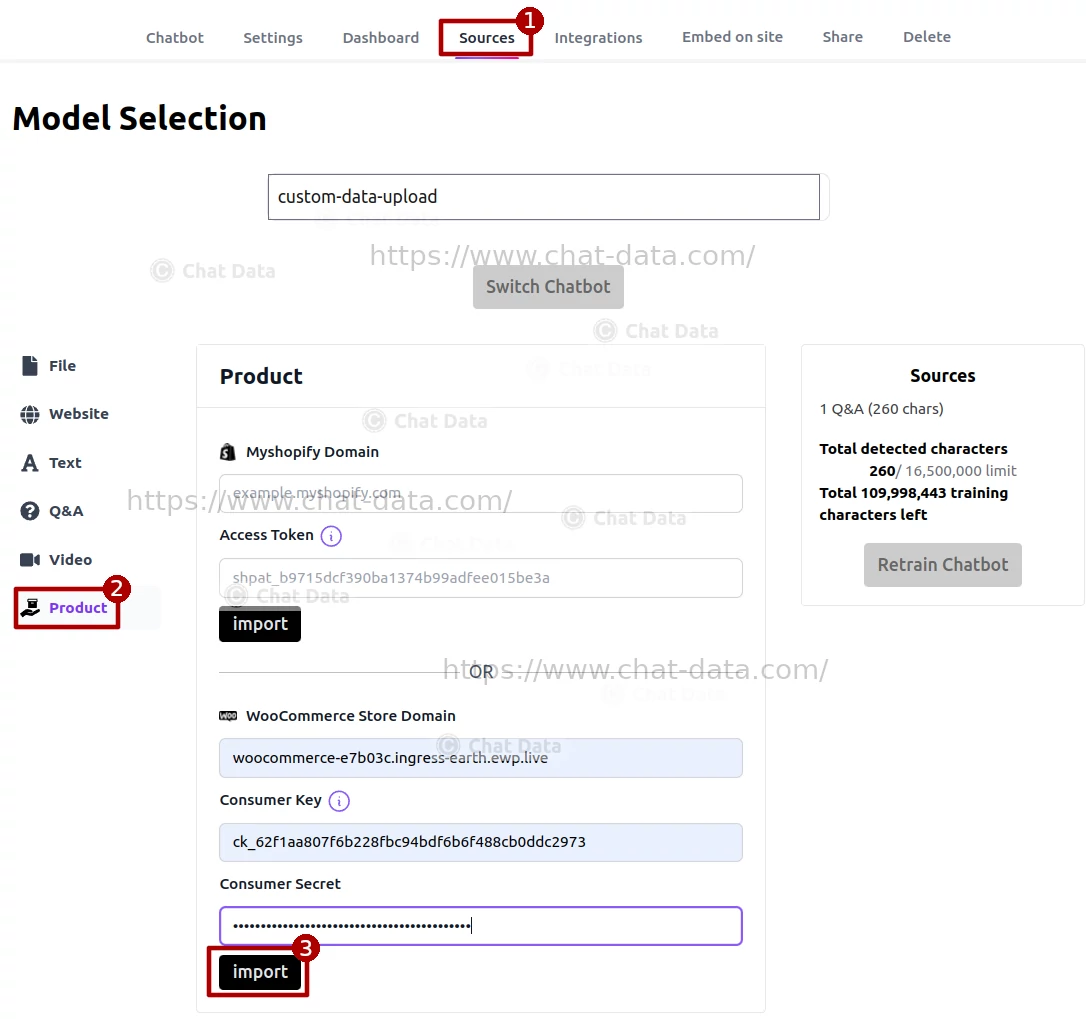 Below is a sample view of an imported product page, representing the information we will submit to the agent for training purposes.
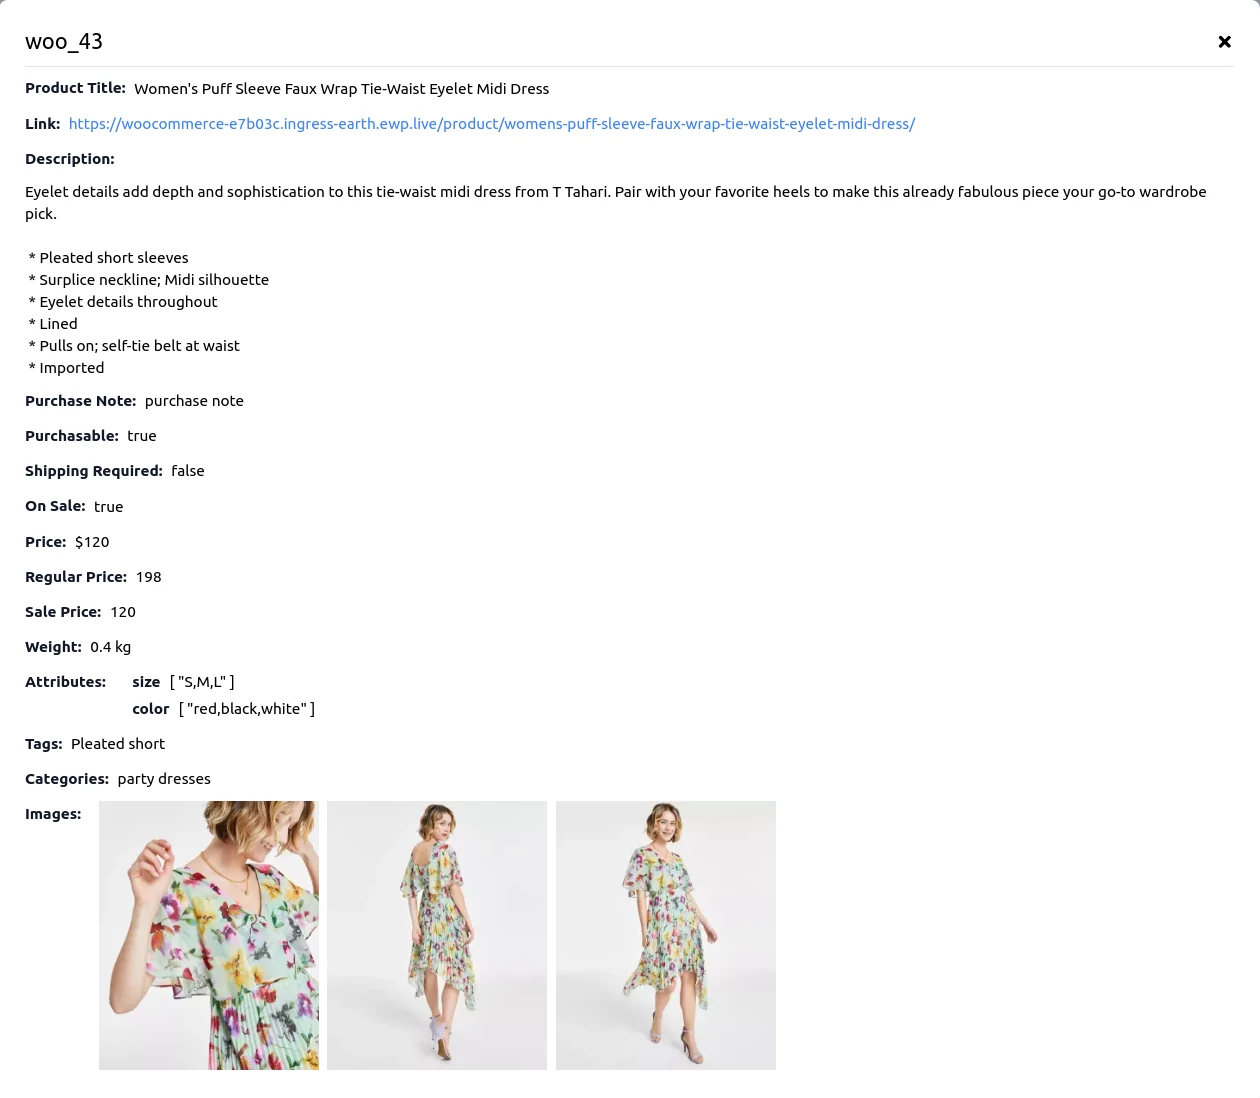
Shopify
Step 1: Get Your Access Token
Prior to importing products from your Shopify store for training purposes, you'll need to obtain an access token. This token enables our platform to invoke the Shopify GraphQL API and import all your store's products. Please be assured that we utilize your access token solely for this purpose and it will not be retained by our system. Below are the steps to acquire your access token:
1.1 Create the Dev App
Click the Create an app button under the Apps and sales channel tab.

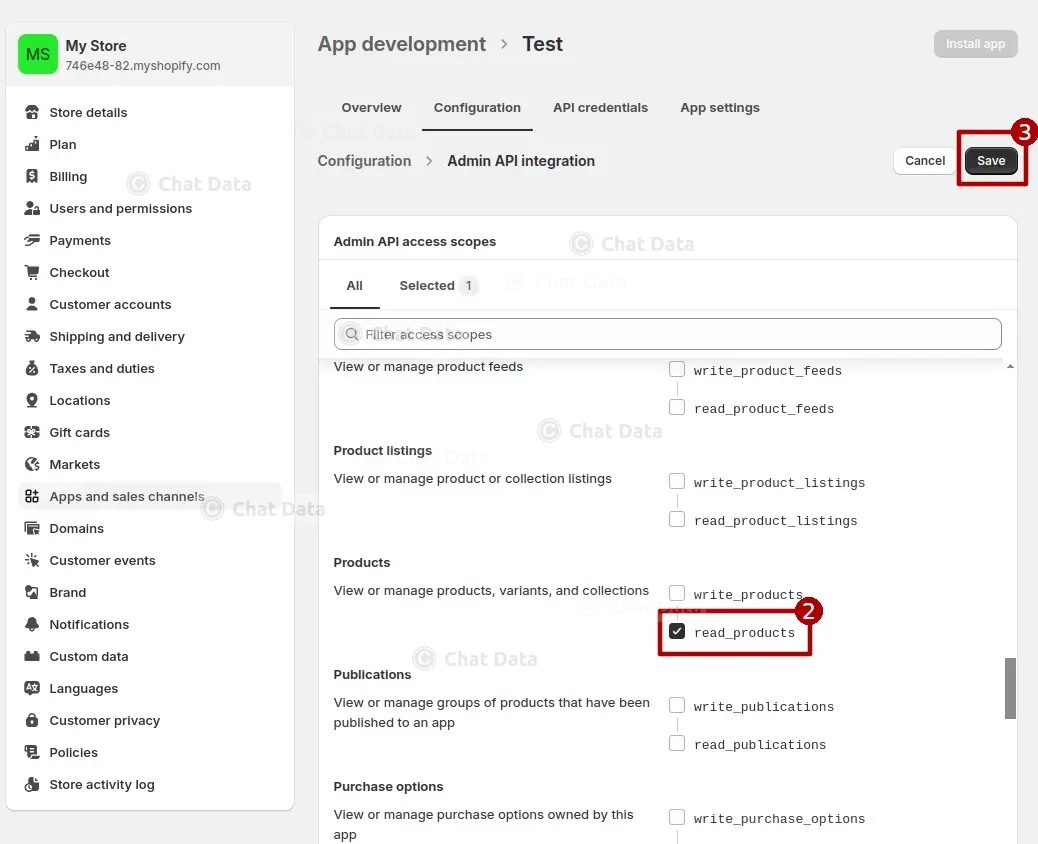
1.2 Config Admin API Scope
Add the
read_productsscope to the created App and save the configuration.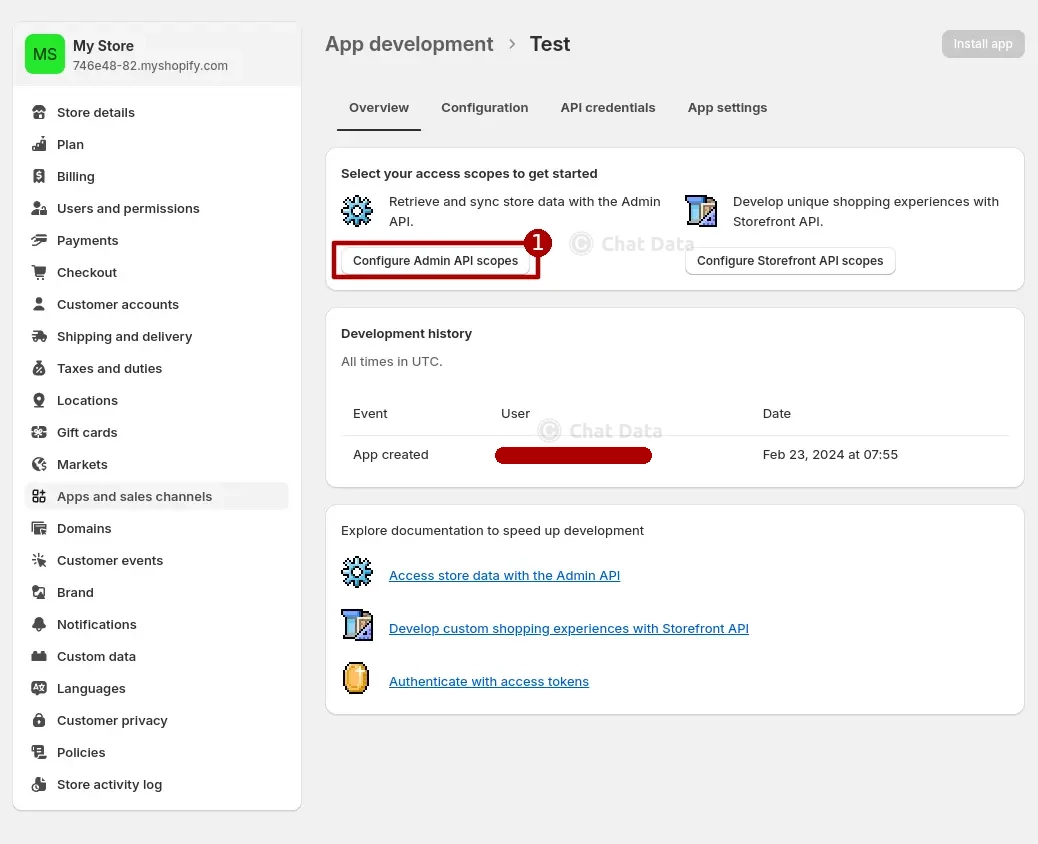
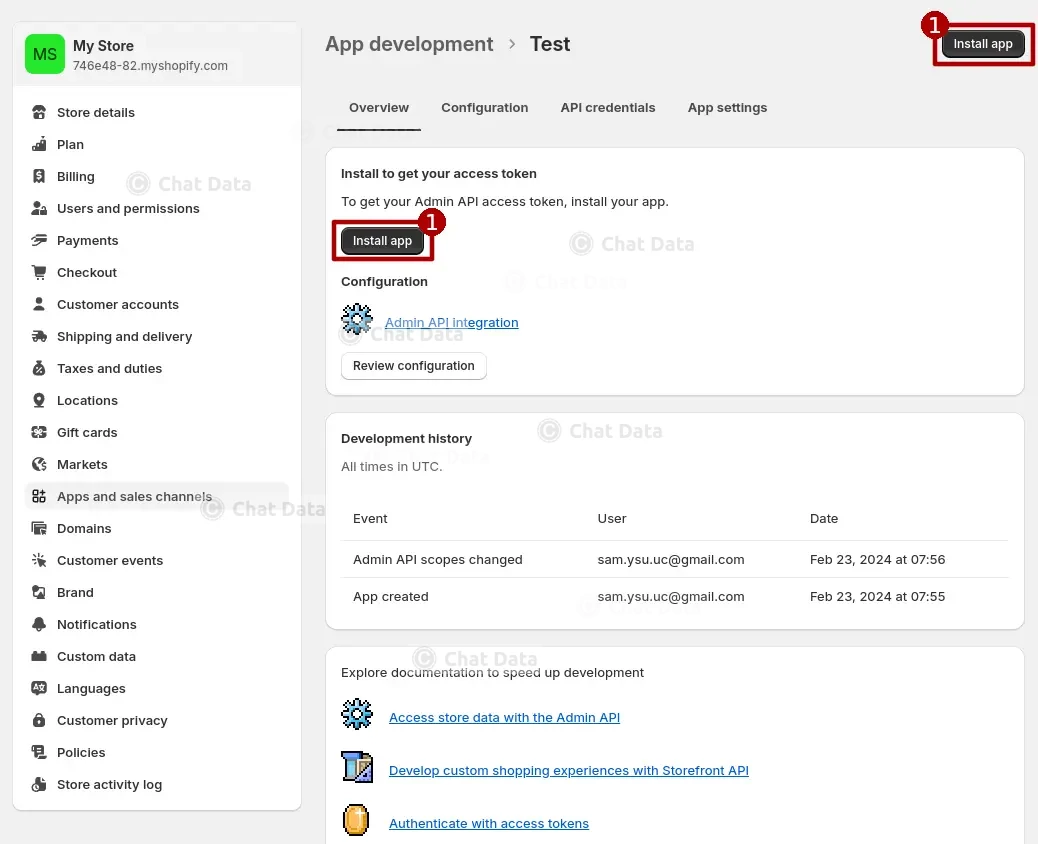
1.3 Install the App
Click the Install app button so that the created app can take effect.
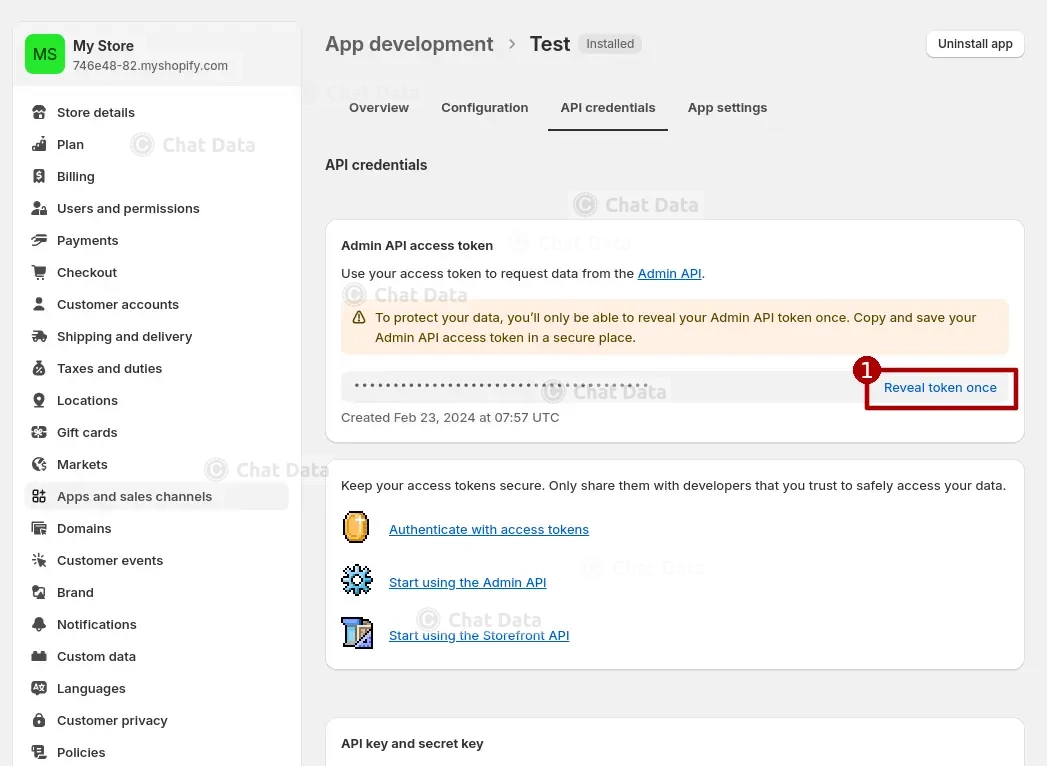
1.4 Reveal Access Token
Click the Reveal token once button to get the access token.
Step 2: Import Products From Shopify Store
Press the Import button to import products from your Shopify Store. By clicking on the eye icon, you can access a detailed view of each product's information. Should you find any discrepancies, kindly correct the product details within your Shopify store and proceed to re-import the products. Please note, direct inline modifications of product details within the product modal are not permitted. Additionally, you have the option to remove any undesired products, retaining only those you wish to keep. Once you have verified the accuracy of all product details, you may proceed to click the Create/Retrain Chatbot button to initiate the agent training process. 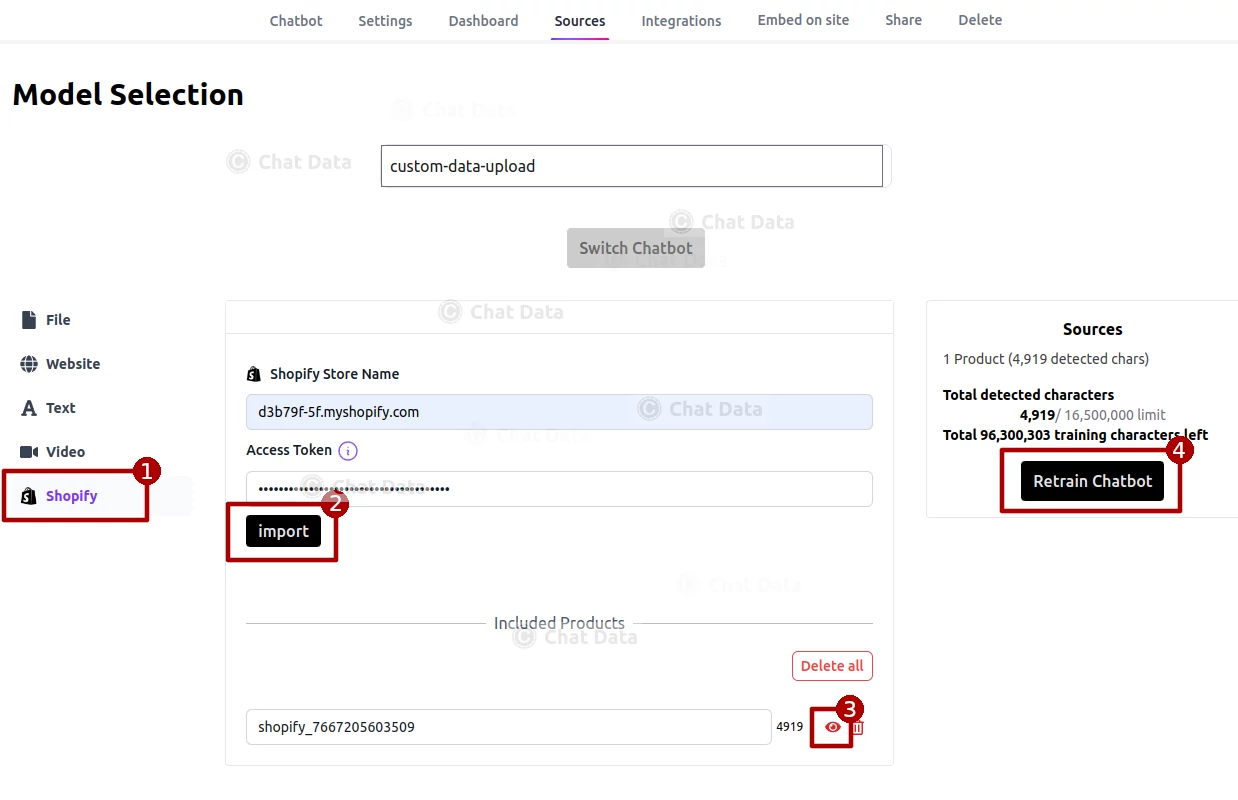 Below is a sample view of an imported product page, representing the information we will submit to the agent for training purposes.
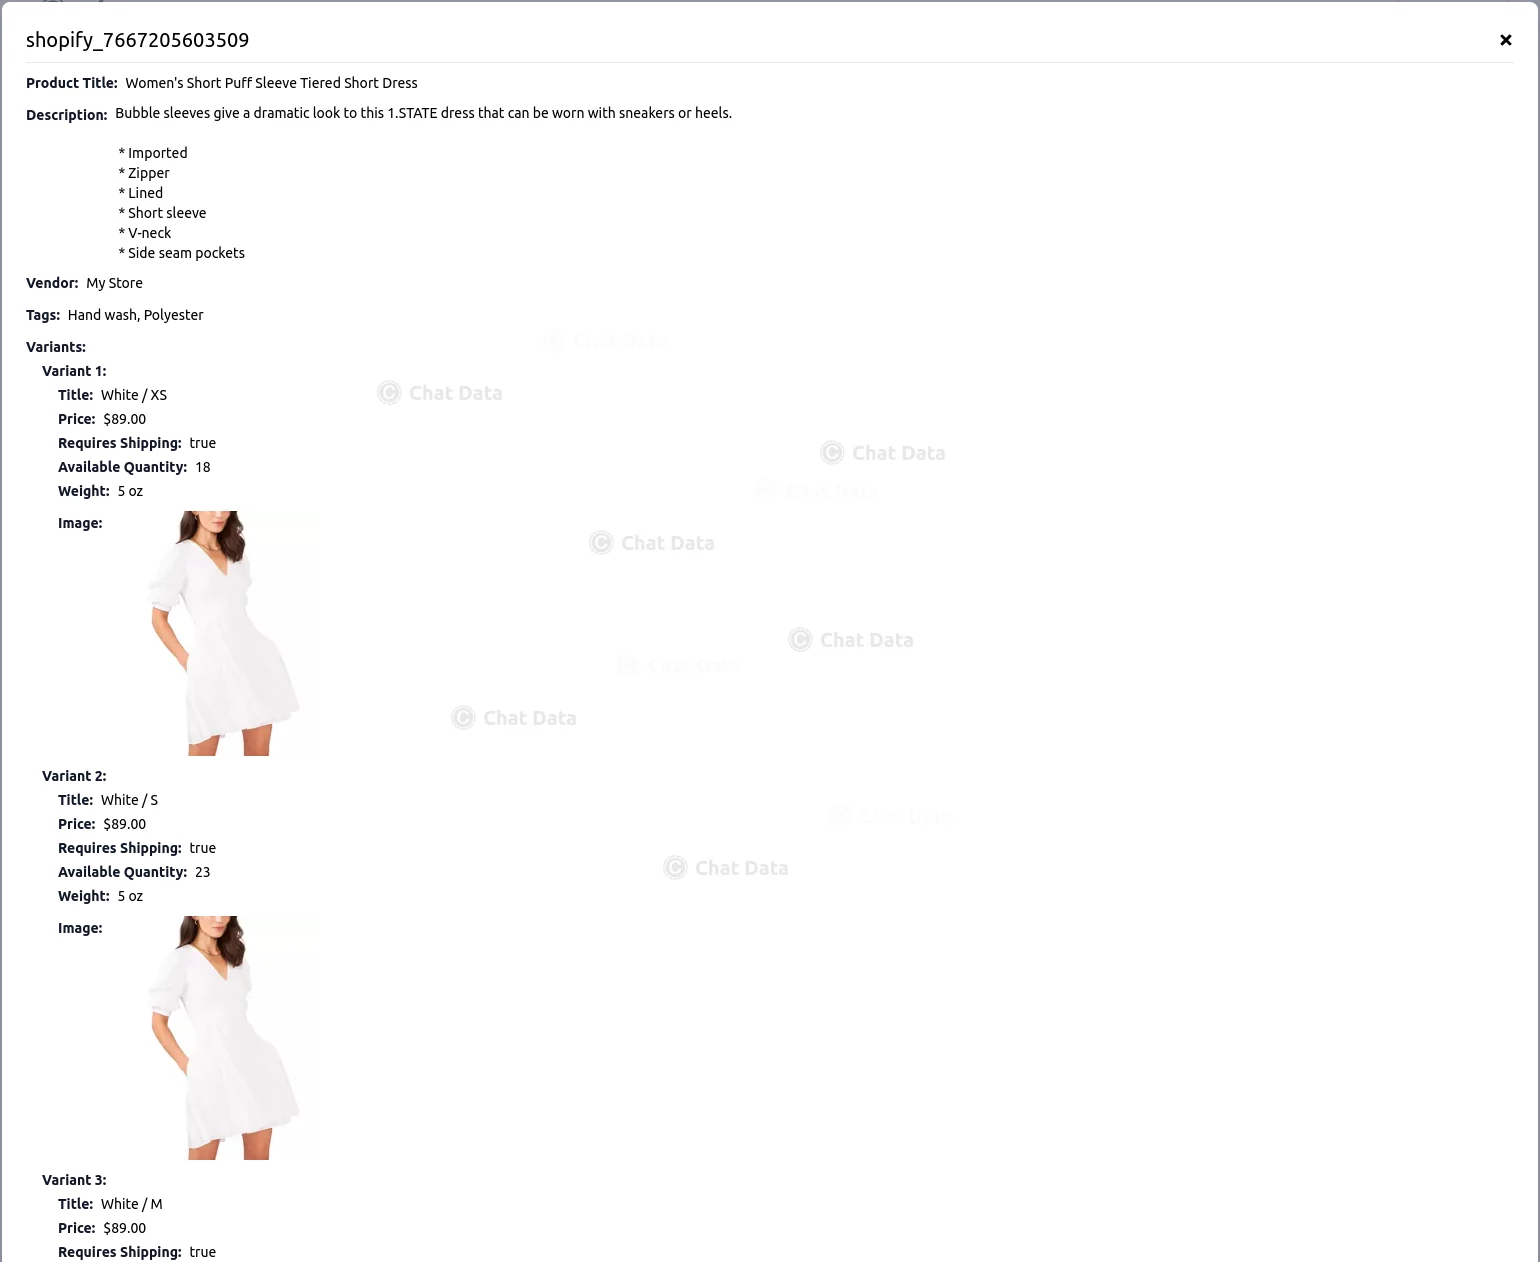
Prestashop
Step 1: Enable and Configure Webservice API
Prior to importing products from your Prestashop store, you'll need to enable the Webservice API and create a dedicated Webservice key. This key enables our platform to securely access your product catalog. Please be assured that we utilize your Webservice key solely for this purpose and it will not be retained by our system. Follow these steps to set up your Webservice access:
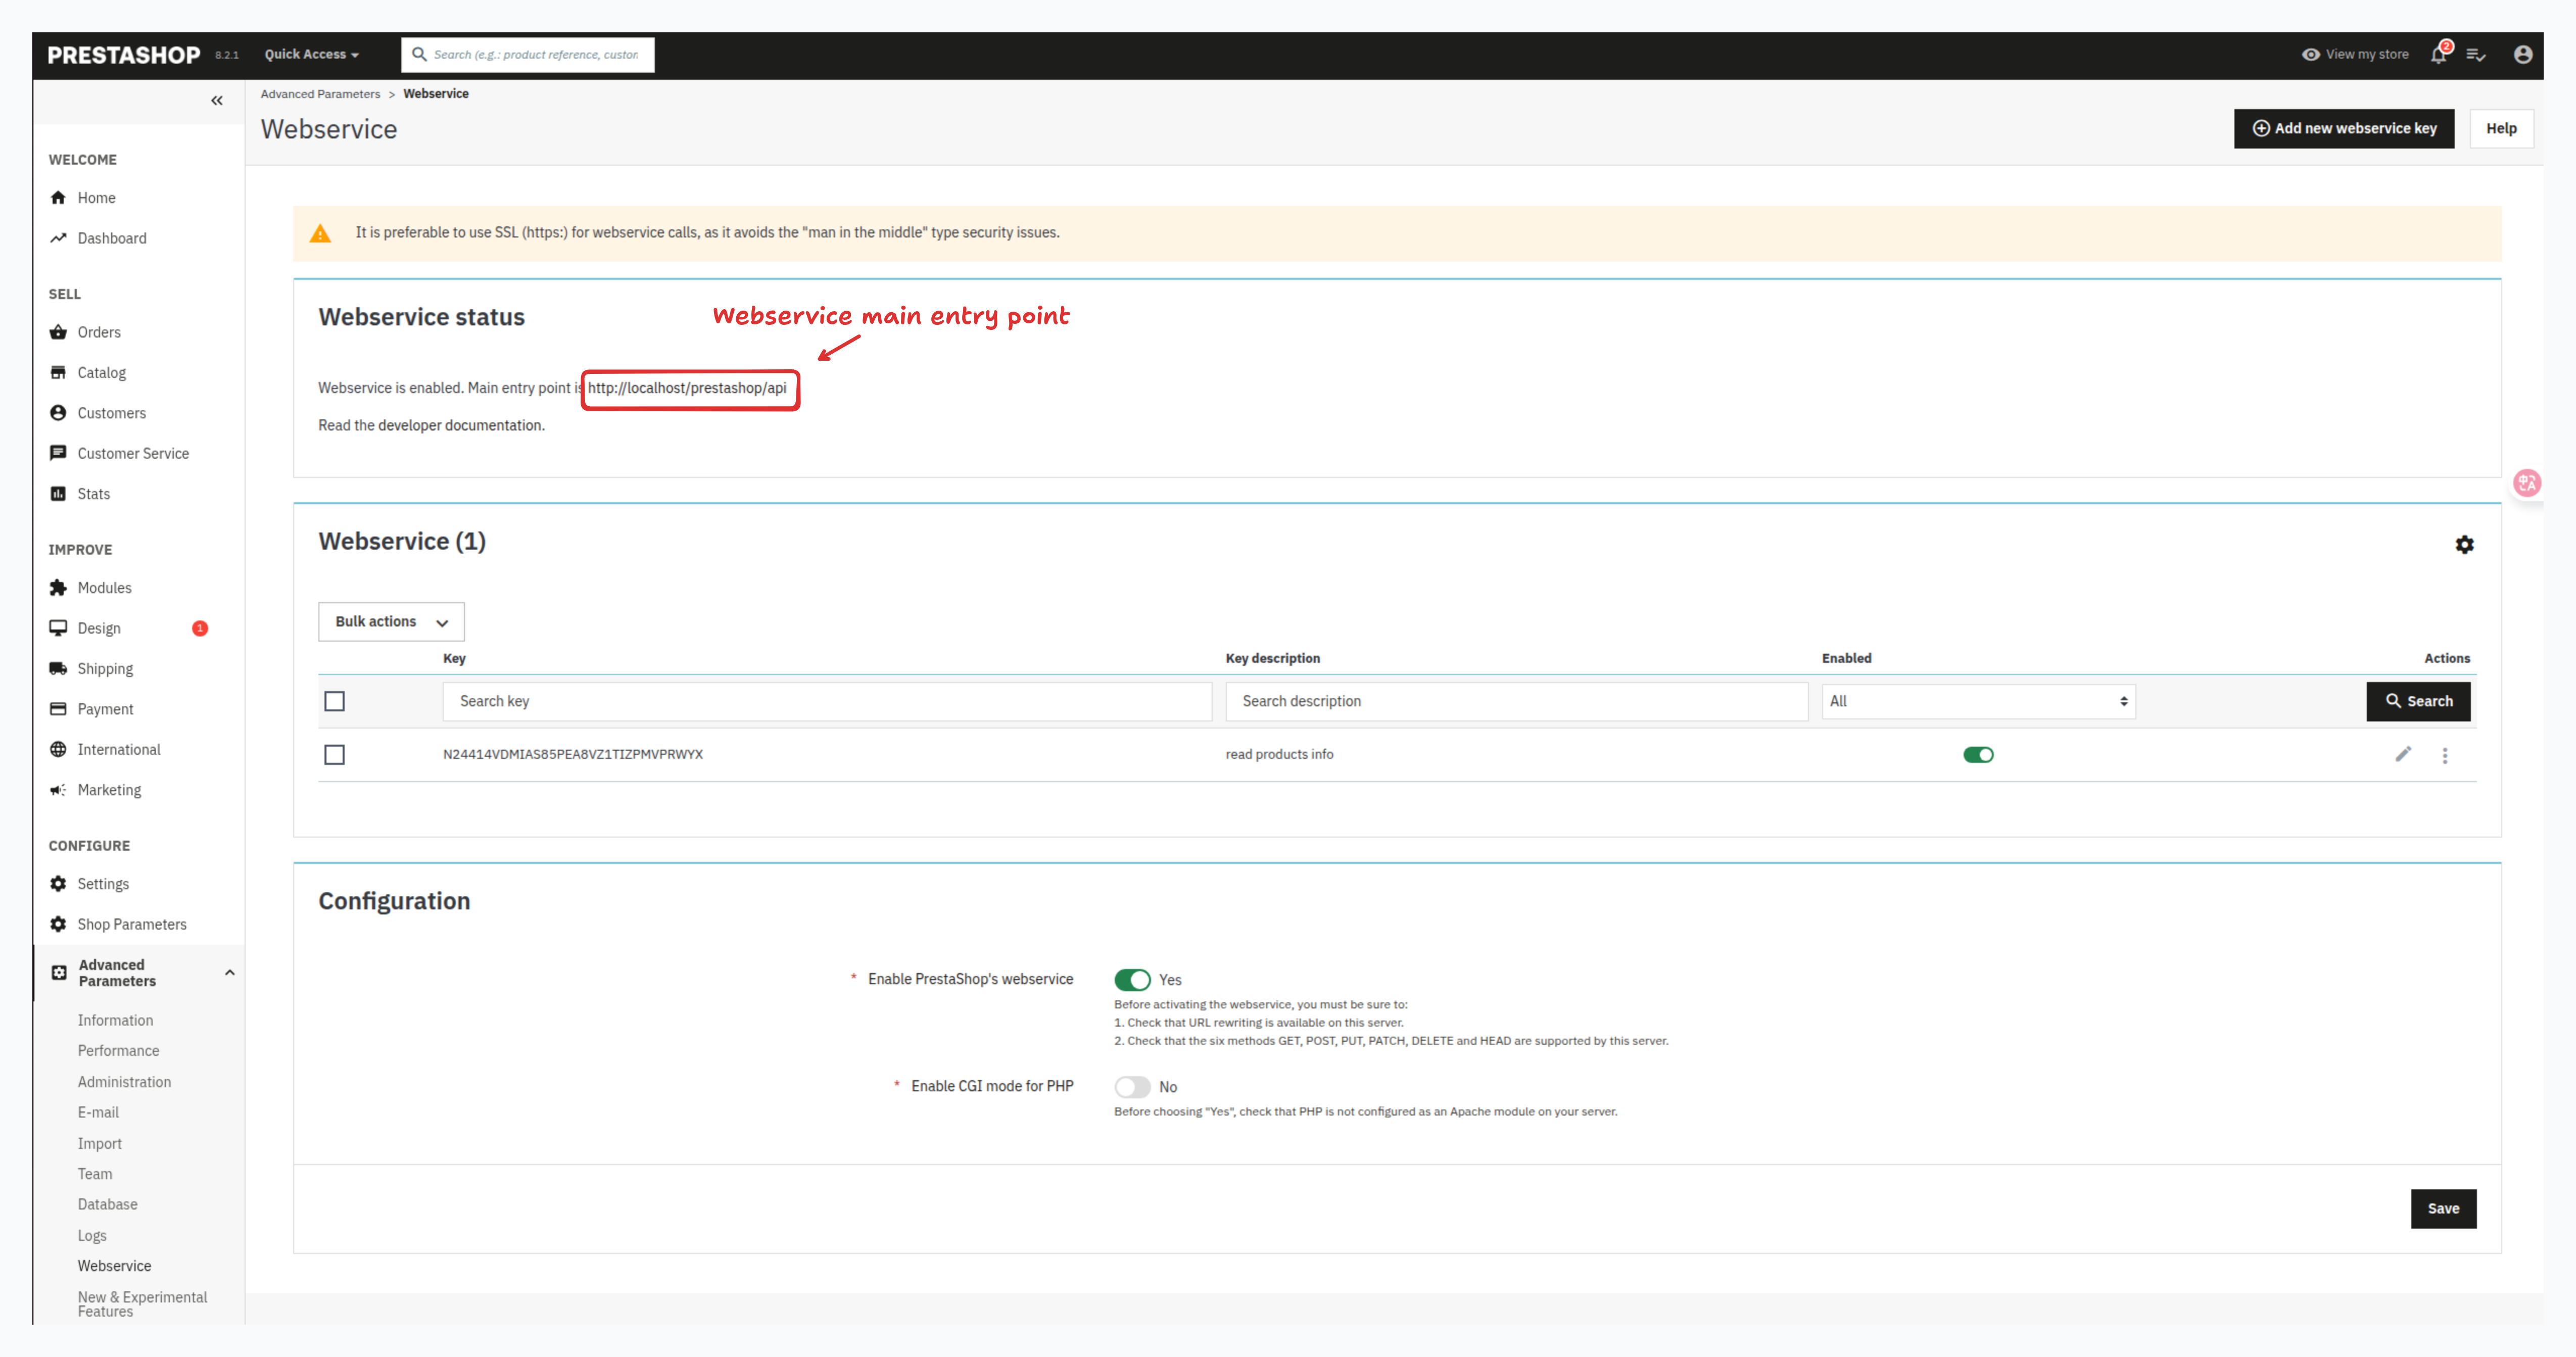
1.1 Access Advanced Parameters
Log in to your Prestashop back office and navigate to Advanced Parameters > Webservice in the left sidebar menu.
1.2 Enable the Webservice If not already enabled, set the Webservice option to "Yes" and save your changes.
1.3 Create a New API Key
Click the Add new webservice key button to create a new access key for product imports.
All the above three steps are demonstrated in the following screenshot: 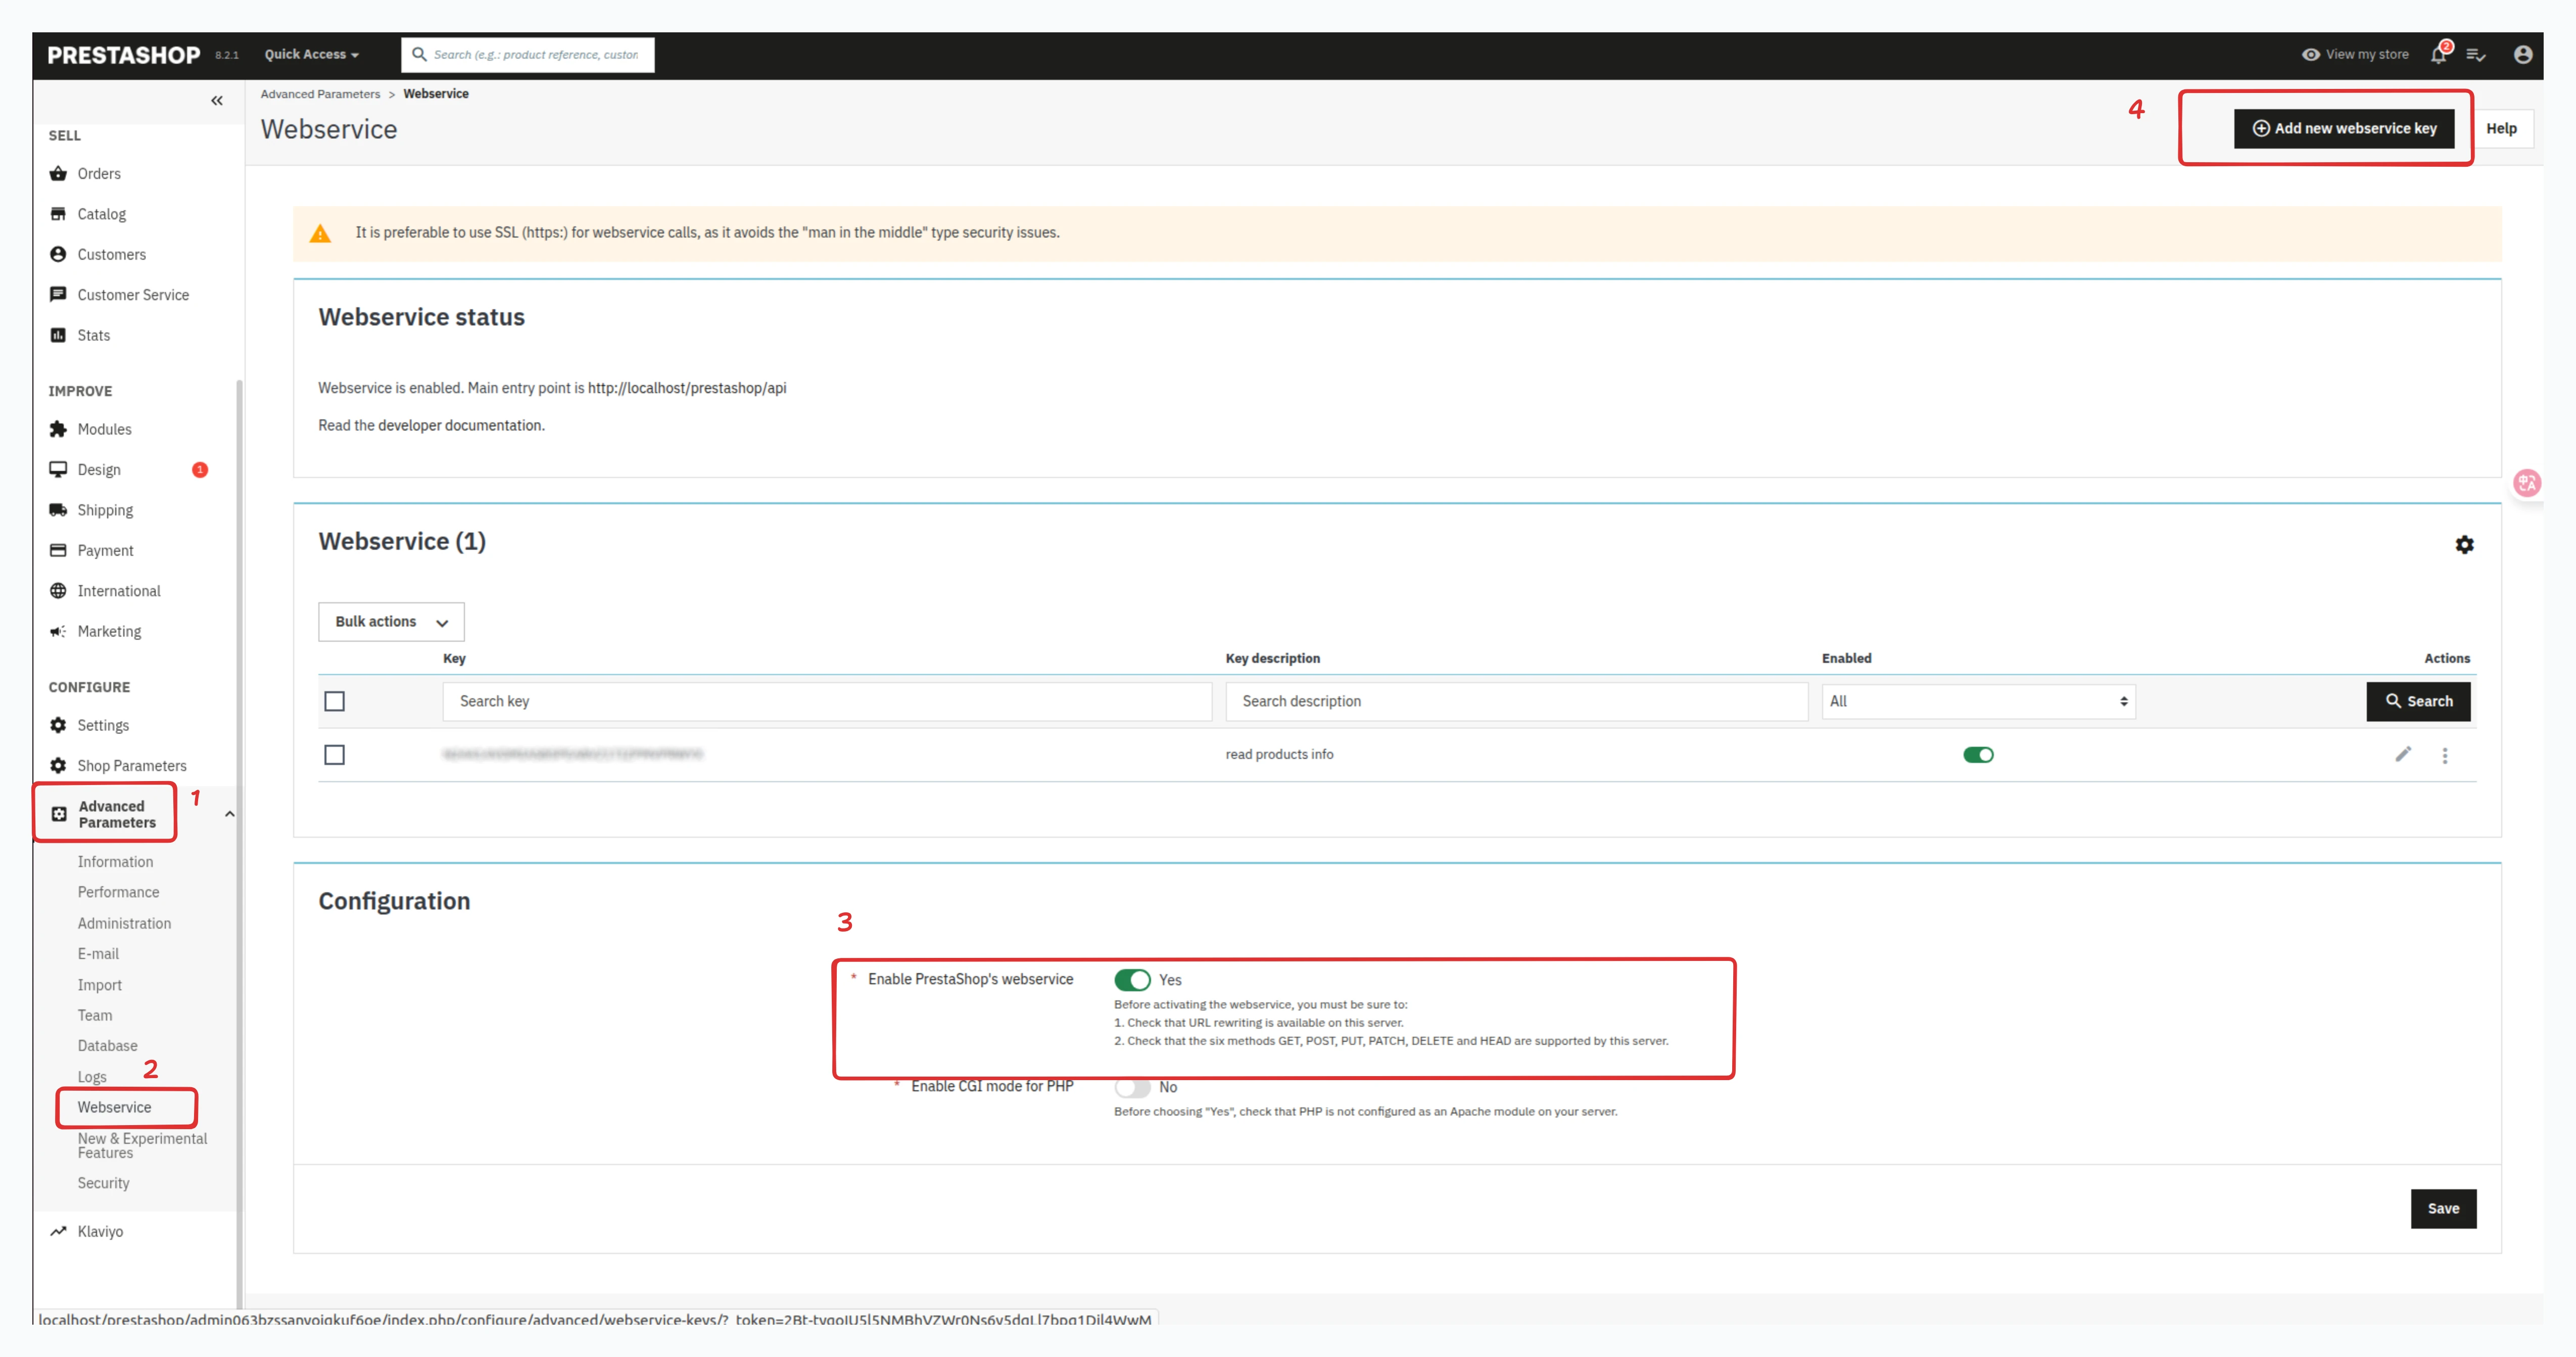
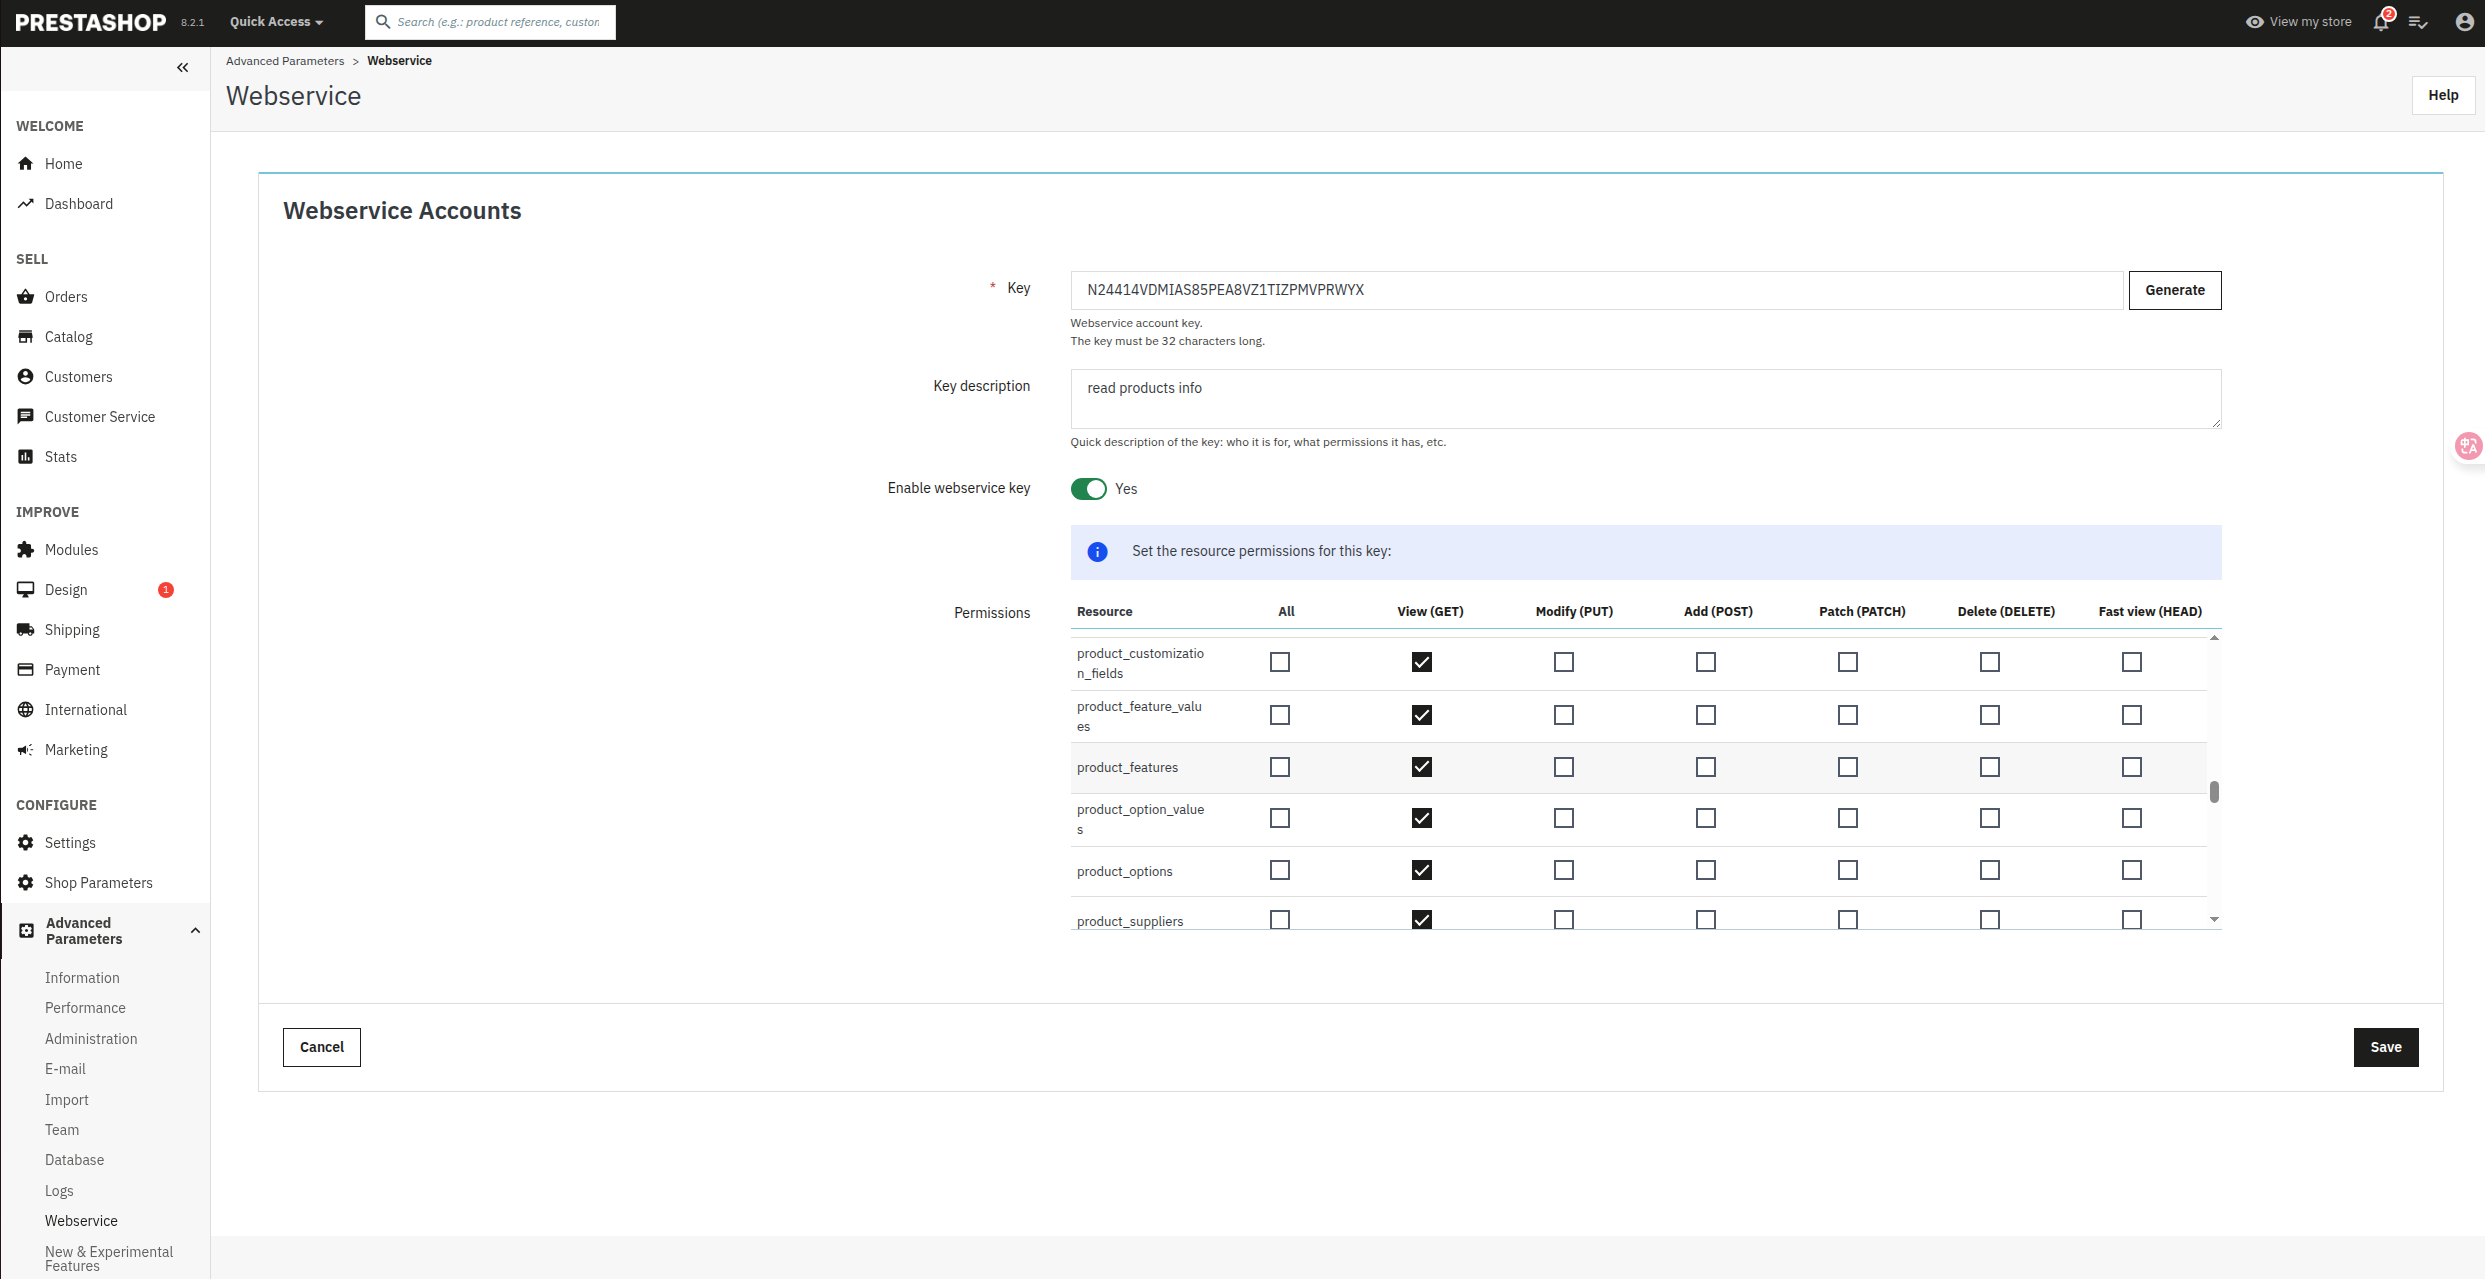
1.4 Configure API Access
Fill in the following details:
- Key: Click the Generate button to generate a random webservice key.
- Key description: Enter a name like "Product read information"
- Enable webservice key: Turn on the toggle button
- Permissions: Under the "Resource" column, find the following resources and select the "GET" permission (read-only access):
- configurations
- attachments
- categories
- combinations
- currencies
- customizations
- images
- languages
- manufacturers
- product_customization_fields
- product_feature_values
- product_features
- product_option_values
- product_options
- product_suppliers
- products
- specific_prices
- stock_availables
- tags
Once configured, click "Save" to generate your API key.
1.5 Copy Your Webservice Main entry point and Key Make a copy of the webservice main entry point and key as you'll need it for the import process. The webservice main entry point is shown as below and the webservice key is what you generated in the above step
Step 2: Import Products From Prestashop Store
Navigate to the Sources tab and select the Product tab as the source. Select "Prestashop Store Domain" from the platform options, then enter your Prestashop webservice main entry point and the webservice key you obtained in Step 1. Press the Import button to begin importing products from your Prestashop store.
By clicking on the eye icon, you can access a detailed view of each product's information. Should you find any discrepancies, kindly correct the product details within your Prestashop admin panel and proceed to re-import the products. Please note, direct inline modifications of product details within the product modal are not permitted.
You have the option to remove any undesired products, retaining only those you wish to include in your chatbot's knowledge base. Once you have verified the accuracy of all product details, proceed to click the Create/Retrain Chatbot button to initiate the agent training process. 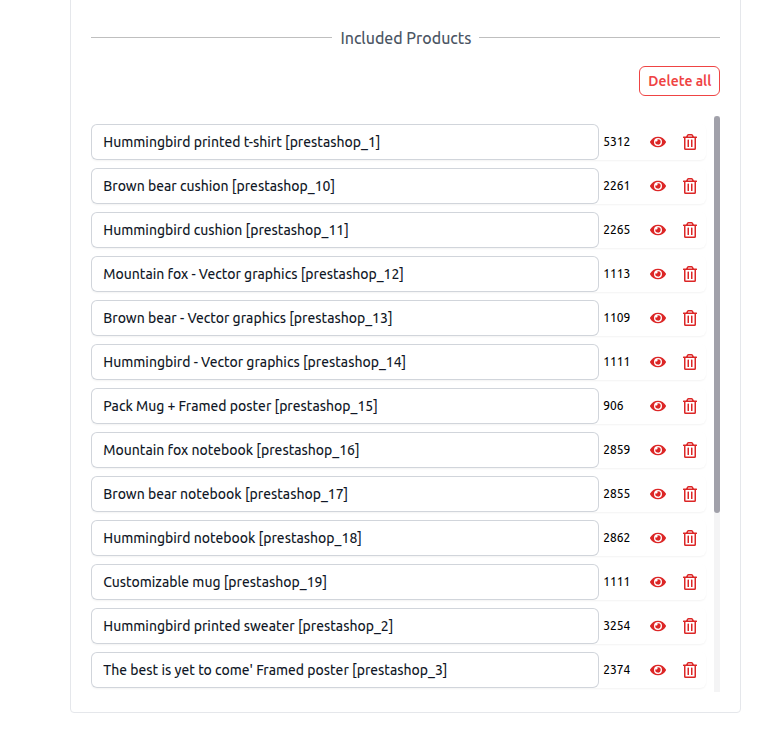
Below is a sample view of an imported Prestashop product, representing the information we will submit to the agent for training purposes. 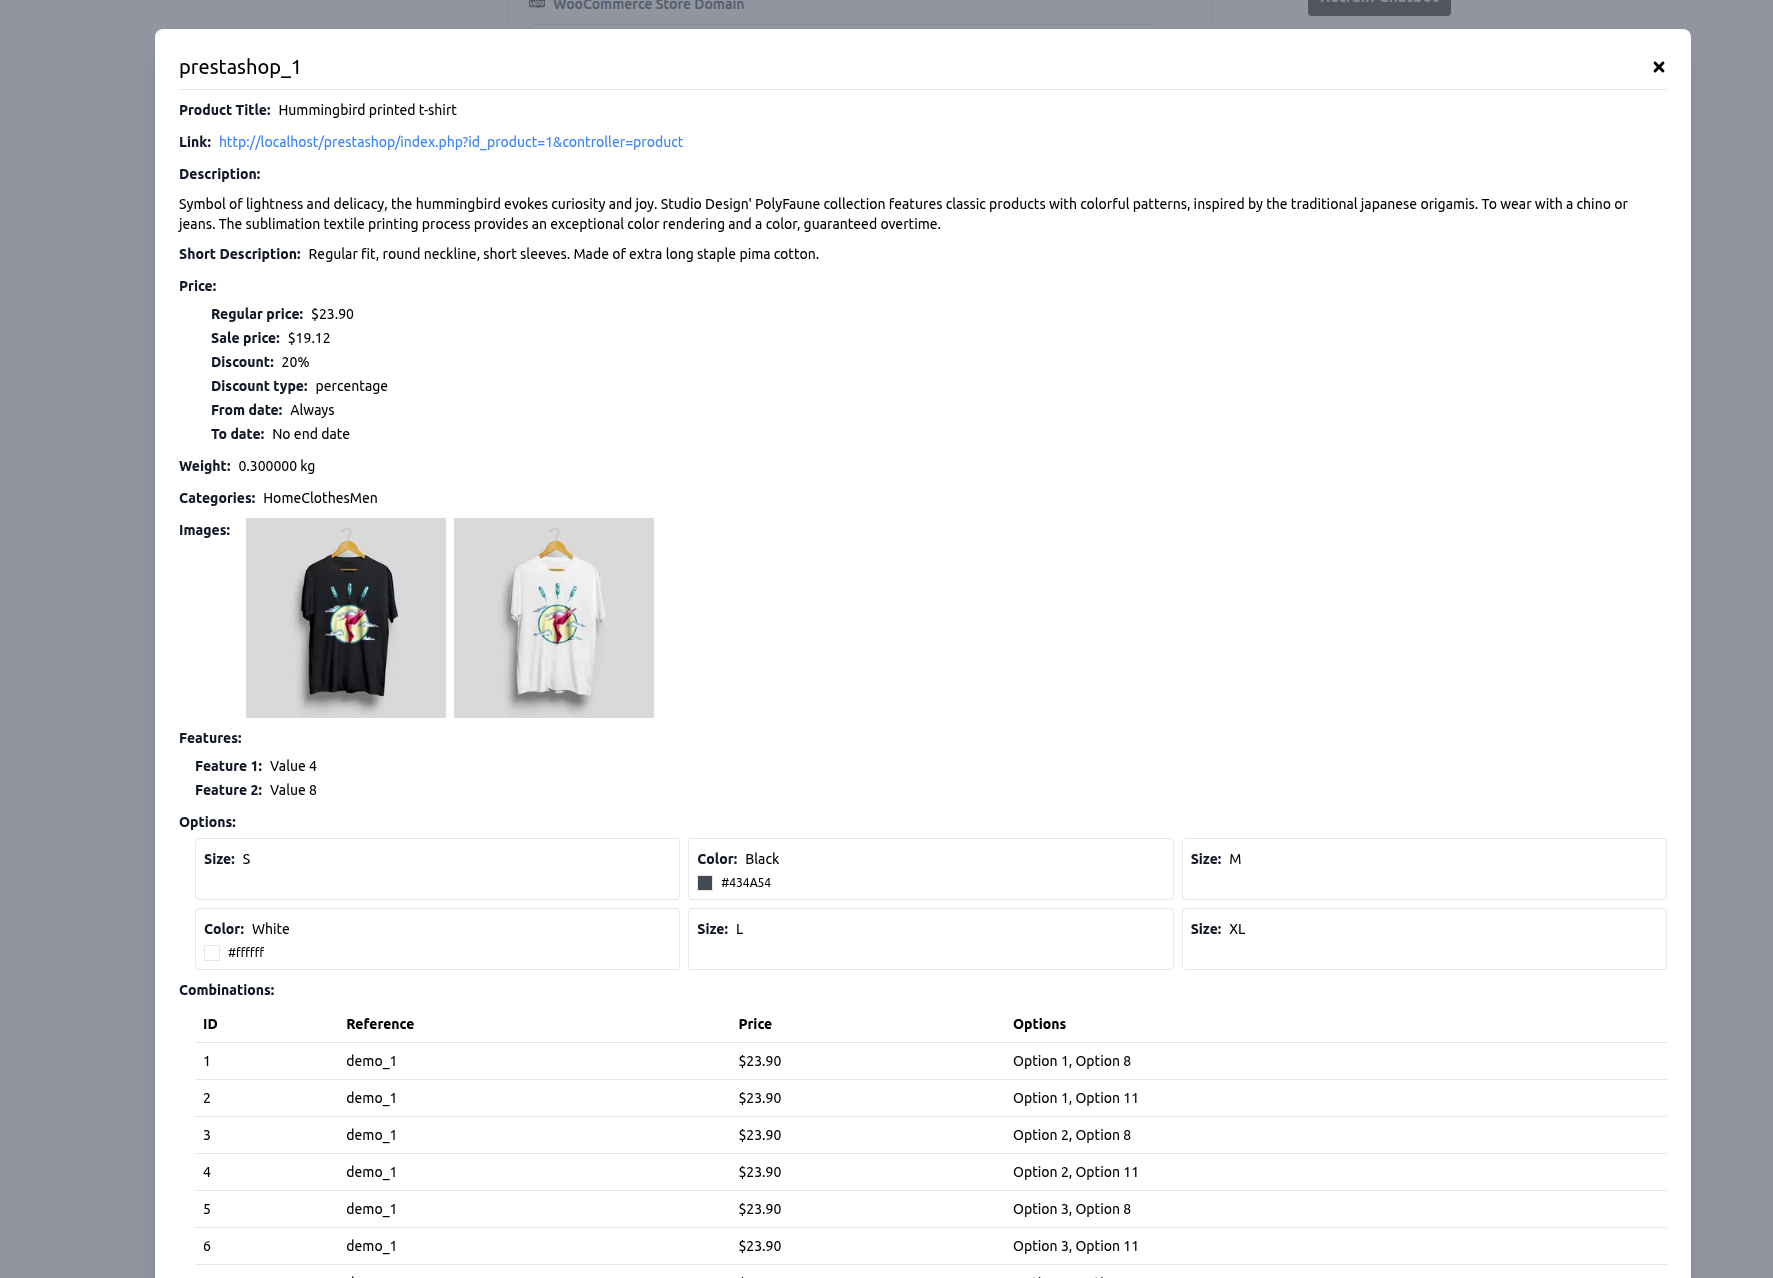
Magento
Magento is a powerful, open-source eCommerce platform designed for scalability and flexibility, widely used by enterprise and mid-sized businesses. This section will guide you through importing products from your Magento store into Chat Data for training your custom chatbot.
Step 1: Create Integration and Get Access Token
Prior to importing products from your Magento store, you'll need to create an Integration to obtain an Access Token for making API calls. Please be assured that we utilize your access token solely for this purpose and it will not be retained by our system. Below are the steps to create an integration and configure Bearer token authentication:
1.1 Access Magento Admin Panel
Navigate to System → Extensions → Integrations in the left sidebar menu.
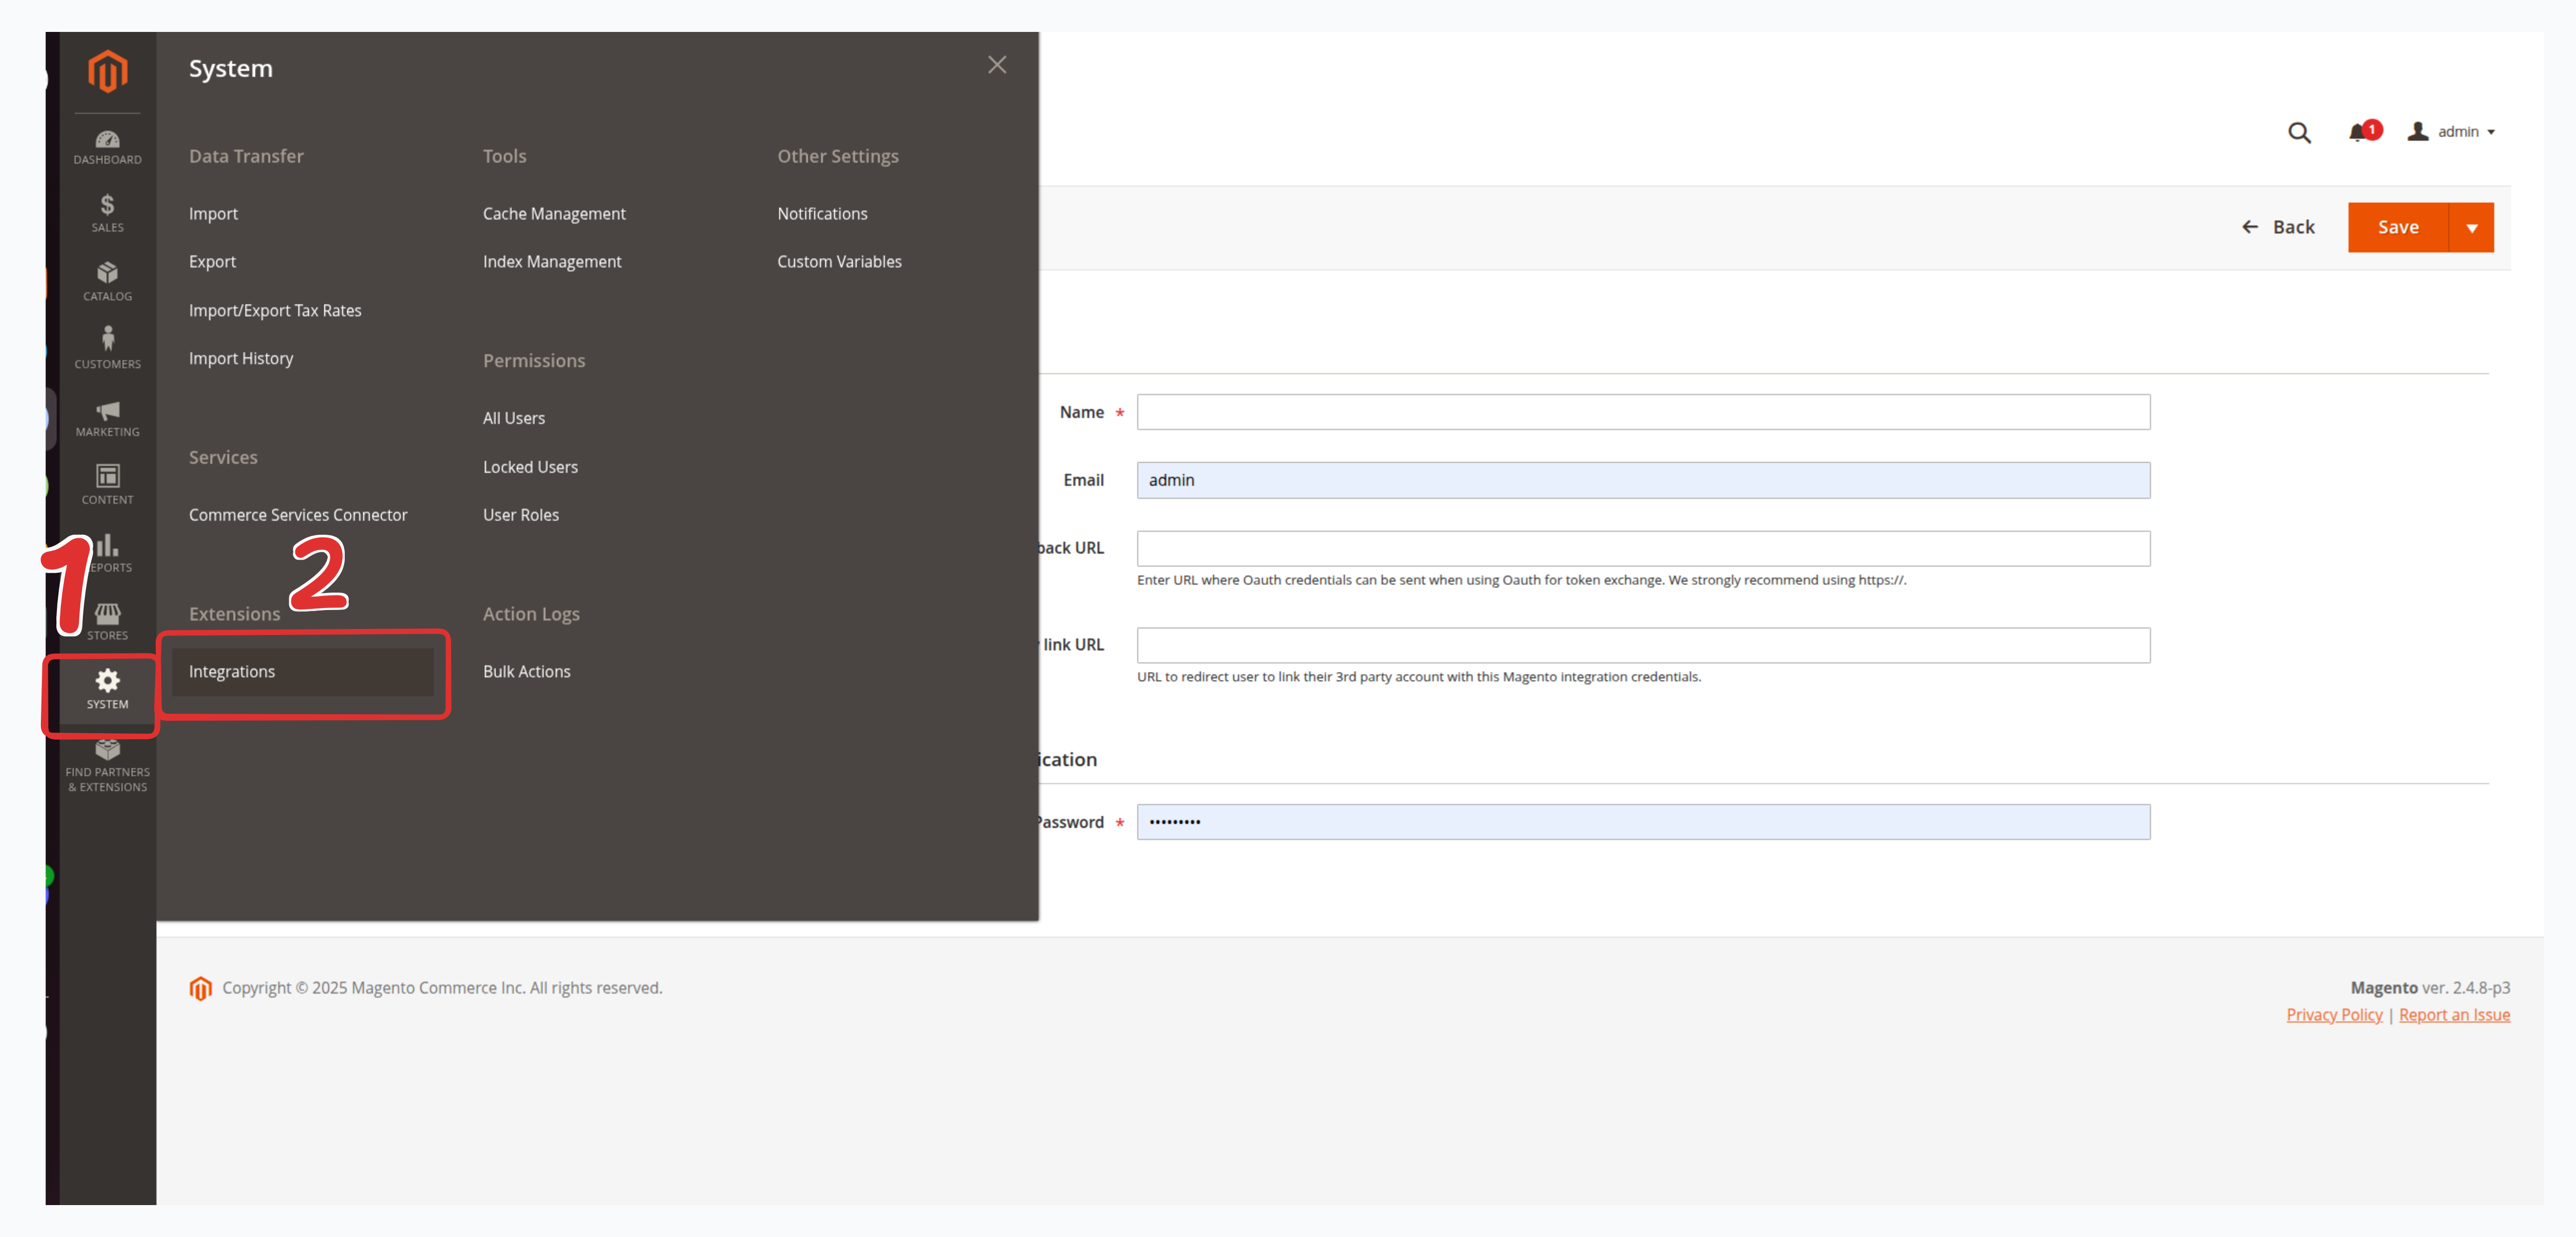
1.2 Create New Integration
Click the Add New Integration button to begin creating a new integration. Fill in the integration details:
- Name: Enter a descriptive name like "Chat Data Product Import"
- Email: Your email address (optional)
- Callback URL: Leave empty (not required)
- Identity Link URL: Leave empty (not required)
1.3 Configure API Permissions
Navigate to the API tab and configure the required permissions. We need read-only (GET) access for the following resources:
Catalog:
- Products - Read product catalog data
- Categories - Convert category IDs to human-readable names
- Inventory - Access stock and inventory information (quantity, availability, backorders)
Stores:
- Settings → All Stores - Get store configuration, base URLs, and currency settings
- Order Status - Access order status information
Currency:
- Currency Rates - Access currency information
- Currency Symbols - Format prices with correct currency symbols
Attributes:
- Product - Access product attribute options for rich metadata (materials, activities, styles, etc.)
- Attribute Set - Get product type classifications (Bag, Clothing, etc.)
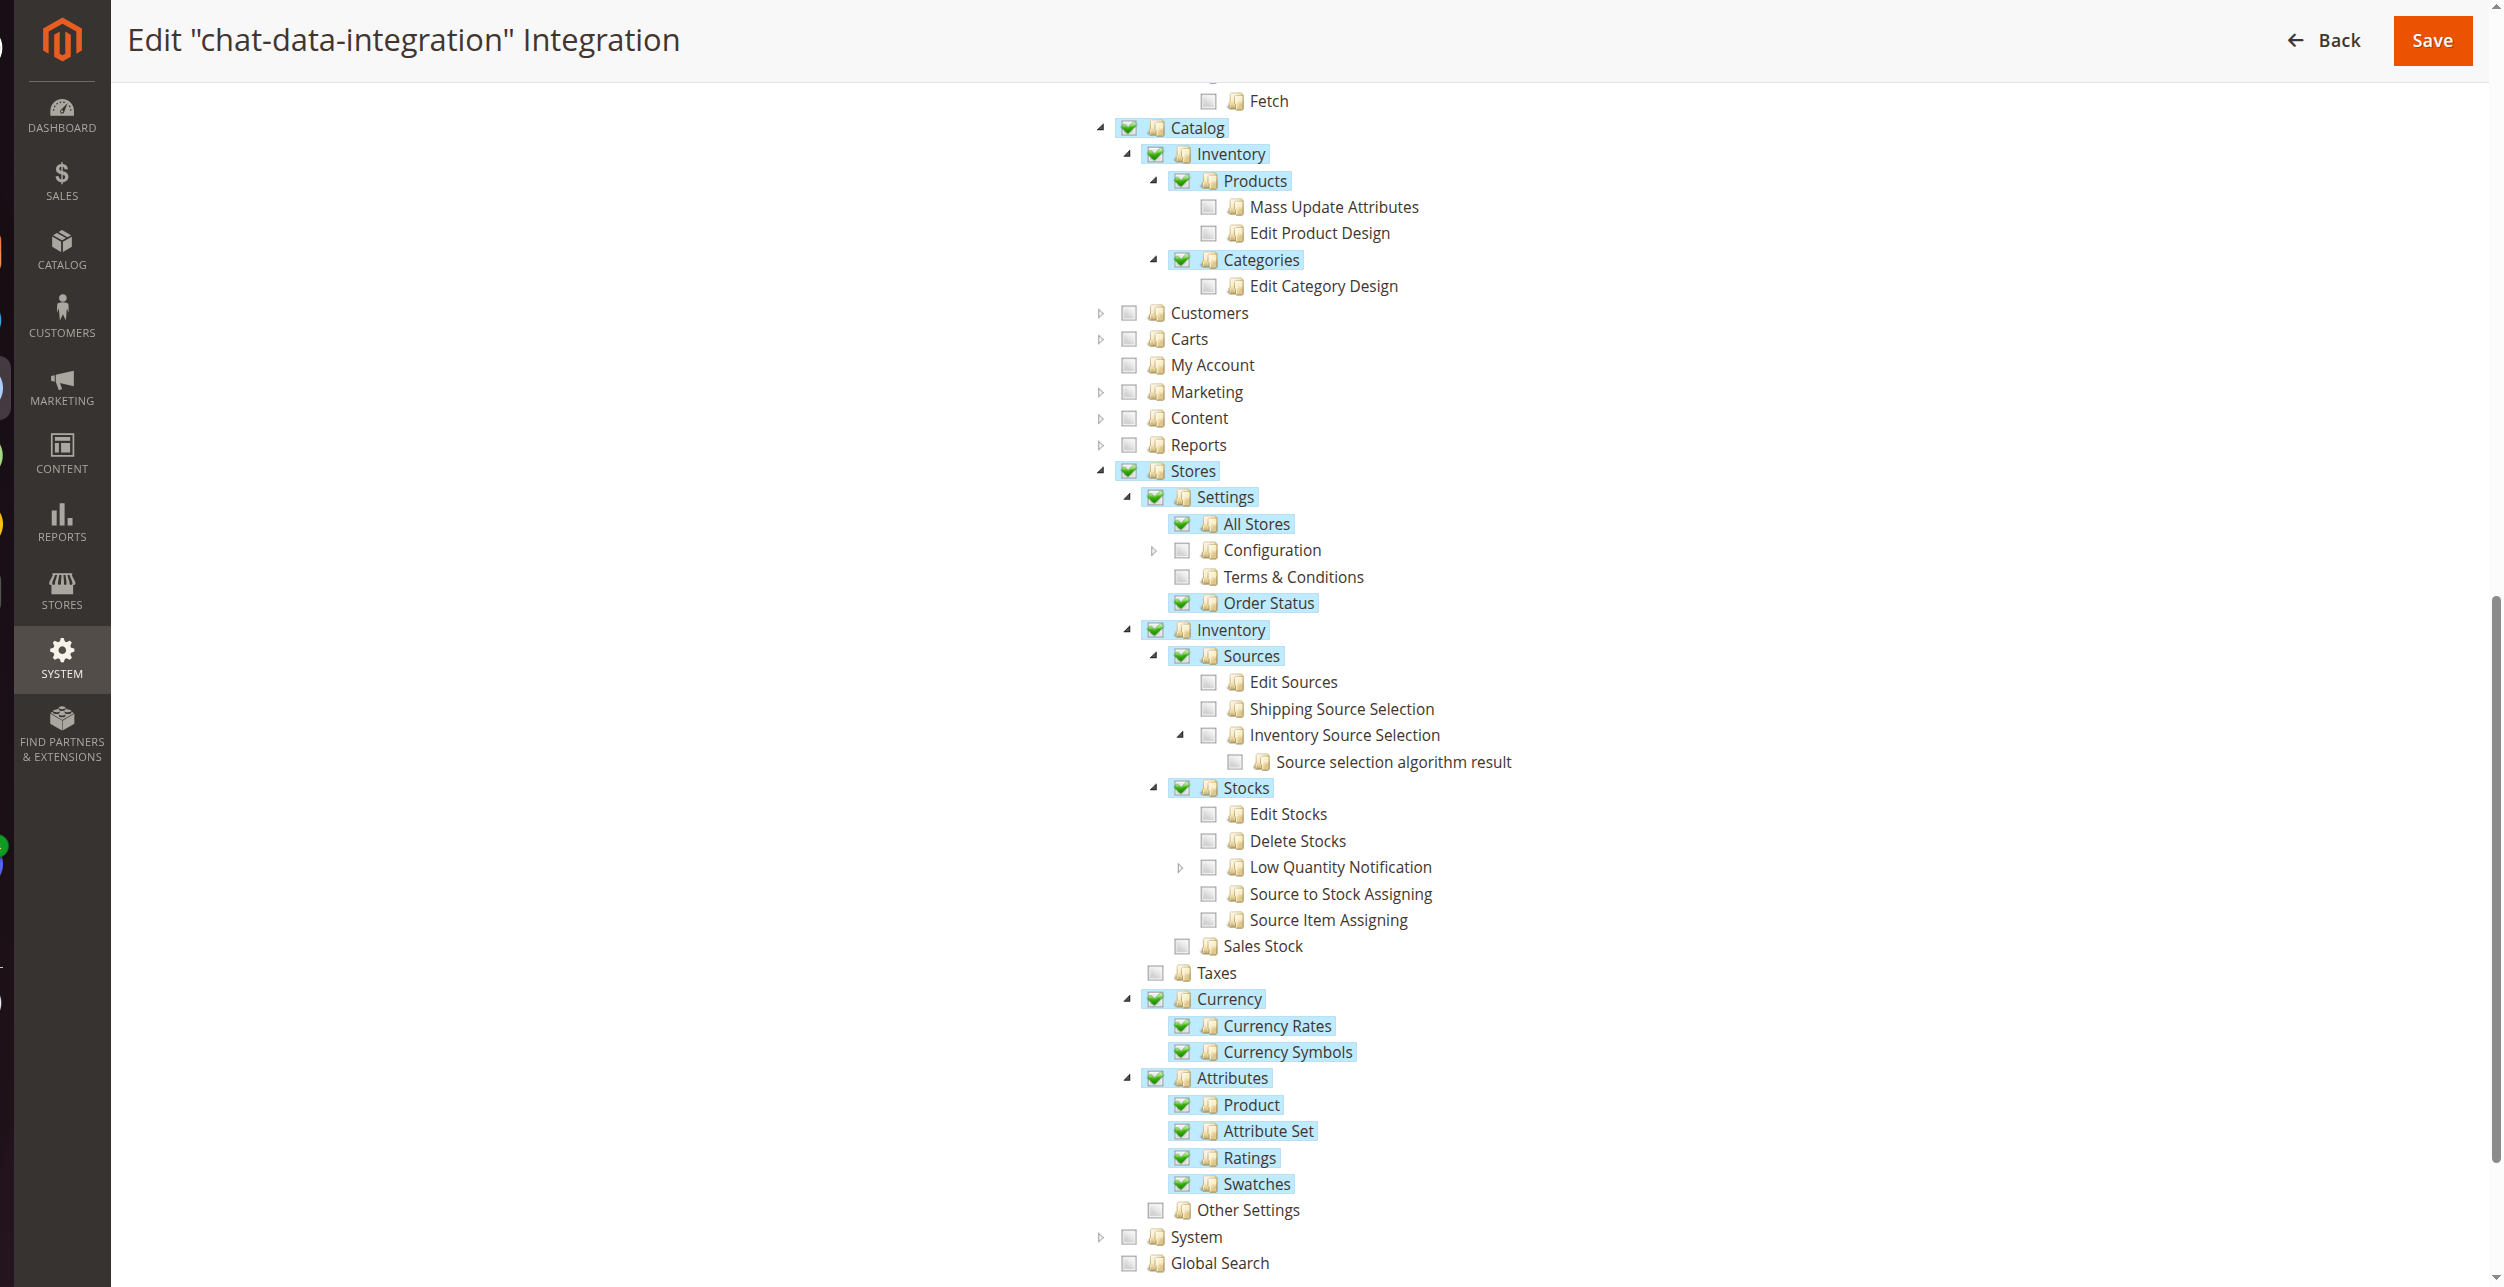
Note: For convenience, you can grant access to the entire "Catalog" resource, which includes Products, Categories, and Inventory.
Optional - For Order Tracking: If you plan to implement order tracking functionality with AI Actions, you'll also need to grant the following Sales permission:
Sales:
- Operations → Orders → Actions → View - Read order information
For detailed setup instructions, refer to the Magento Order Tracking section in the Order Tracking Integration Guide.
1.4 Activate Integration
After saving the integration, click the Activate button in the integrations list. When prompted, click Allow to authorize the integration.

1.5 Copy Access Token and REST API Endpoint
After authorizing the integration, a popup window will display your integration credentials. This window contains important information that you'll need for importing products:
Access Token: A long alphanumeric string (Bearer token) used for API authentication. This token enables token-based authentication (not OAuth 1.0). Copy the entire token exactly as shown.
Access Token Secret: Also displayed, but not required for Chat Data integration.
Consumer Key and Consumer Secret: Also displayed, but not required for Chat Data integration.
The popup also shows your store's REST API Endpoint URL, which should end with
/rest.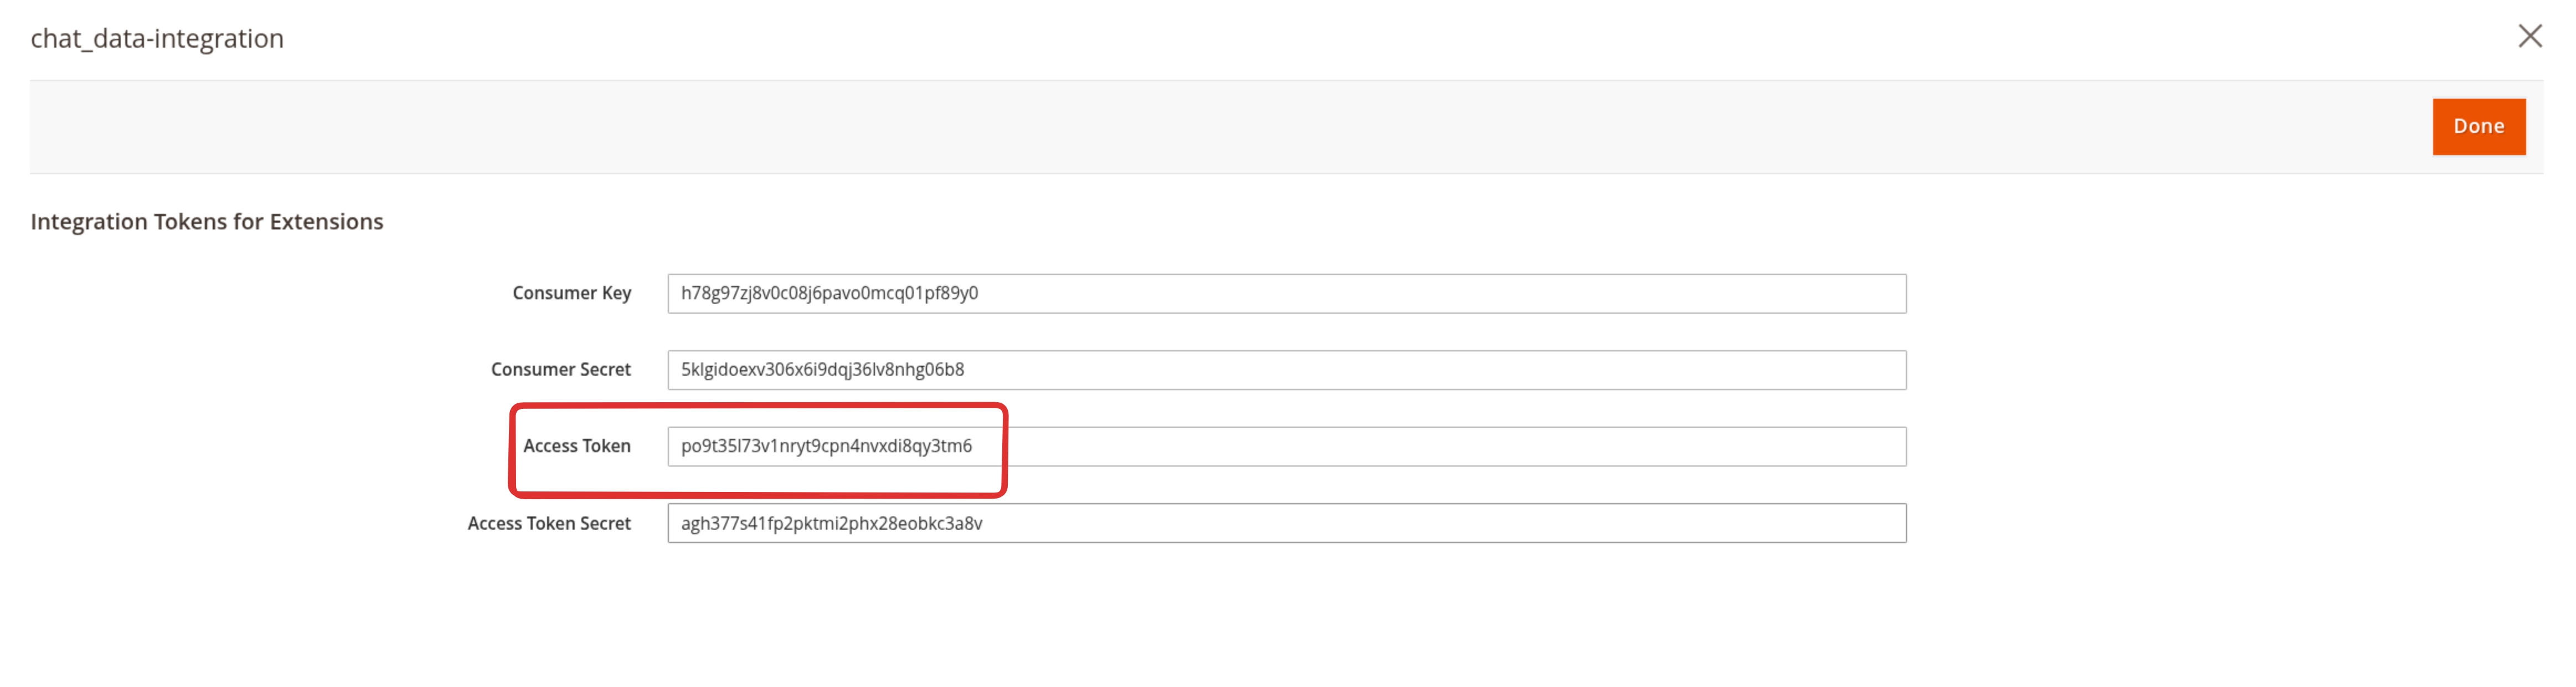
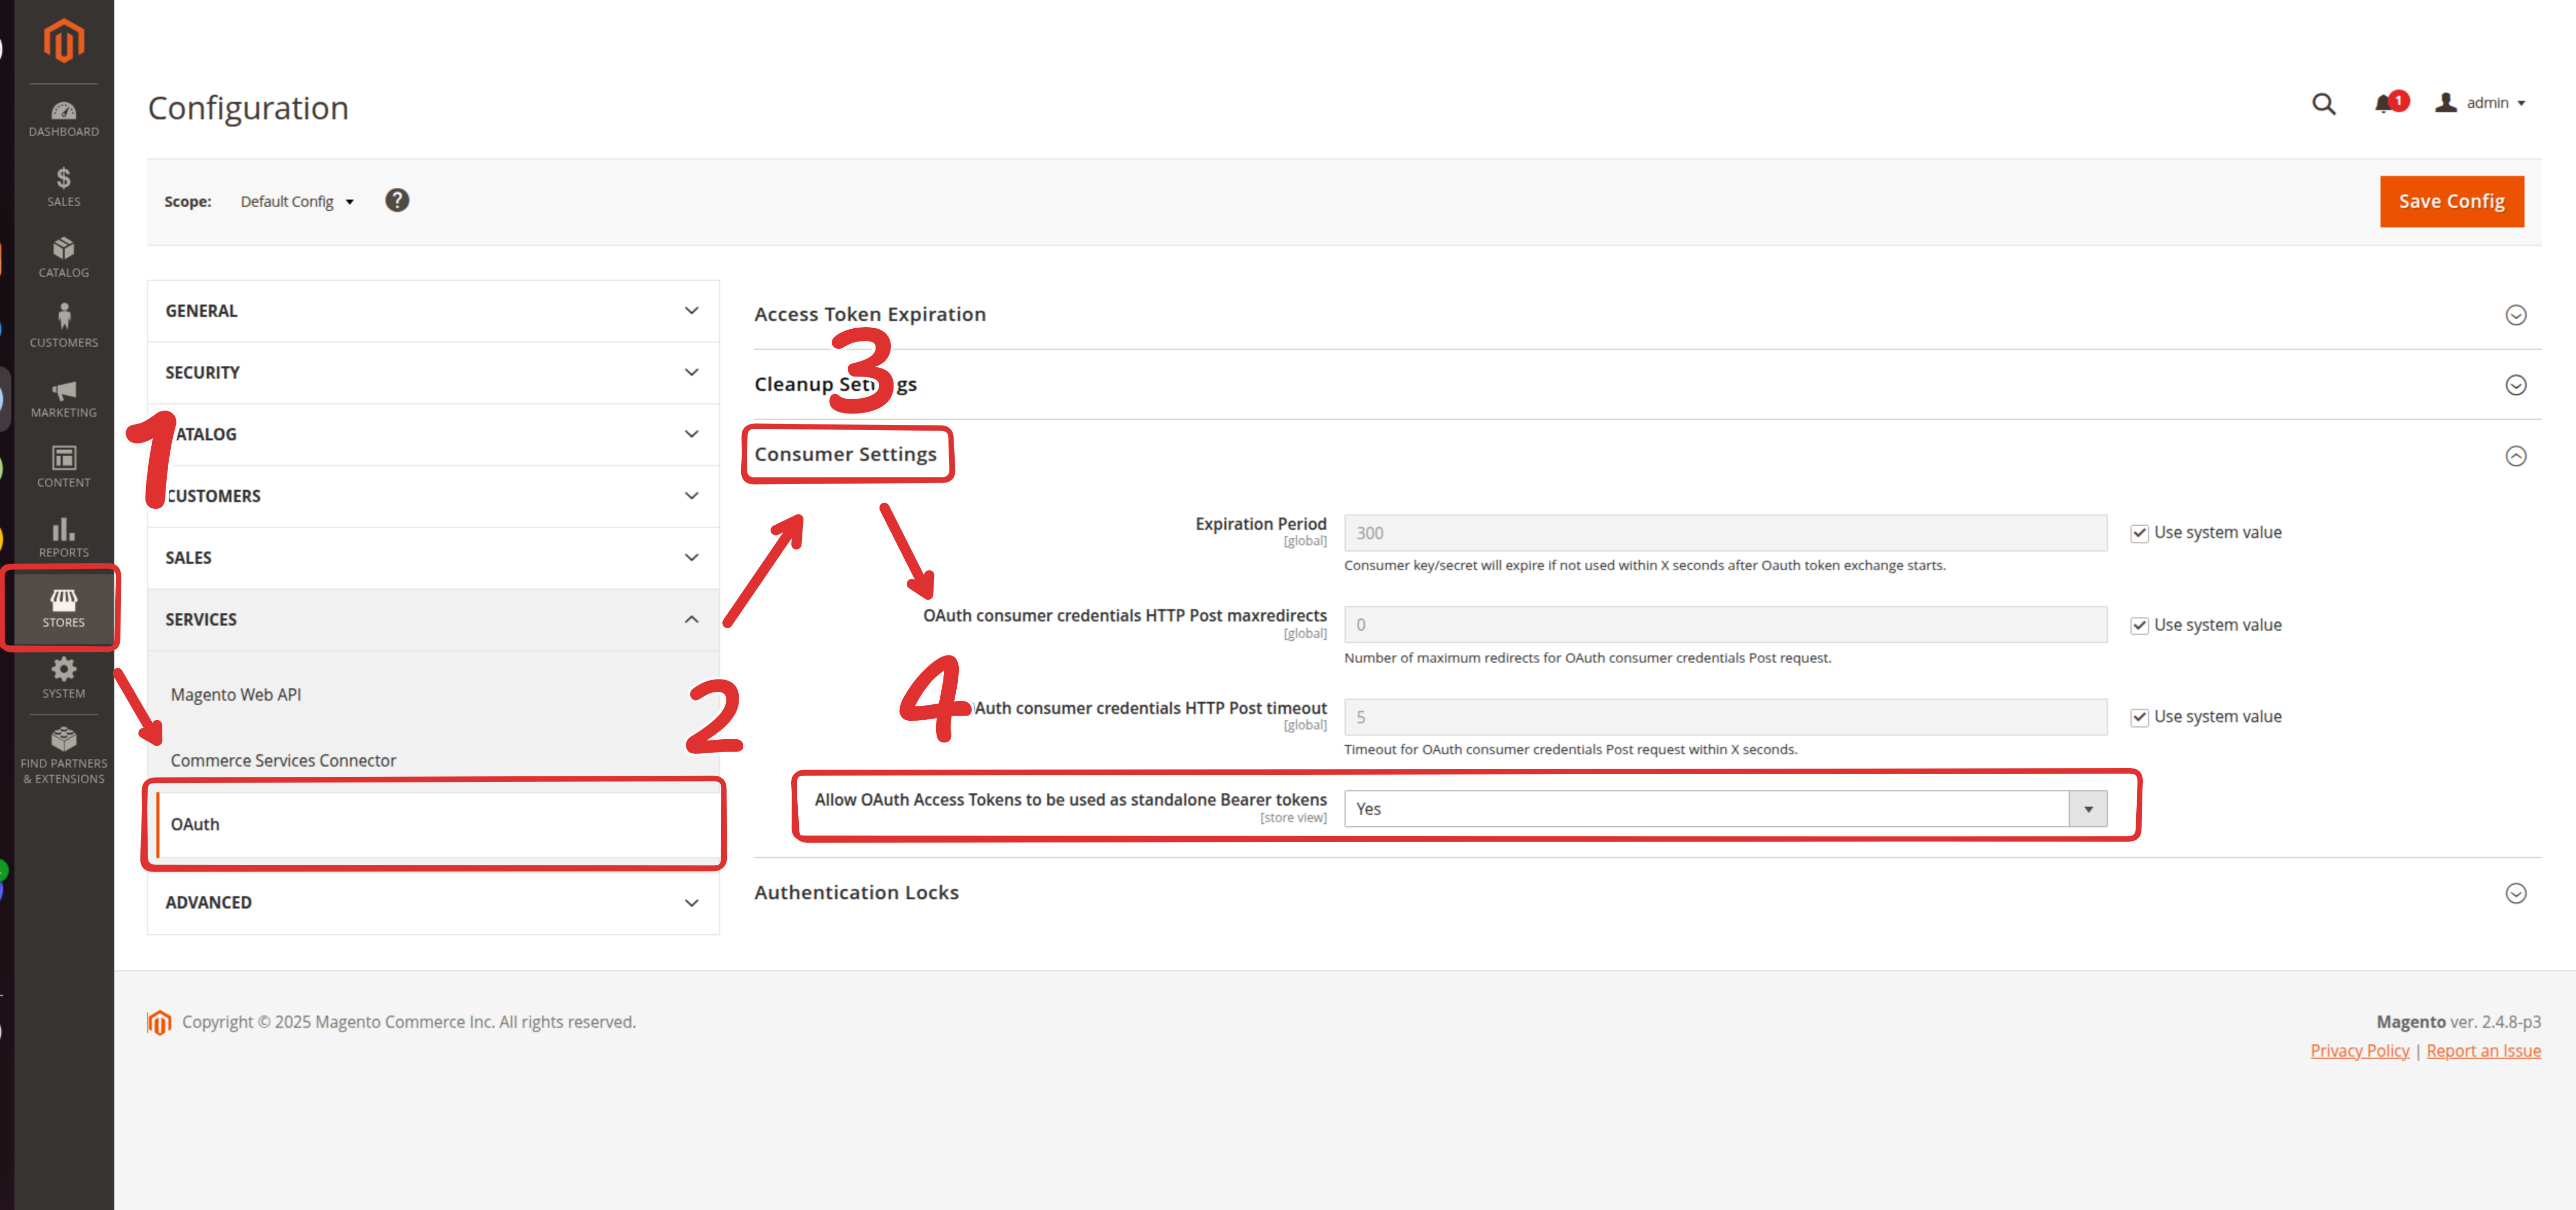
1.6 Enable Bearer Token Authentication
Now that you have obtained your Access Token, you need to enable Bearer token authentication in Magento's configuration to use this token. Navigate to Stores → Configuration → Services → OAuth → Consumer Settings. Enable the setting "Allow OAuth Access Tokens to be used as standalone Bearer tokens". For all other options in this section, choose "Use System value". Save the configuration. This is required for Chat Data to authenticate with your store using the Access Token.
Step 2: Import Products From Magento Store
Navigate to the Sources tab and select the Product tab as the source. Select "Magento Store" from the platform options, then enter your Magento REST API Entry Point (must end with /rest) and the Access Token you obtained in Step 1. Press the Import button to begin importing products from your Magento store.
By clicking on the eye icon, you can access a detailed view of each product's information. Should you find any discrepancies, kindly correct the product details within your Magento admin panel and proceed to re-import the products. Please note, direct inline modifications of product details within the product modal are not permitted.
You have the option to remove any undesired products, retaining only those you wish to include in your chatbot's knowledge base. Once you have verified the accuracy of all product details, proceed to click the Create/Retrain Chatbot button to initiate the agent training process.
Shopware
Shopware 6 is a modern, open-source eCommerce platform built with Symfony and Vue.js, offering flexibility and scalability for businesses of all sizes. This section will guide you through importing products from your Shopware 6 store into Chat Data for training your custom chatbot.
Step 1: Create a Role with Product Permissions
Prior to importing products from your Shopware store, you'll need to create a Role with the appropriate permissions, then create an Integration based on that role. Please be assured that we utilize your credentials solely for this purpose and they will not be retained by our system. Below are the steps:
1.1 Access User & Permissions Settings
Navigate to Settings → User & Permissions in the left sidebar menu.
1.2 Create a New Role
Click the Roles tab, then click Add role to create a new role. Fill in the role details:
- Name: Enter a descriptive name like "Chat Data Product Read"
- Description: Optional description for the role
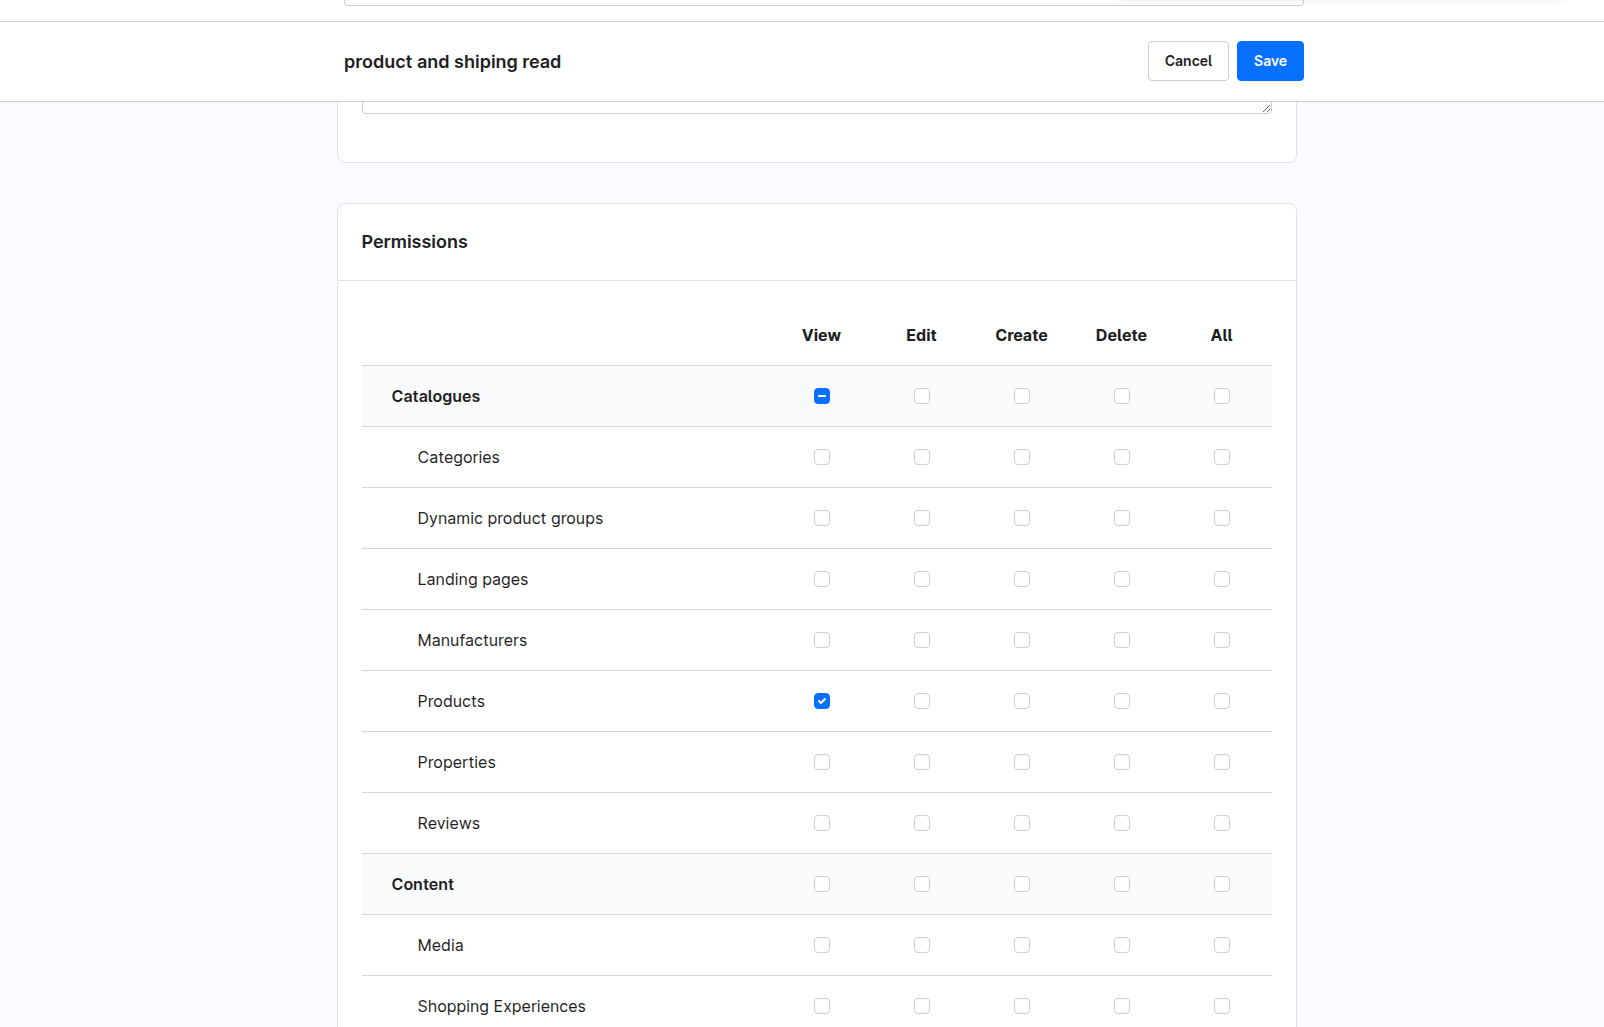
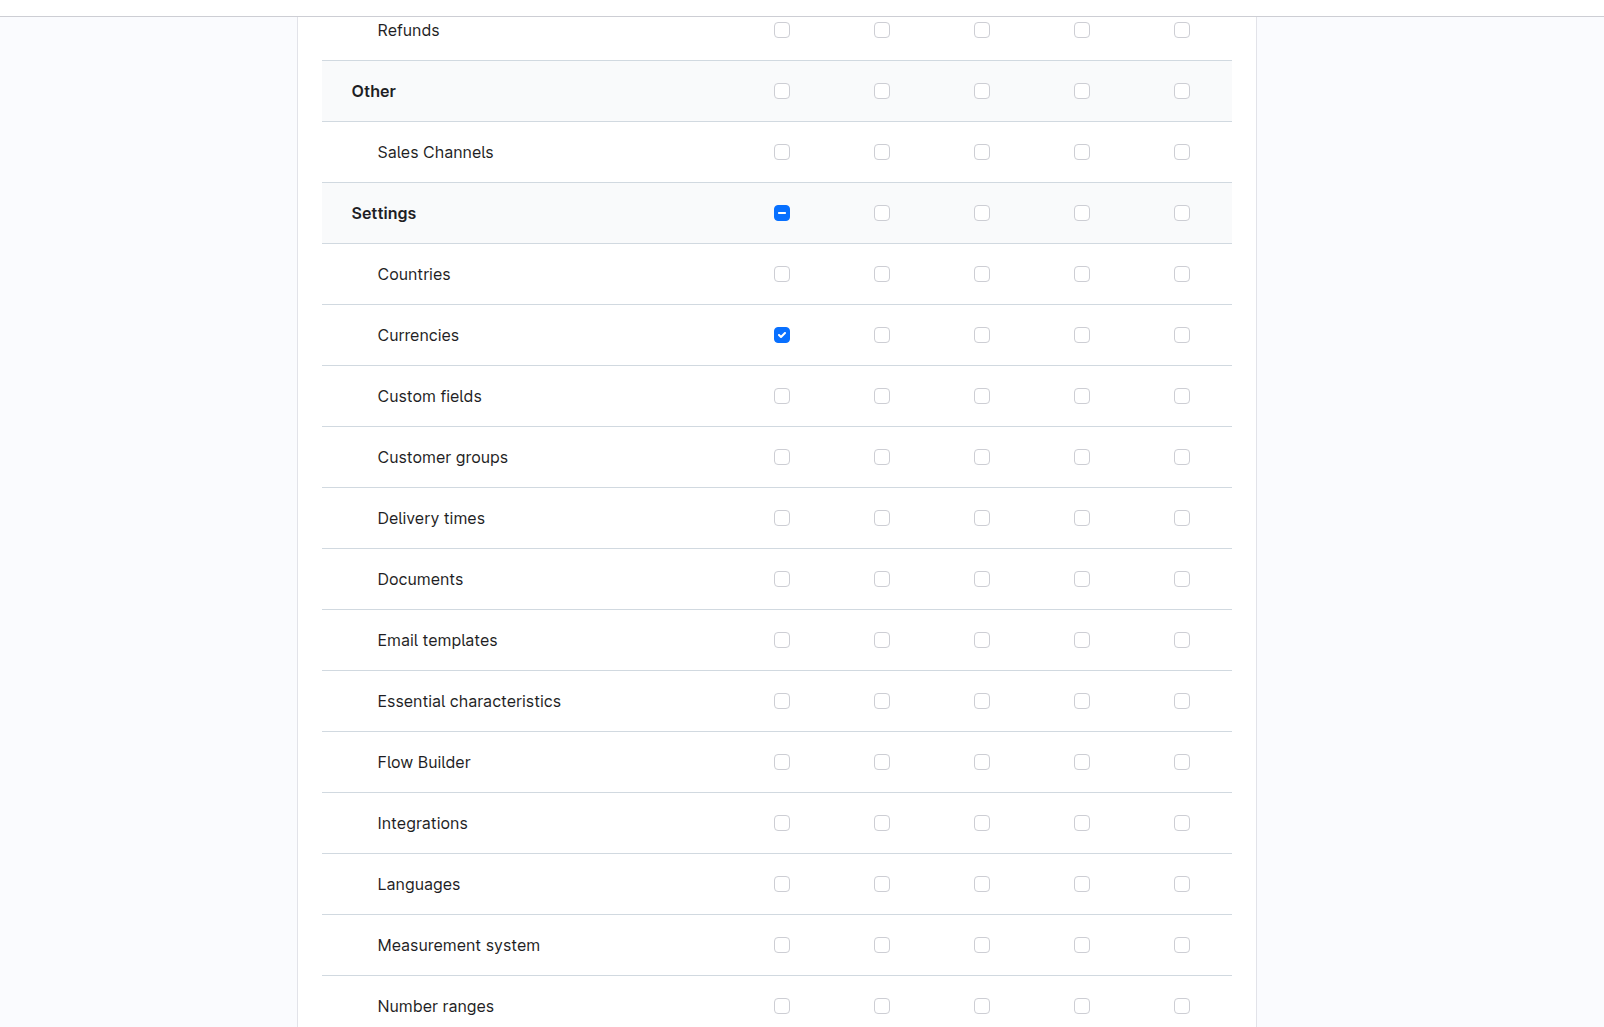
1.3 Configure Role Permissions
In the permissions section, grant view (read-only) access to the following resources:
- Product - Read product catalog data (includes associated manufacturer, categories, media, etc.)
- Currency - Access currency information for price formatting
Save the role after configuring the permissions.
Step 2: Create an Integration
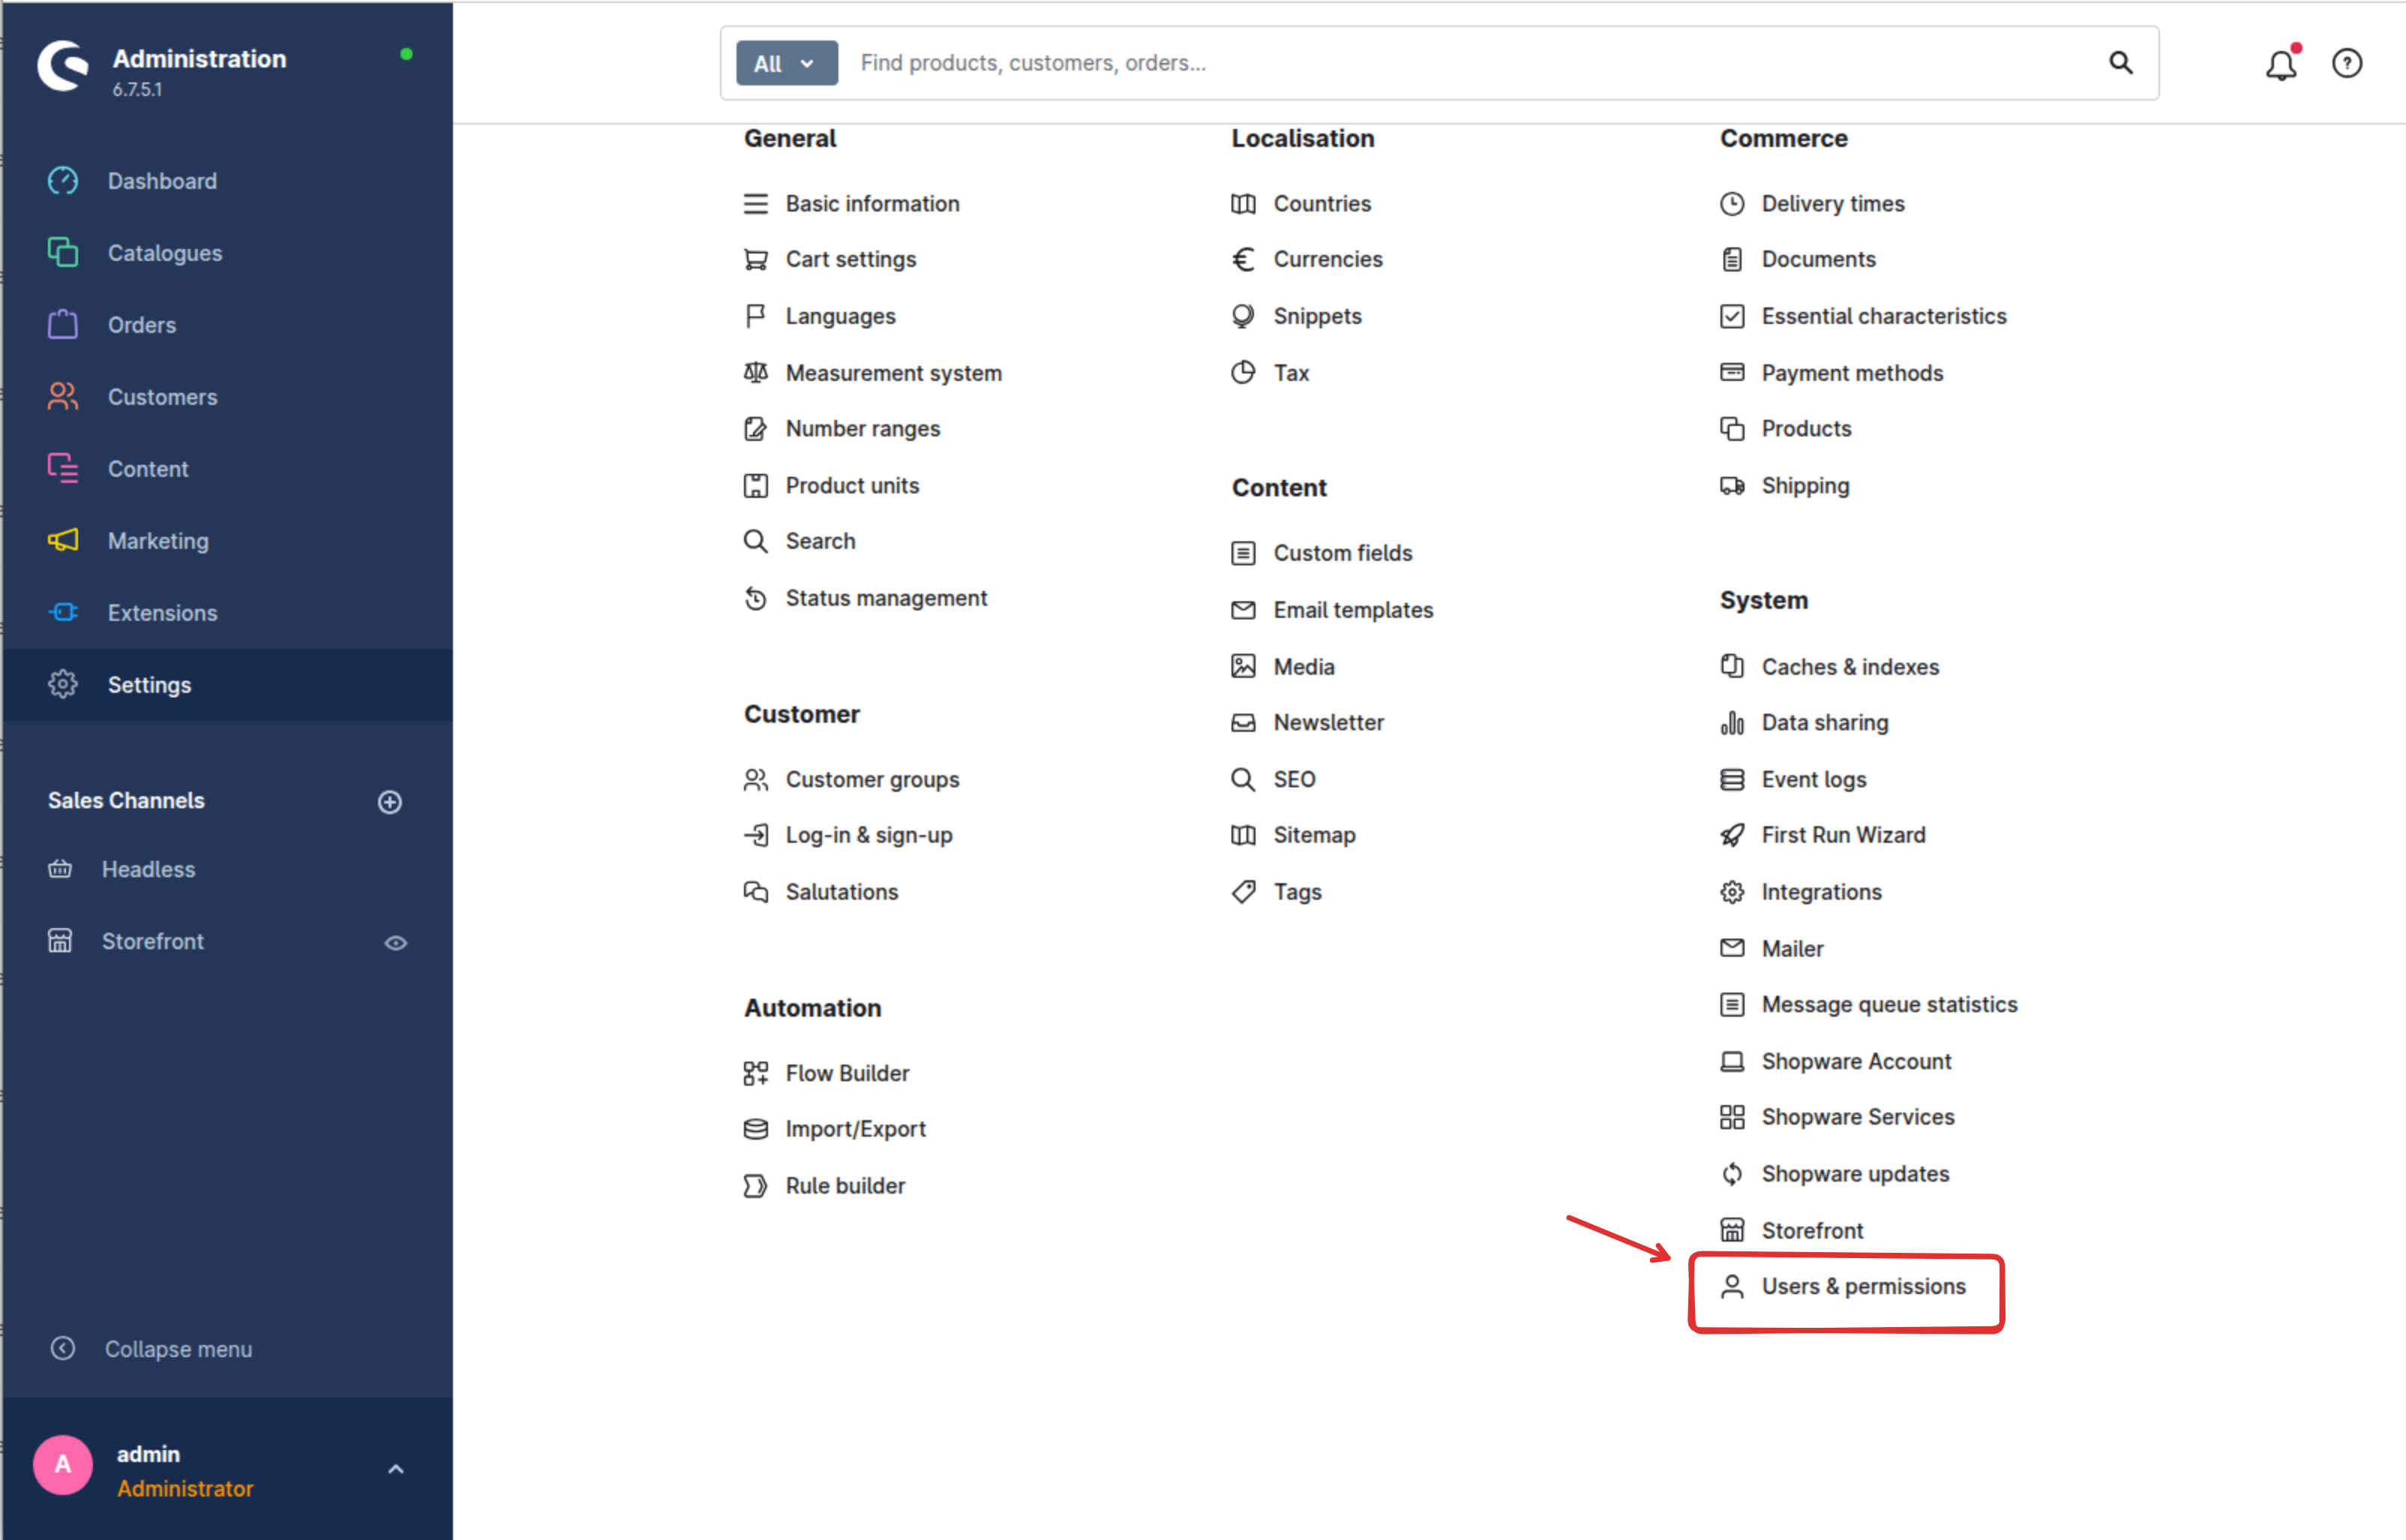
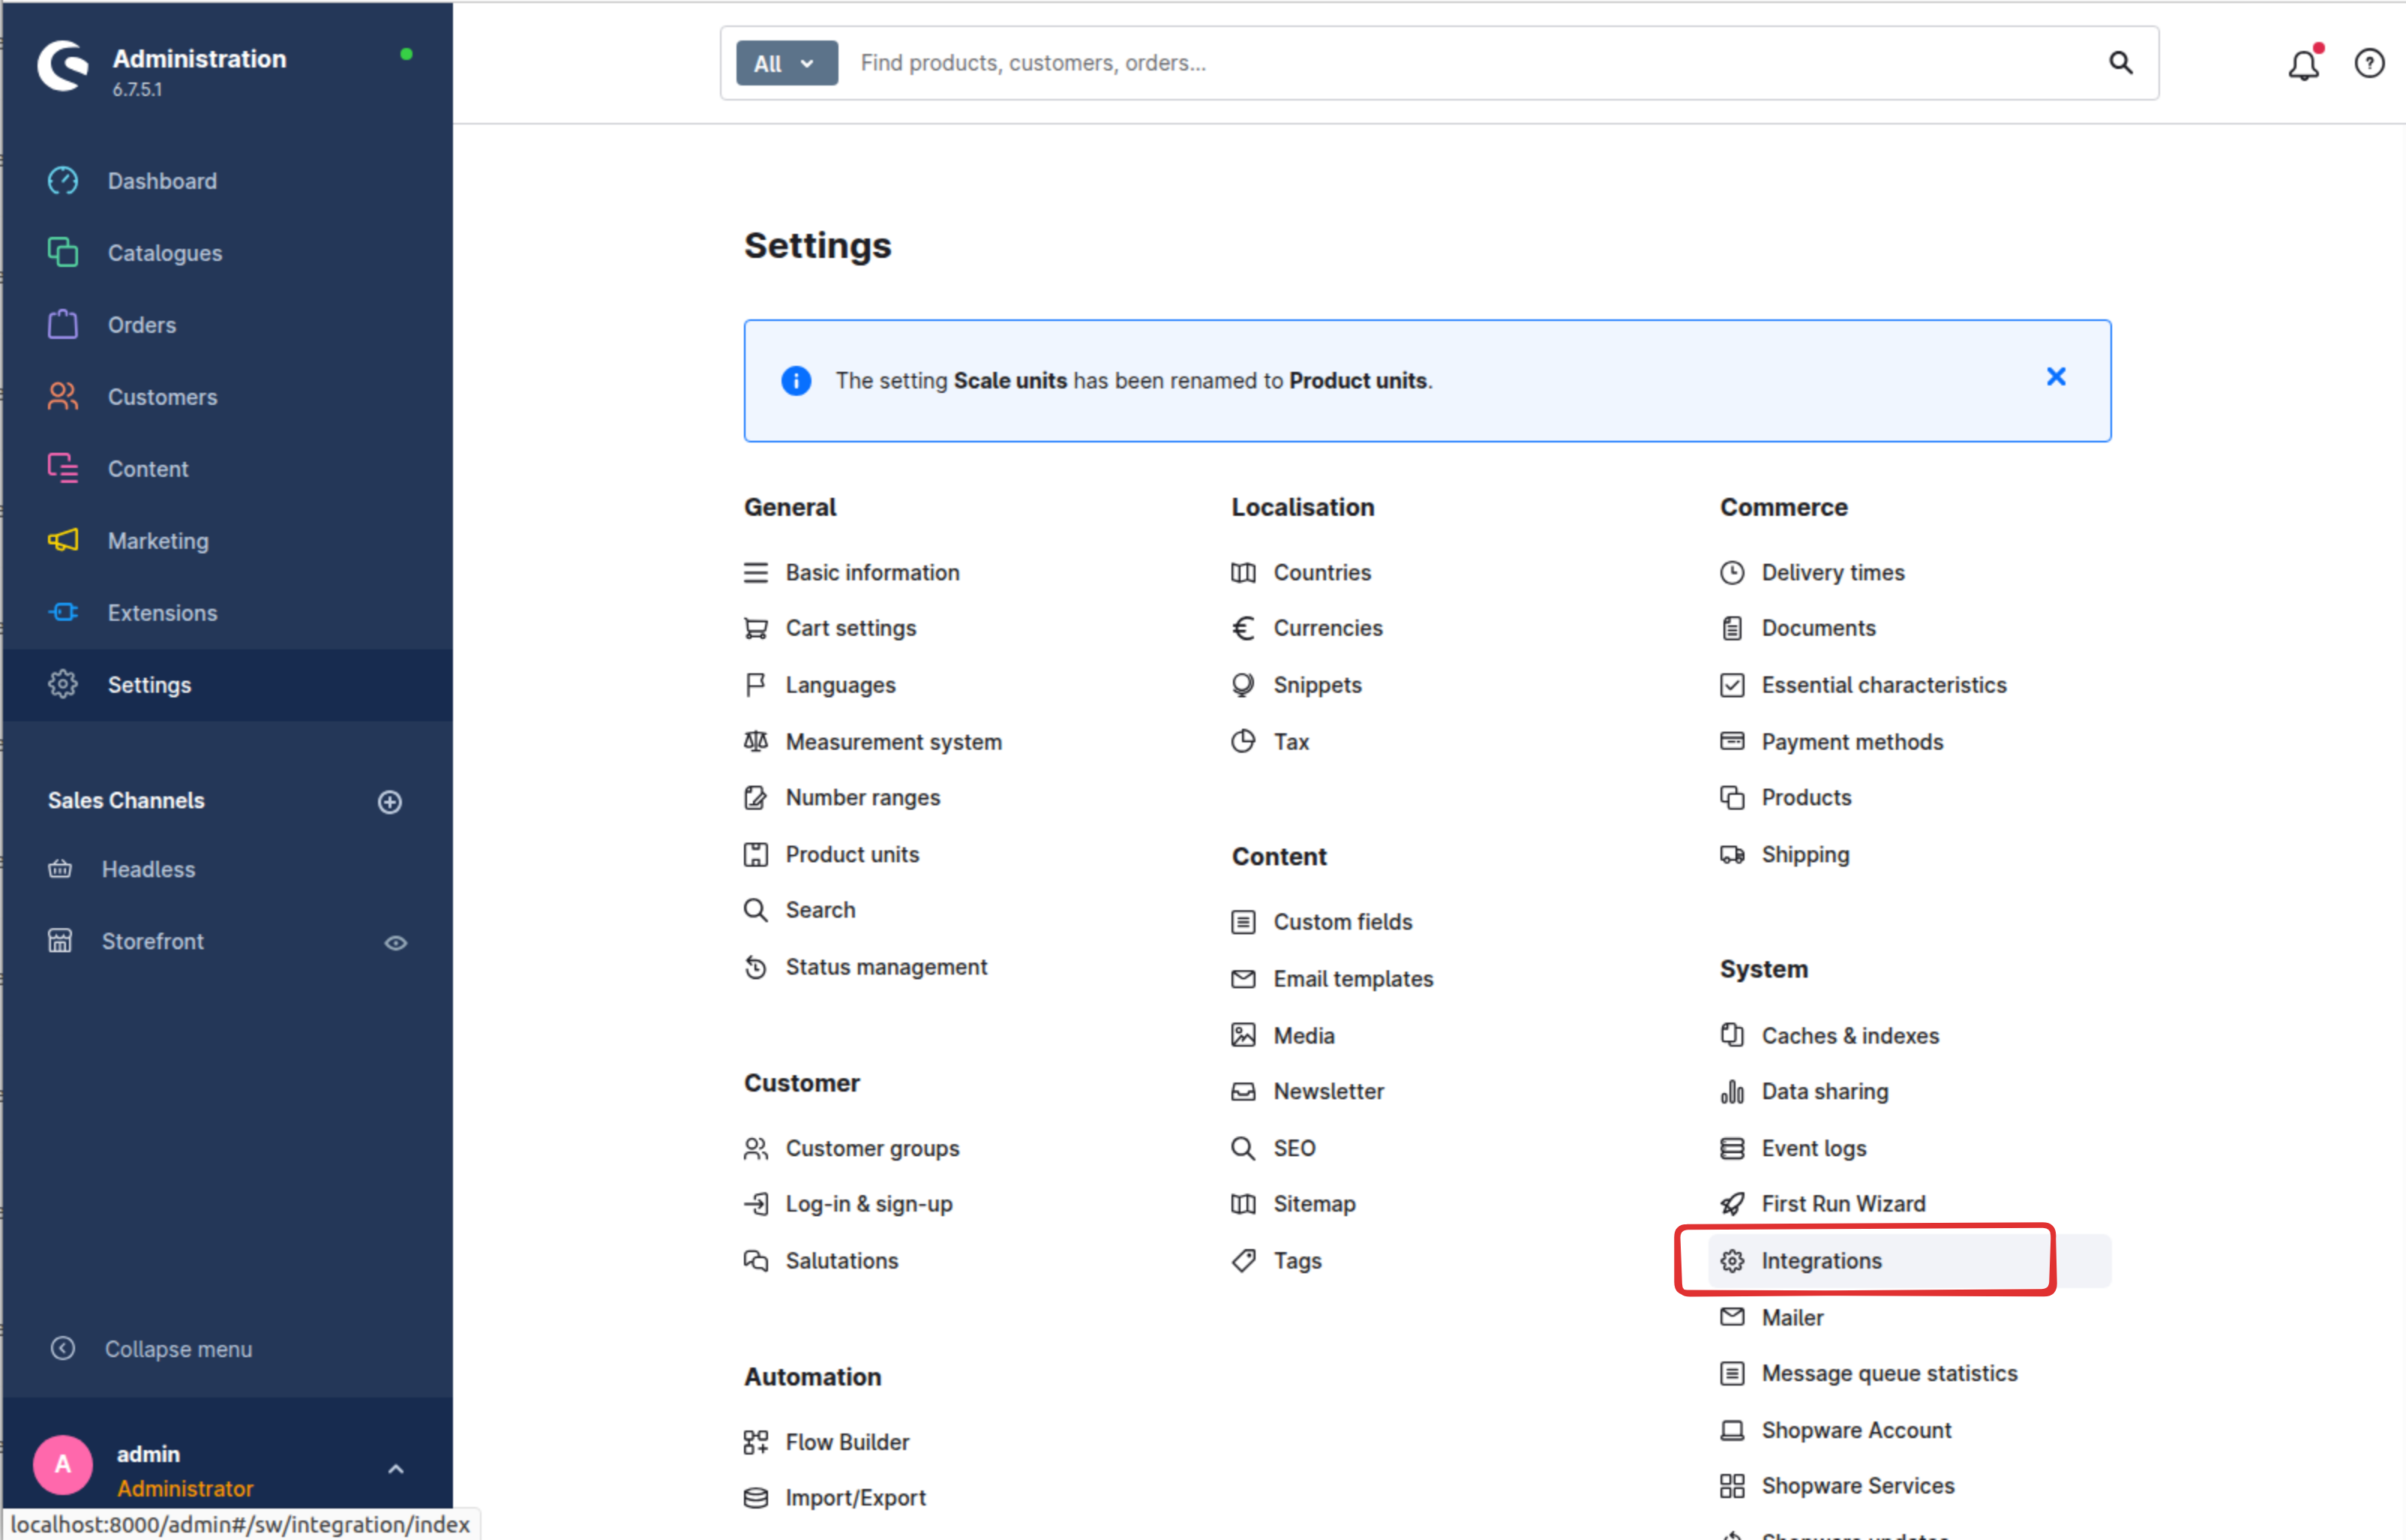
2.1 Navigate to Integrations
Go to Settings → System → Integrations in the left sidebar menu.
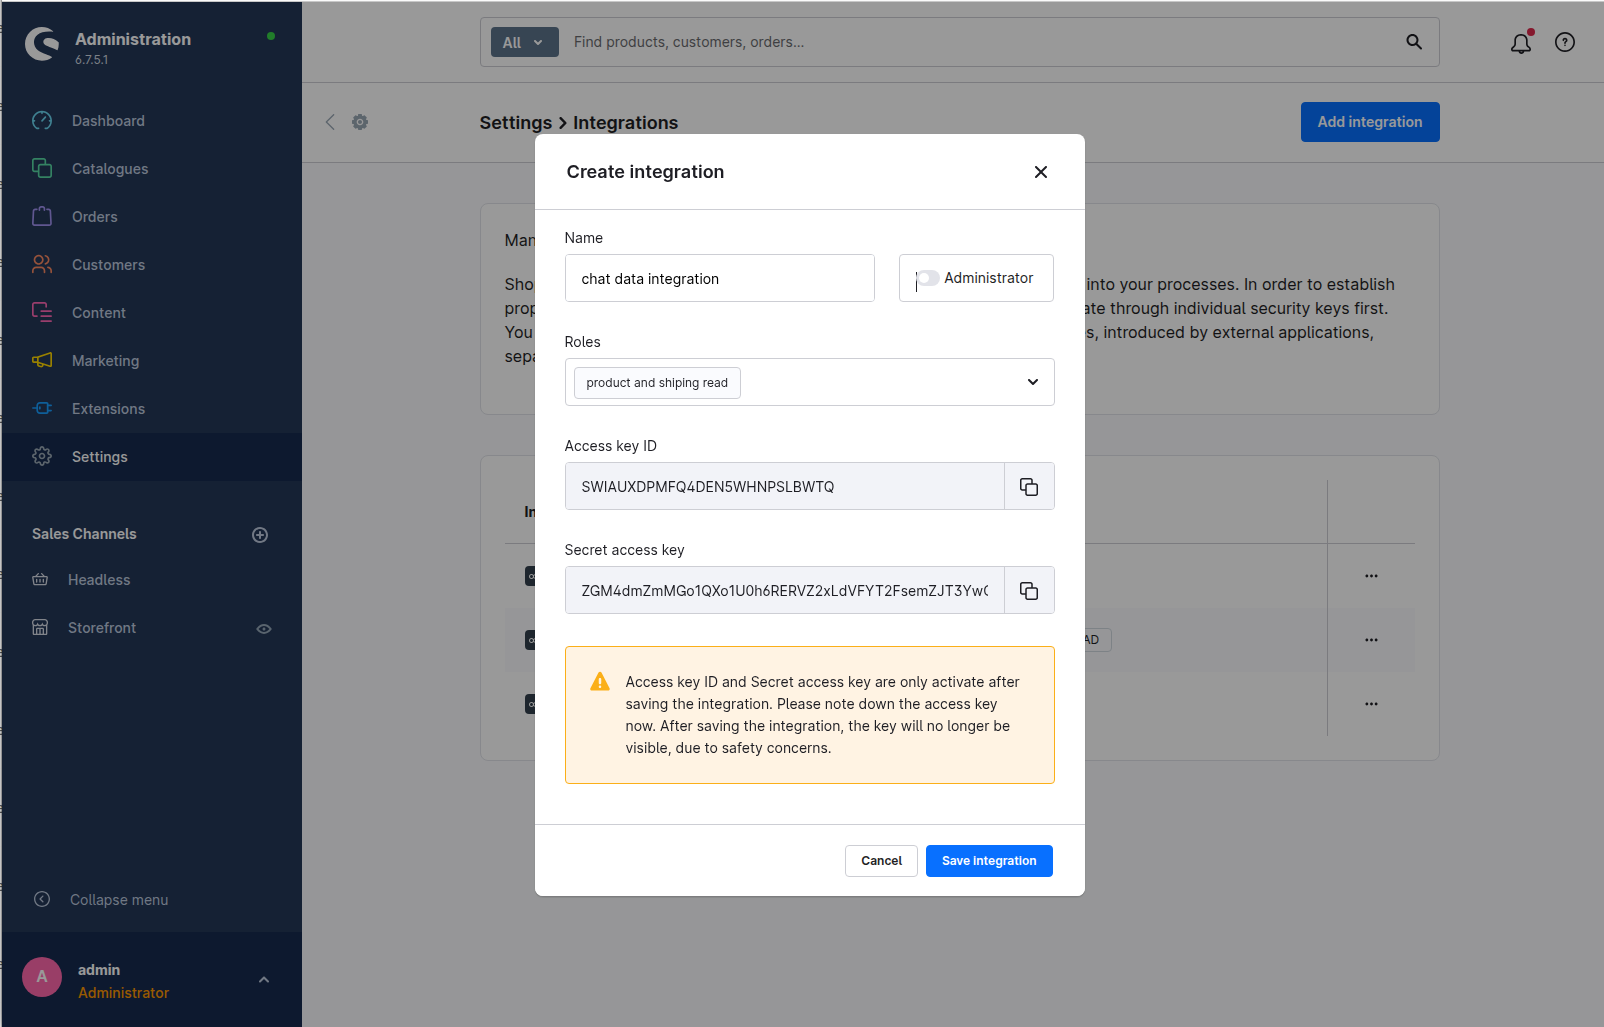
2.2 Create New Integration
Click the Add integration button to begin creating a new integration. Fill in the integration details:
- Name: Enter a descriptive name like "Chat Data Product Import"
- Administrator: Leave unchecked (we will use the role-based permissions)
- Roles: Select the role you created in Step 1 (e.g., "Chat Data Product Read")
2.3 Save and Copy Credentials
Before saving the integration, your Access Key ID and Secret Access Key will be displayed. Make a copy of these credentials as you'll need them for importing products into Chat Data.
Step 3: Import Products From Shopware Store
Navigate to the Sources tab and select the Product tab as the source. Select "Shopware Store" from the platform options, then enter your Shopware store domain (without https:// prefix) along with the Access Key ID and Secret Access Key you obtained in Step 2. Press the Import button to begin importing products from your Shopware store.
By clicking on the eye icon, you can access a detailed view of each product's information. Should you find any discrepancies, kindly correct the product details within your Shopware admin panel and proceed to re-import the products. Please note, direct inline modifications of product details within the product modal are not permitted.
You have the option to remove any undesired products, retaining only those you wish to include in your chatbot's knowledge base. Once you have verified the accuracy of all product details, proceed to click the Create/Retrain Chatbot button to initiate the agent training process.
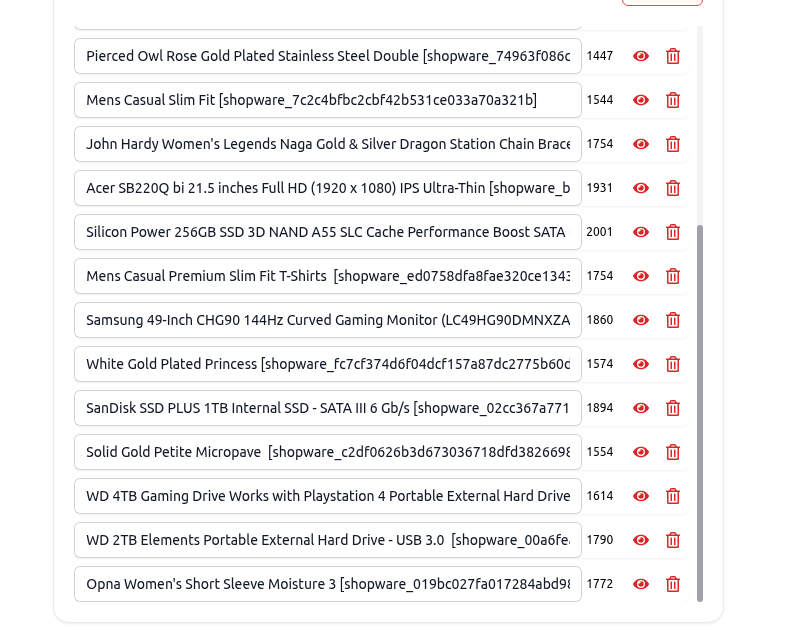
Below is a sample view of an imported Shopware product, representing the information we will submit to the agent for training purposes.
Google Drive
Train your agent with documents and spreadsheets directly from Google Drive. This feature allows you to leverage existing content from any Google Drive accounts you have access to.
Importing Google Drive Files
To import files from Google Drive:
- Navigate to the Sources tab and select Google Drive
- Click the Import from Google Drive button
- Grant access permissions when prompted
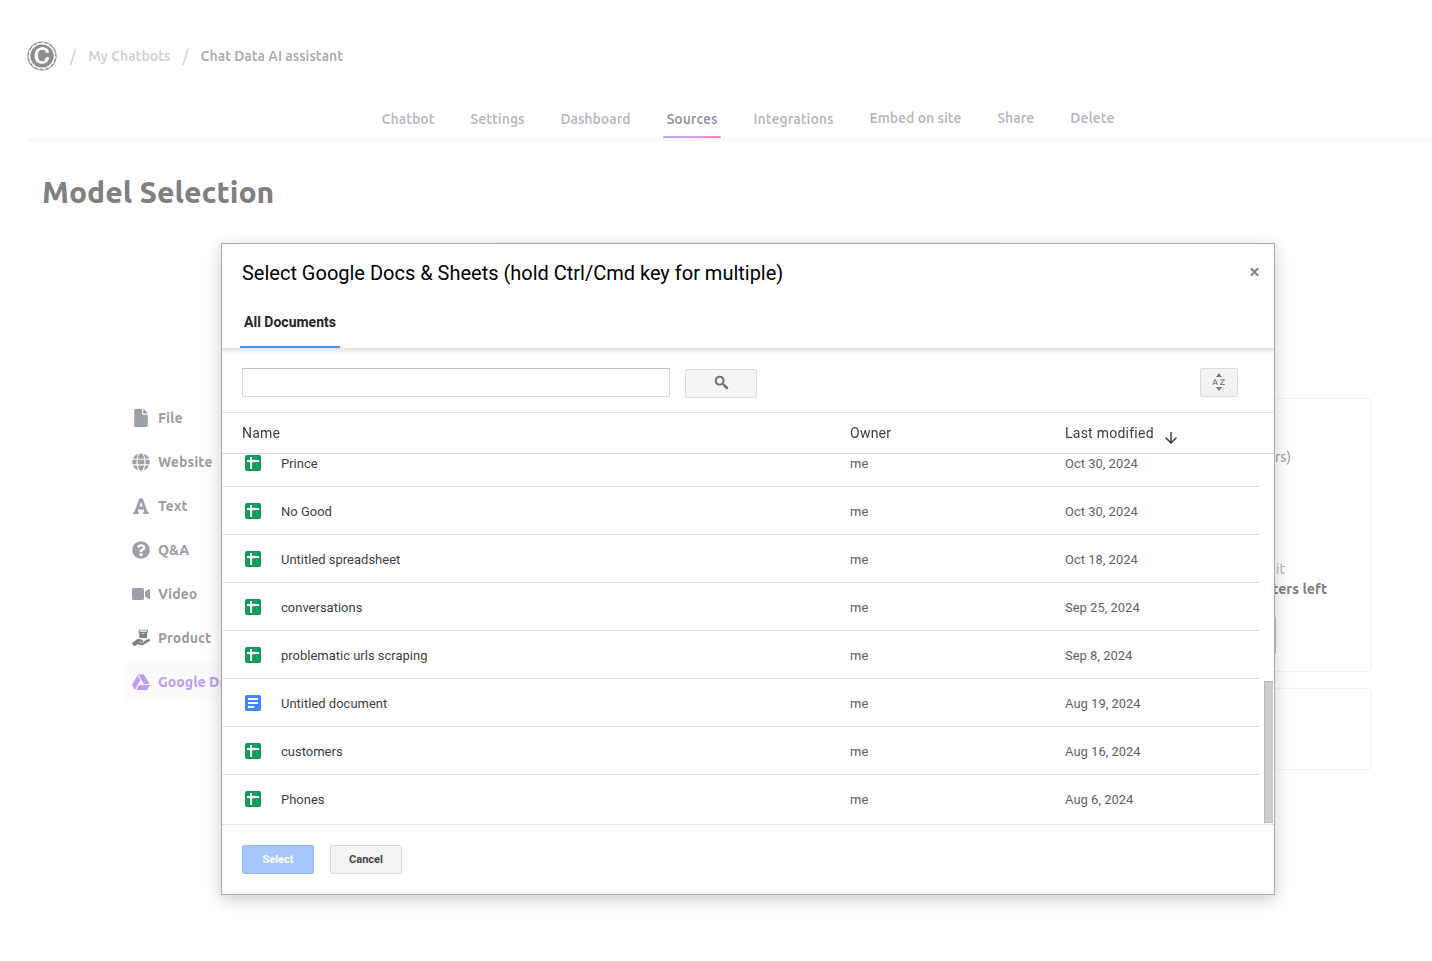
- Use the Google Drive Picker modal to select multiple documents and spreadsheets
- Review the imported content by clicking the eye icon next to each file
- Click Create/Retrain Chatbot to begin training with the imported files
Supported File Types
We currently support the following Google Drive file types:
- Google Docs - Processed similarly to .docx files
- Google Sheets - Processed similarly to .csv files
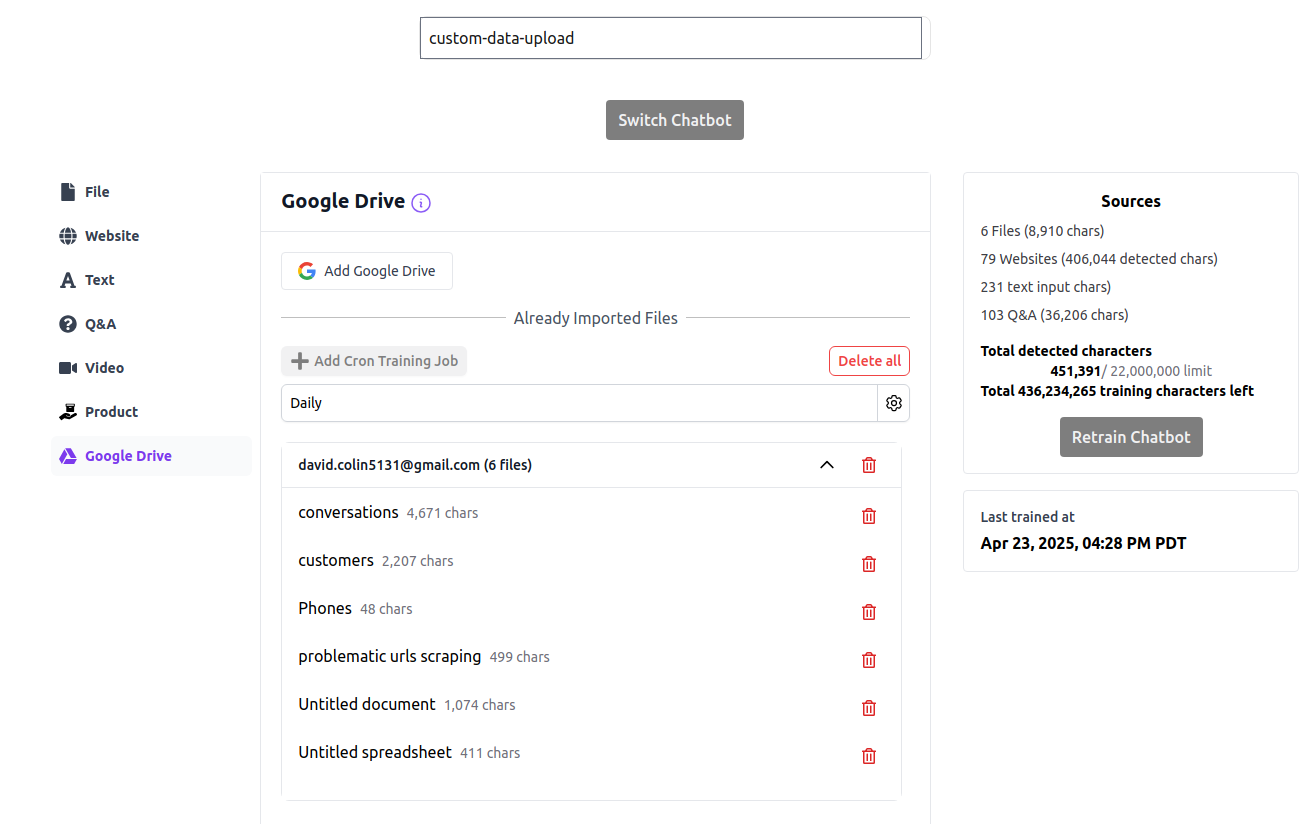
Automated Retraining with Google Drive
Set up automatic retraining to keep your agent updated with the latest versions of your Google Drive documents:
- Navigate to the Sources tab and select Google Drive
- Click the Add Cron Training Job button
- Select your preferred frequency: Daily, Weekly, or Monthly
- Click Save to activate the scheduled retraining
Important Notes About Automatic Retraining
- You can only create one Google Drive cron job per agent
- All previously imported Google Drive files will be retrained at the scheduled frequency
- If a file is removed from your Google Drive, the agent will continue using the last imported version
- To remove a file's content from your agent's knowledge base, you must manually delete it from your sources
Notion
Train your agent with pages directly from Notion. This feature allows you to leverage content from any Notion workspace you have access to.
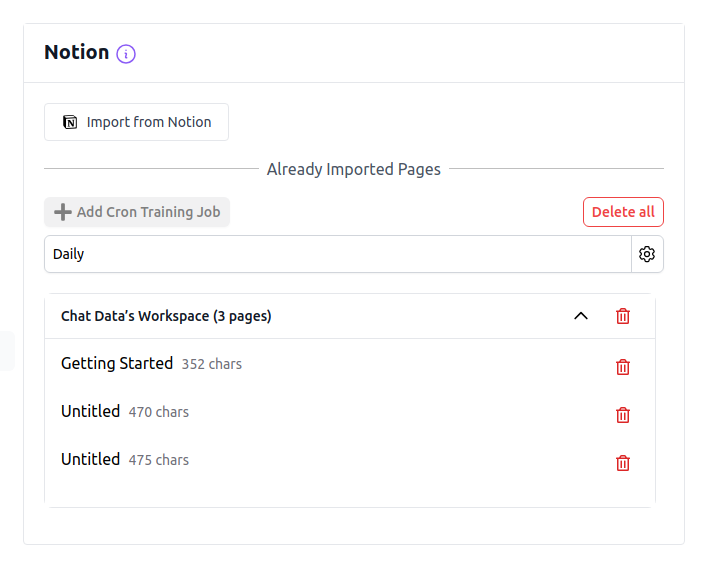
Import Pages From Notion
To import pages from Notion:
- Navigate to the Sources tab and select Notion
- Click the Import from Notion button
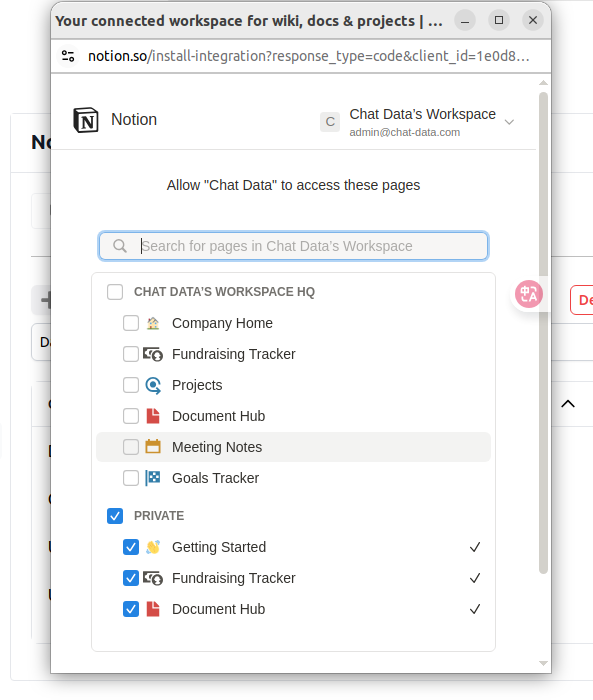
- After confirmation, select the documents from your Notion workspace
Important
- Your selection determines which Notion pages Chat Data can access across all your agents and any Chat Data accounts linked to this Notion workspace
- Always keep previously selected pages for active agents selected
- Never deselect pages that are already selected
- If you only need a subset of pages, you can delete unwanted pages after importing
- Click the Allow Access button in the Notion page picker modal to begin importing
Note
- Notion access permissions may take up to 20 seconds to propagate
- If files don't appear after importing, Notion may not have fully processed the access grant
- In this case, repeat from step 2 with the same page selection, which typically resolves the issue
- Review the imported content by clicking the eye icon next to each file
- Click Create/Retrain Chatbot to begin training with your Notion pages
Automated Retraining with Notion
Set up automatic retraining to keep your agent updated with the latest versions of your Notion pages:
- Navigate to the Sources tab and select Notion
- Click the Add Cron Training Job button
- Select your preferred frequency: Daily, Weekly, or Monthly
- Click Save to activate the scheduled retraining
Important Notes About Automatic Retraining
- You can create only one Notion cron job per agent
- All previously imported Notion pages will be automatically retrained at your scheduled frequency
- If a page is removed from your Notion workspace, the agent will continue using the last imported version
- To remove content from your agent's knowledge base, you must manually delete it from your sources
For plan-specific limitations on cron job frequency, please refer to our pricing page.