Advanced Use Cases
Build AI Email Followup Pipeline
By leveraging both Chat Data AI agents and the Make flow builder, you can create a pipeline that:
- Automatically collects lead contact information and conversation messages in your Google Spreadsheet
- Drafts personalized followup emails for each engaged lead
Goal
Our objective is to create an email followup flow that will:
- Draft emails based on your company's knowledge base following an email drafting system prompt
- Generate content based on previous conversations between leads and your customer support AI agent
- Allow you to simply review, modify if needed, and approve the drafted emails before sending them out
Prerequisites
- A Chat Data account with webhook, API features and the ability to create at least two agents
- A Google account
- A free Make account with scenario-building capabilities

Overview of the Scenario
This pipeline consists of two scenarios:
- The first scenario collects conversation messages containing lead information and stores both the conversations and lead details in your Google Spreadsheet, where they await processing by the second scenario.
- The second scenario processes the collected messages and lead information stored in your Google Spreadsheet, generates draft emails based on previous conversations, and stores these emails back in the spreadsheet.
Let's explore each scenario in detail.
Conversation and Leads Collection
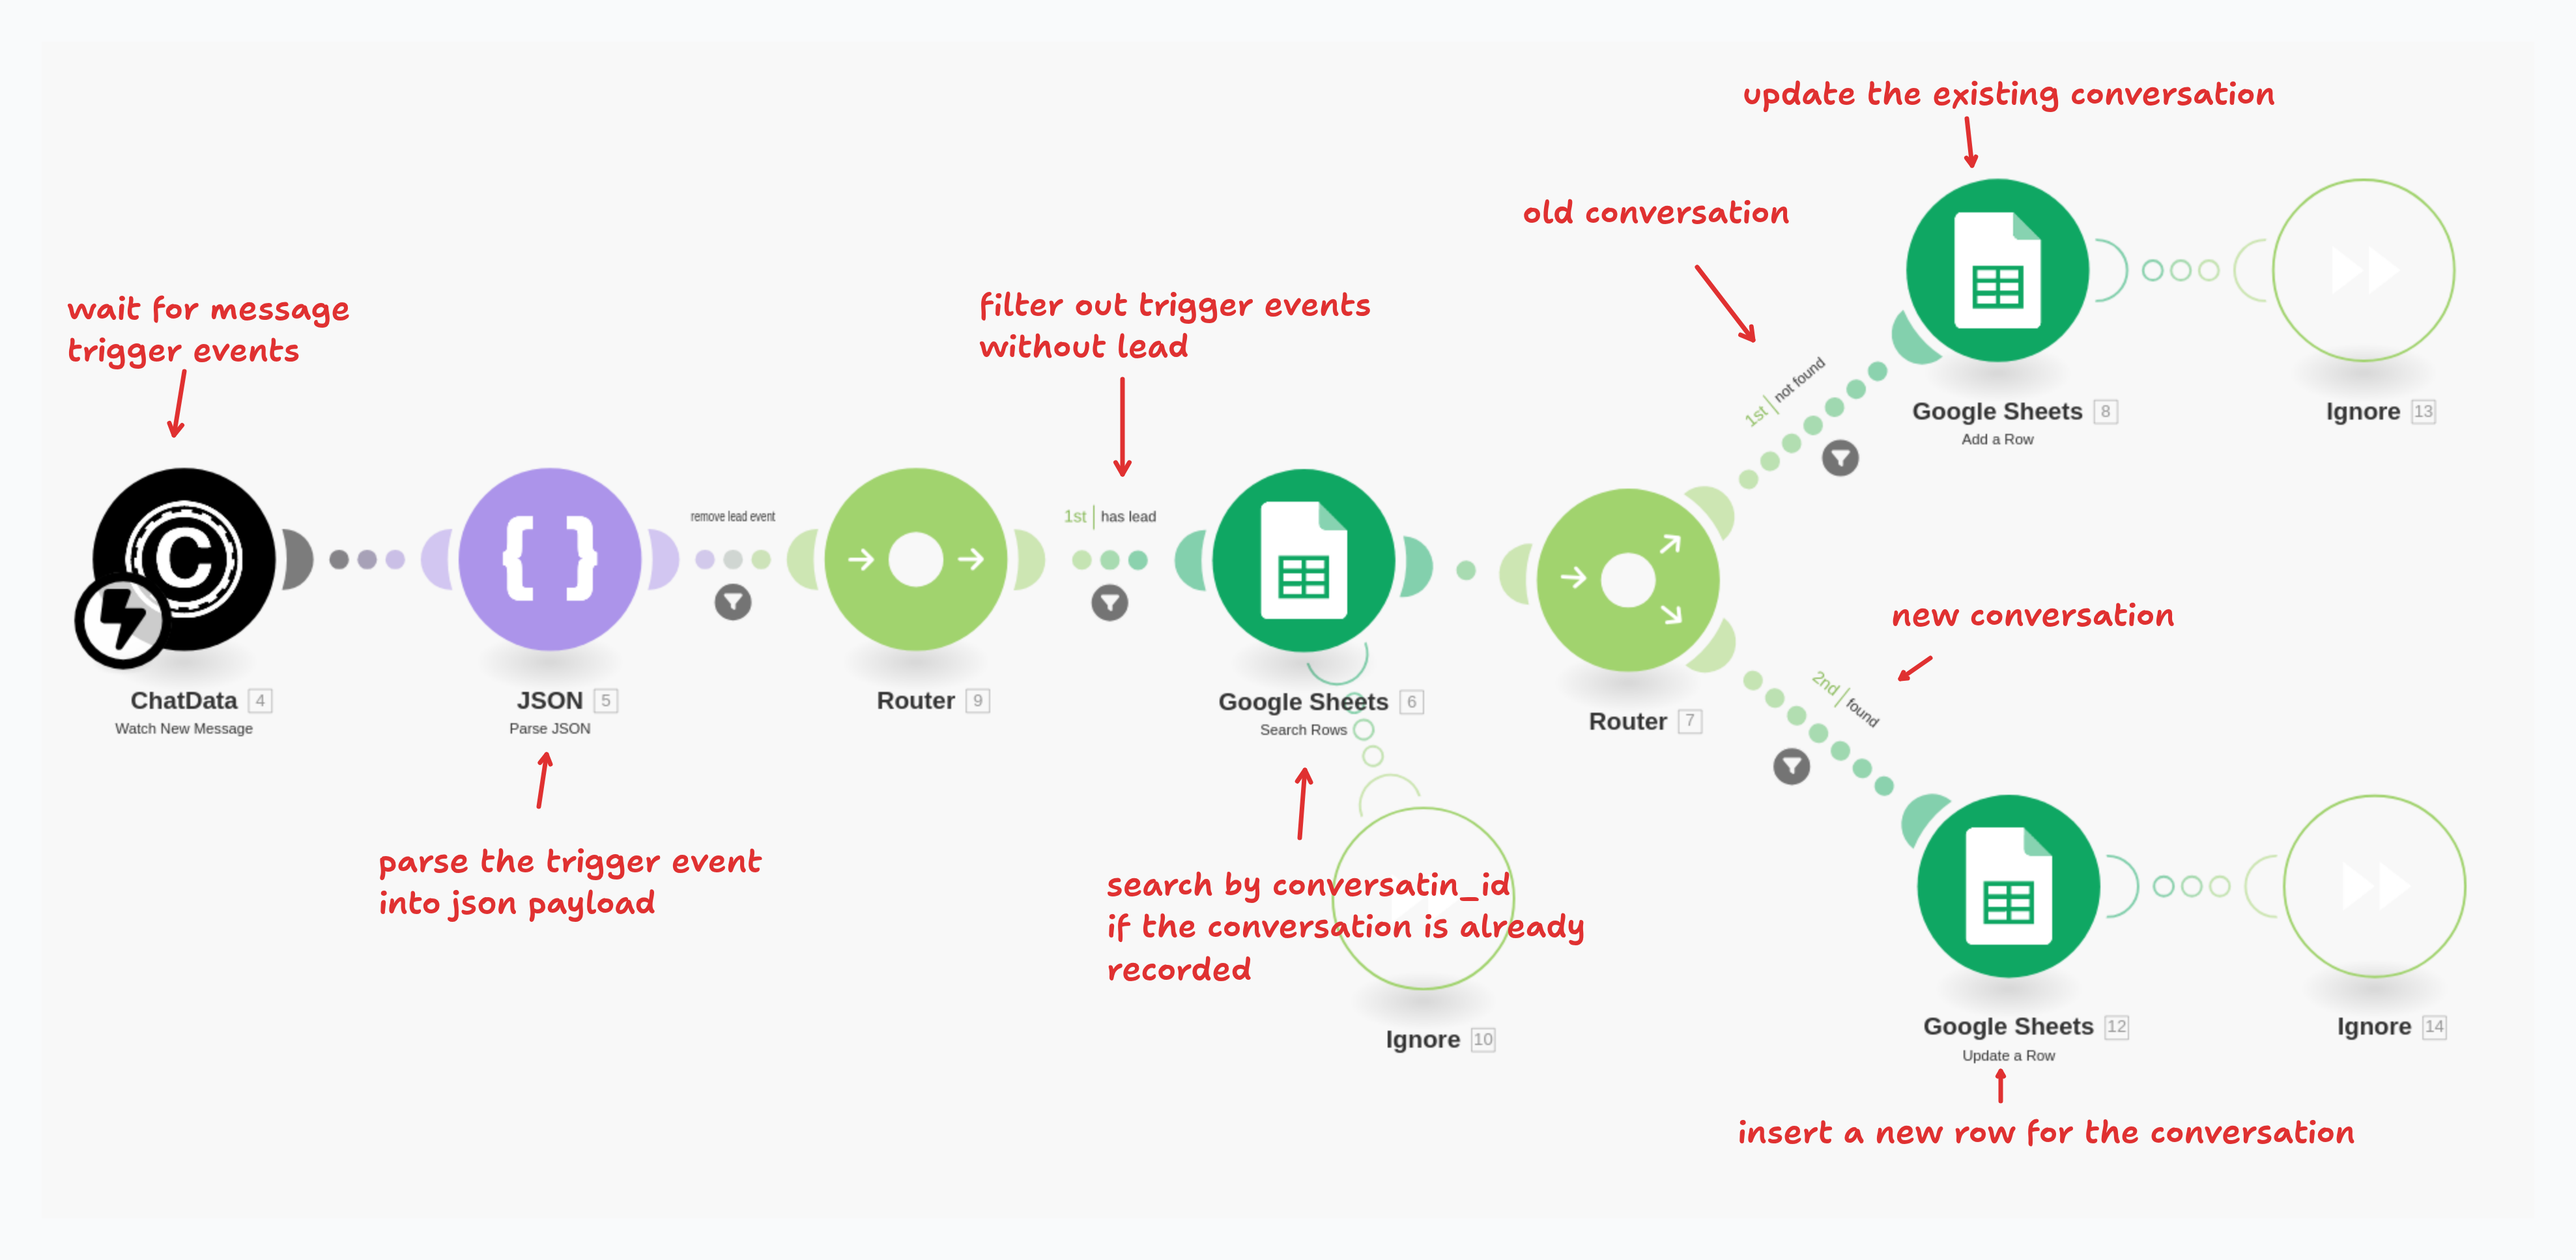
- When a user chats with the AI agent, a
chatevent with messages is delivered to theWatch New Messagemodule. - The delivered
chatevent payload is parsed into JSON format, and we verify if lead information is included in the event payload. - Only
chatevents containing lead information proceed through the remaining flow; events without leads are filtered out. - The system searches the Google Spreadsheet to check if the
chatevent with the given conversation_id has already been recorded. - If it exists, we update the existing row with the new messages. If not, we insert the messages into the spreadsheet as a new row. In both cases, we set the
processedcolumn toFALSE, signaling that this row should be processed by thefollowup email generation flow.
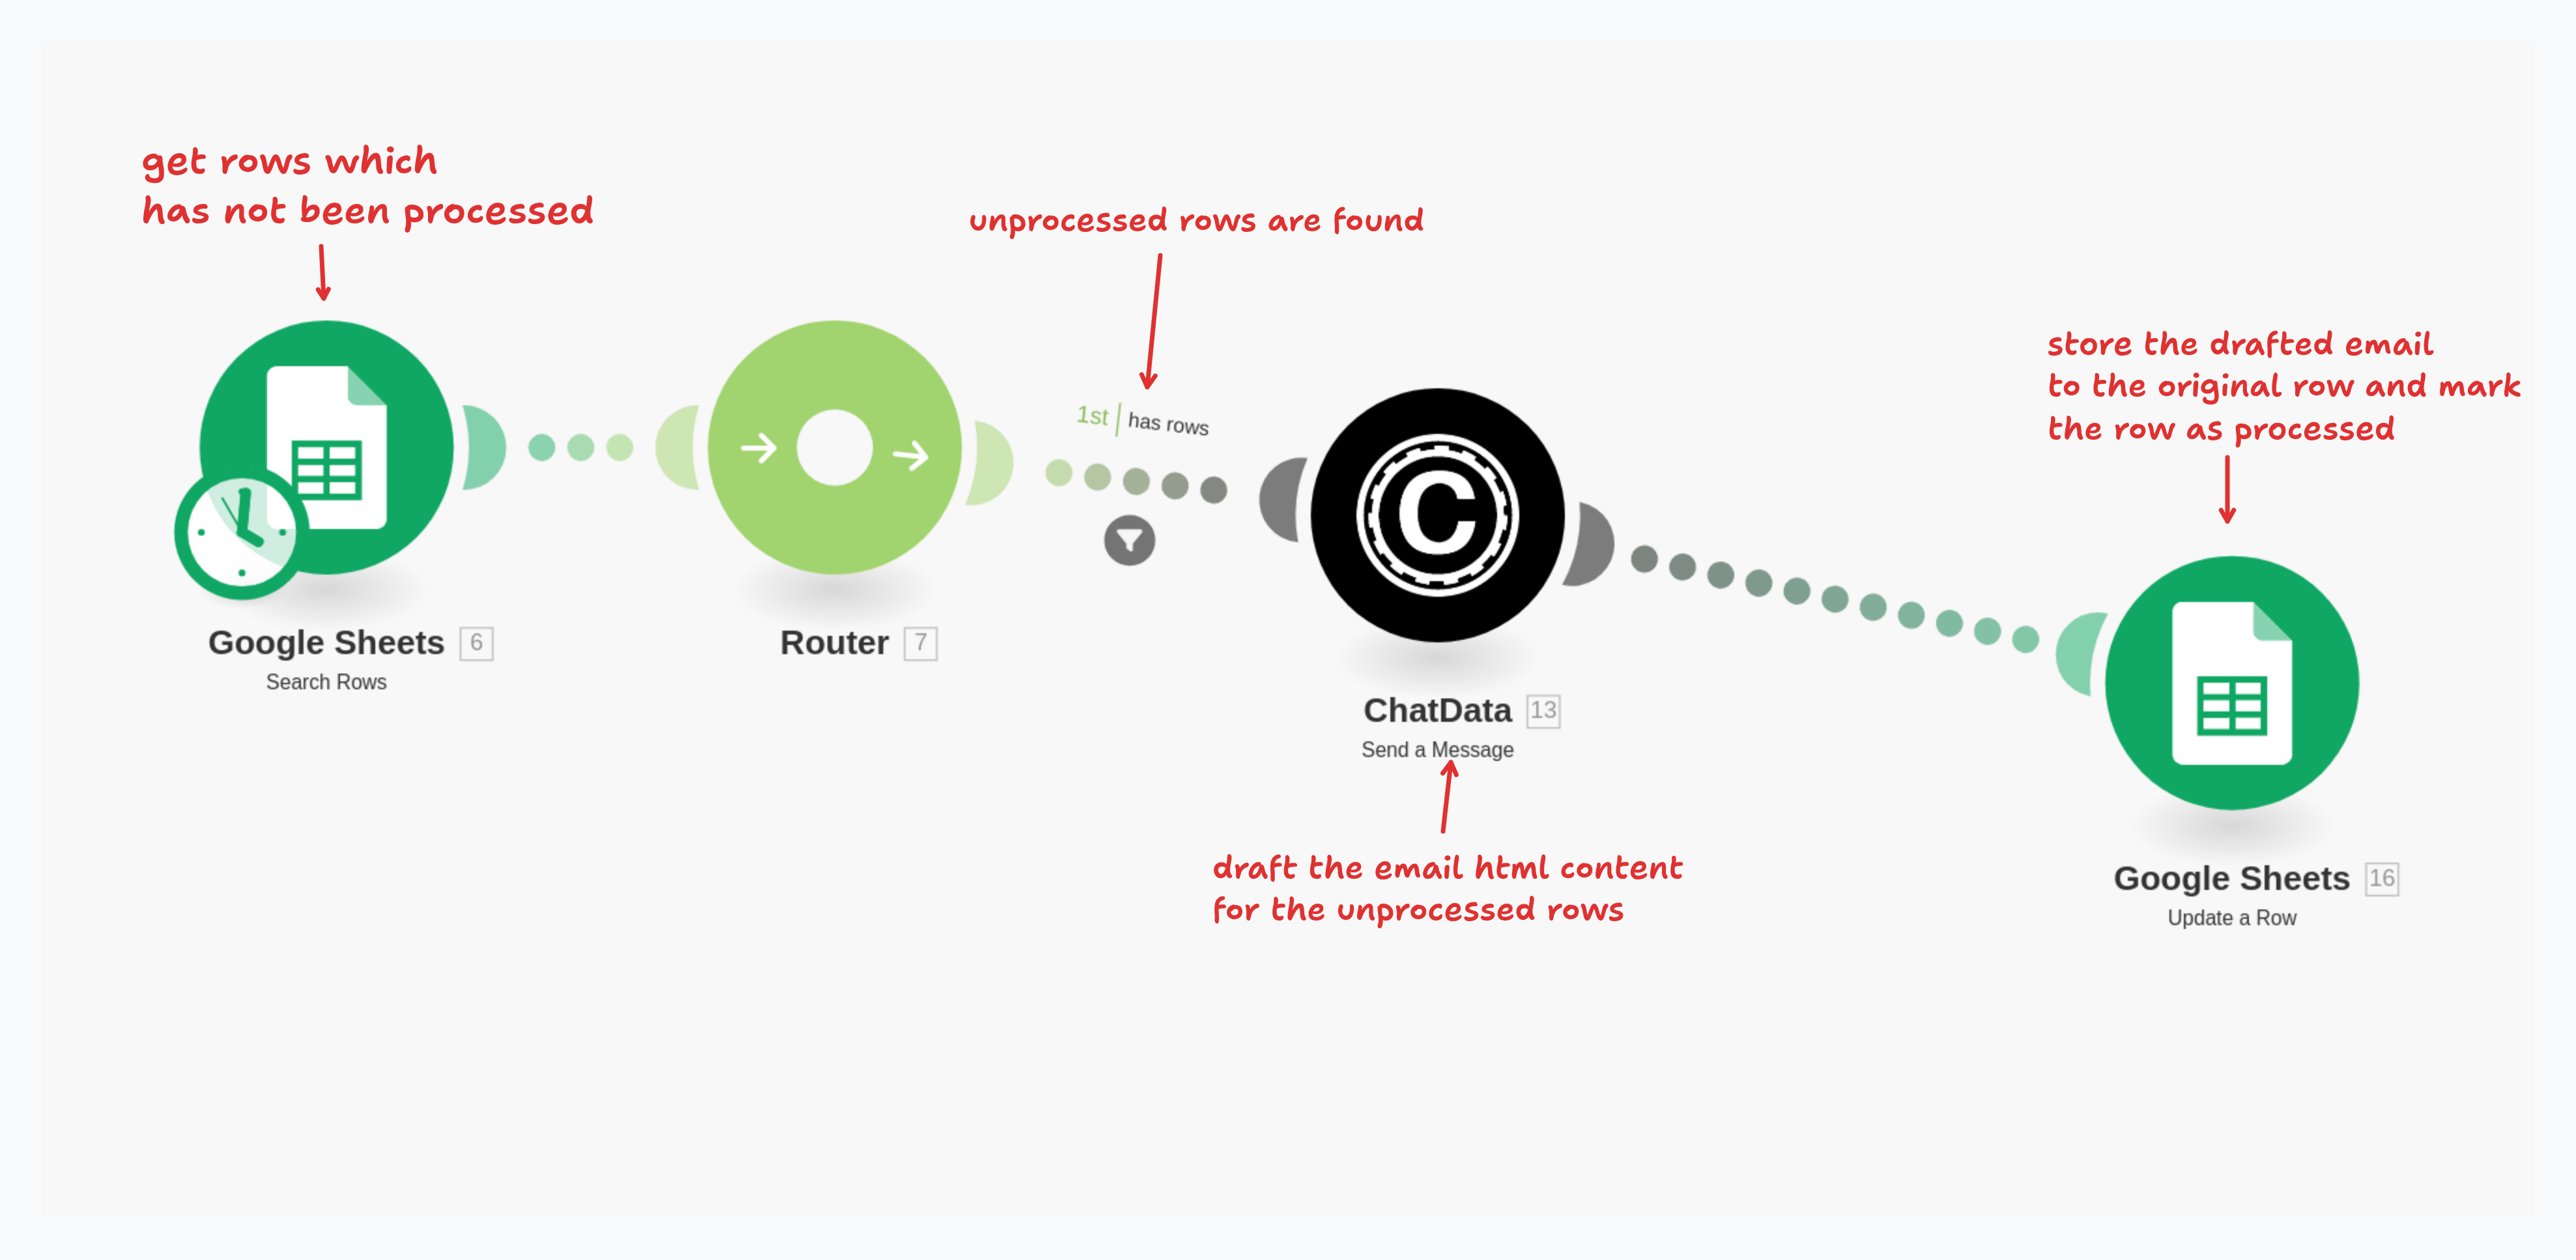
- This flow regularly checks for new rows where the
processedcolumn is set to false. - When unprocessed rows are found, the message history in the column is sent to the email drafting chatbot to draft an email in HTML format.
- The drafted email HTML content is then added back to the same row.
- The processed row is updated with the drafted email, and the
processedcolumn is set toTRUEso that this row won't be processed again.
Blueprint Download
Download the Record Conversations With Leads BlueprintDownload the Generate Followup Email BlueprintModule Setup Guide
Let's examine the configuration of each module in detail.
Collecting Leads and Conversation Flow
New Message Trigger
Adding this trigger will create a webhook event in your chatbot webhook settings as demonstrated in Webhook Setup. After creating this trigger, click the run this module only button and chat with your AI agent once to trigger a test chat event. After chatting with the AI agent, the new message trigger will receive the chat event delivered to this module as shown below: 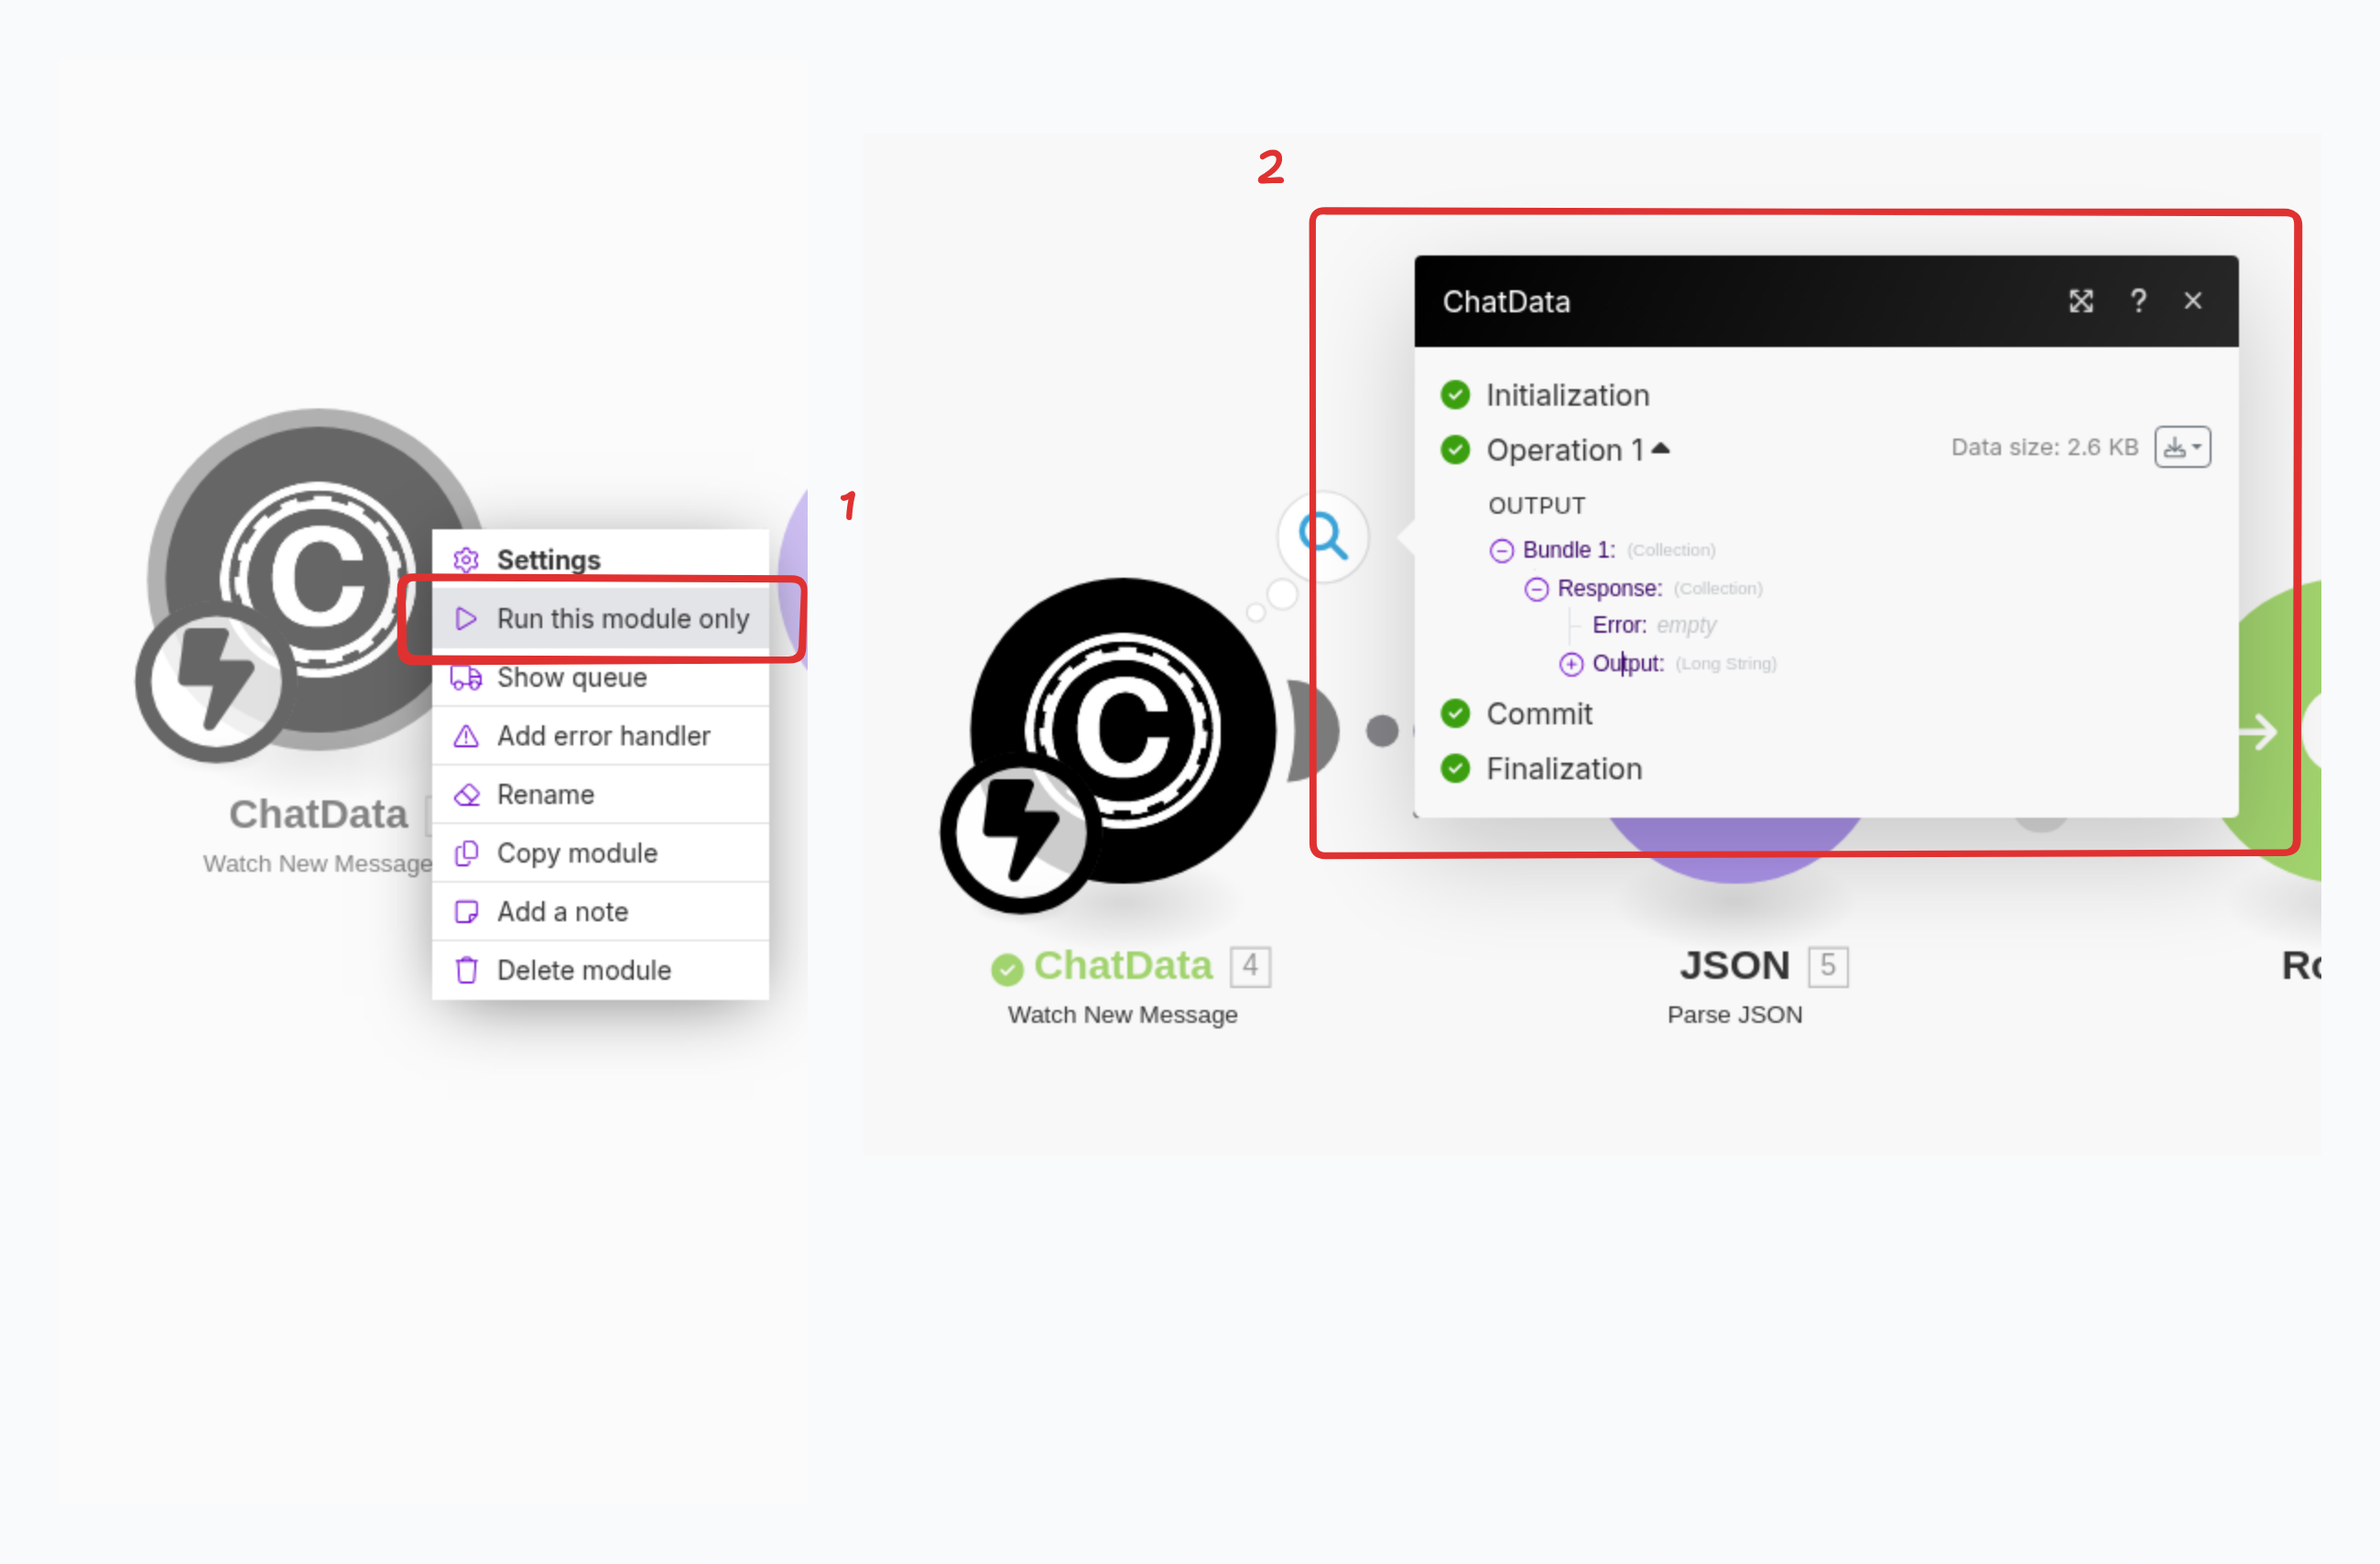
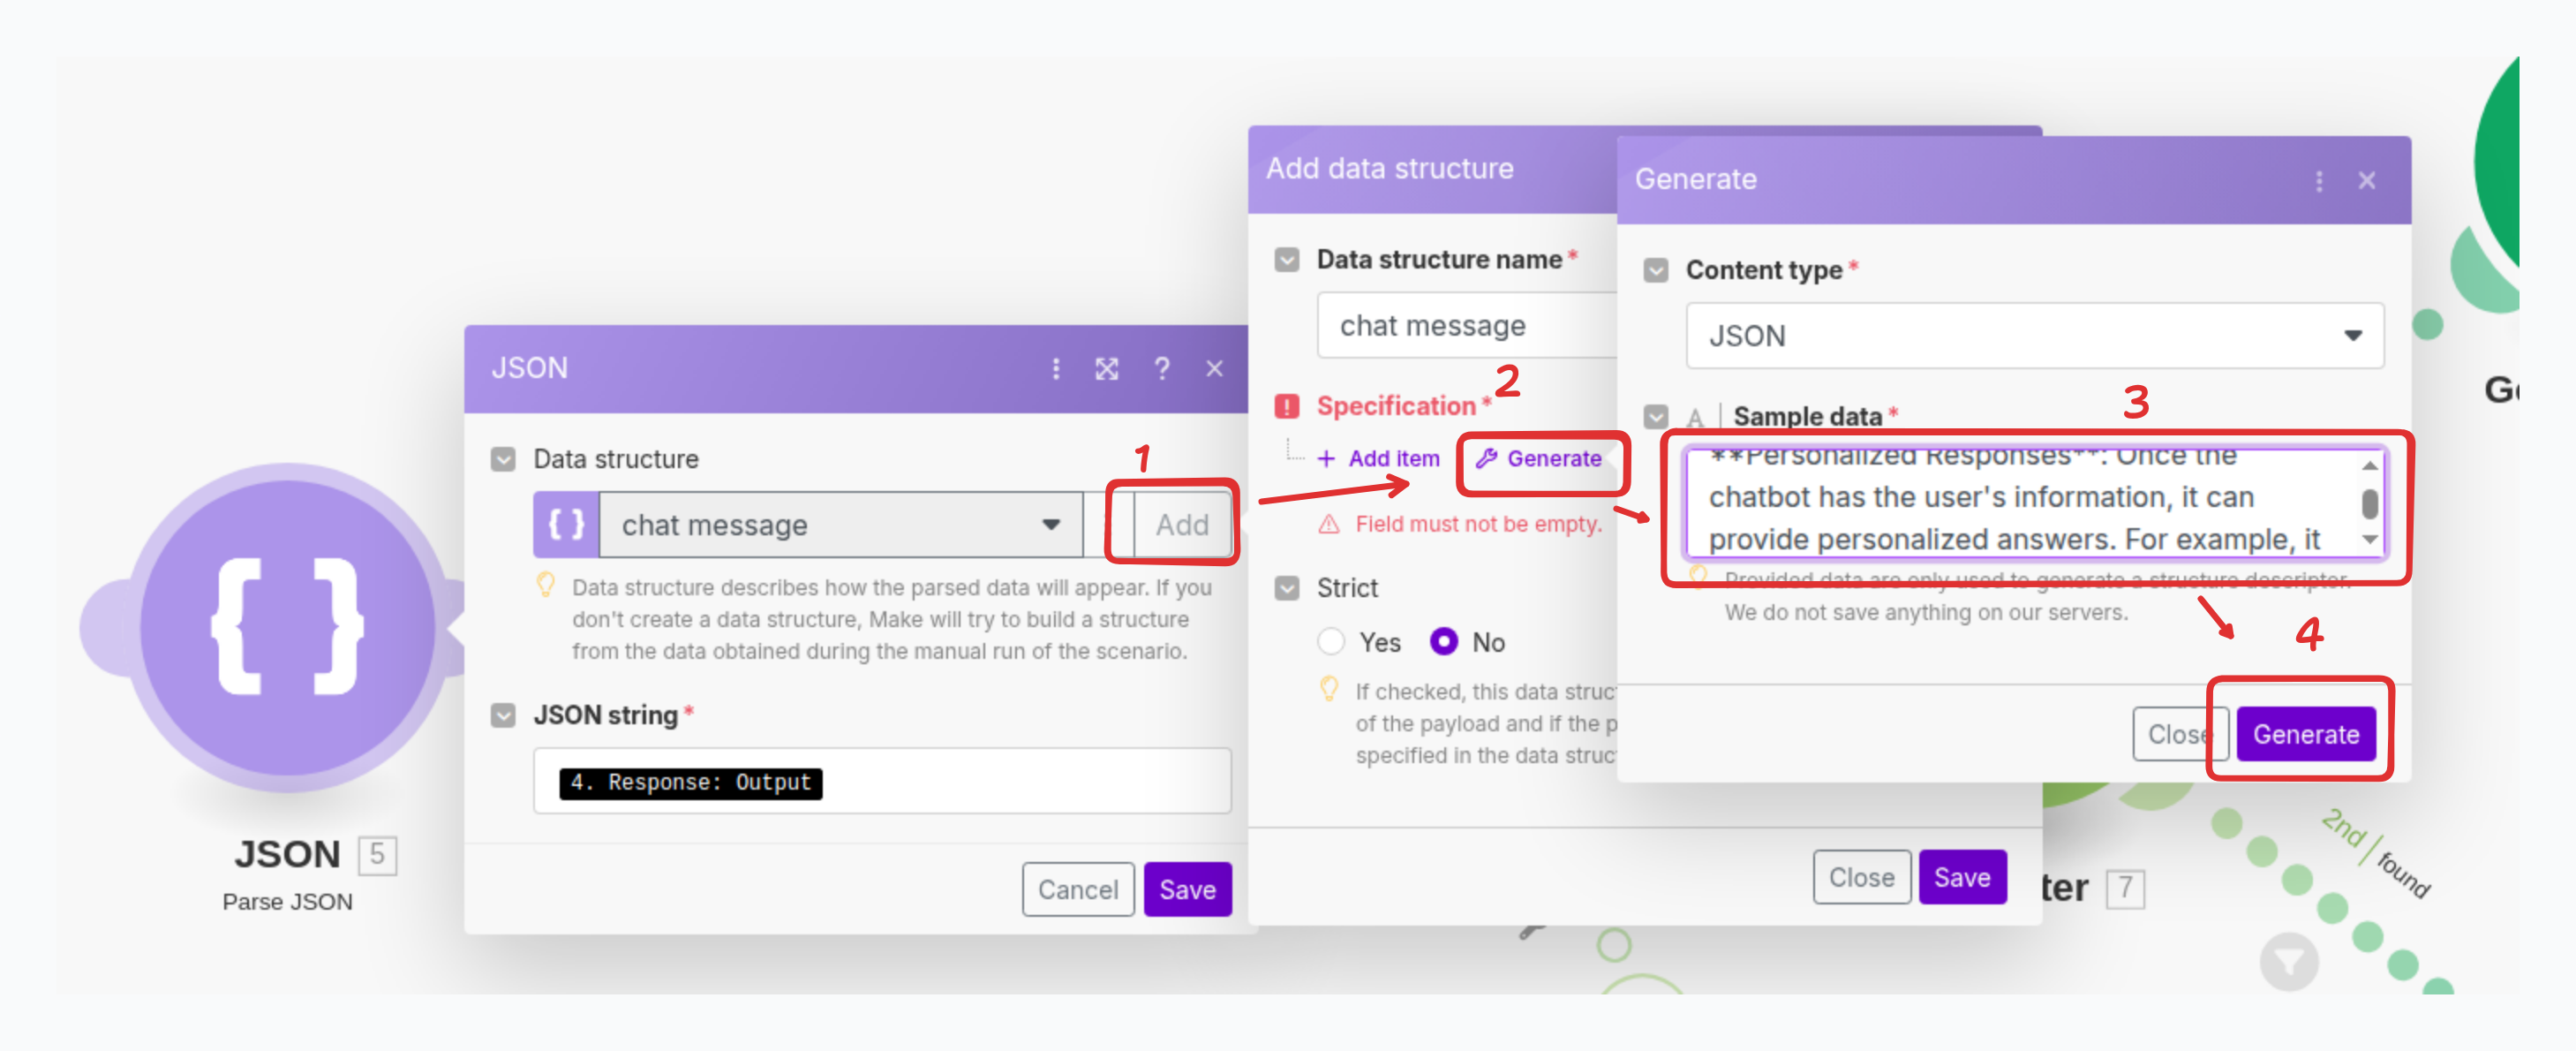
Parse Event as JSON
By default, the output of the trigger event is a string. Therefore, we need to use the JSON parse module to convert the string into a defined structure. To create this structure, copy the output from the previous testing event
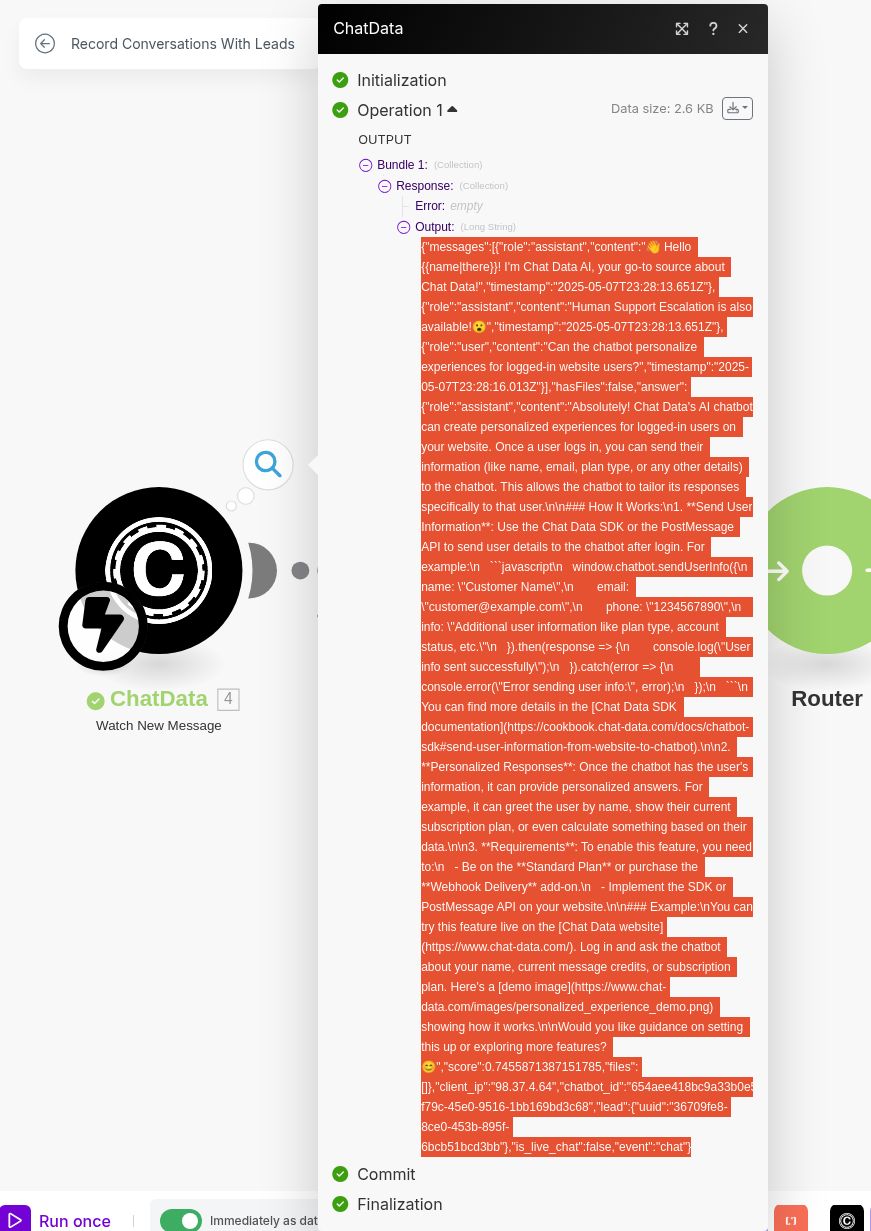
and click the generate button to generate the structure.
Filter Out Unrelated Events
To ensure high-quality conversations for email drafting, we filter out events that:
- Are not
chattype events - Don't contain collected lead information

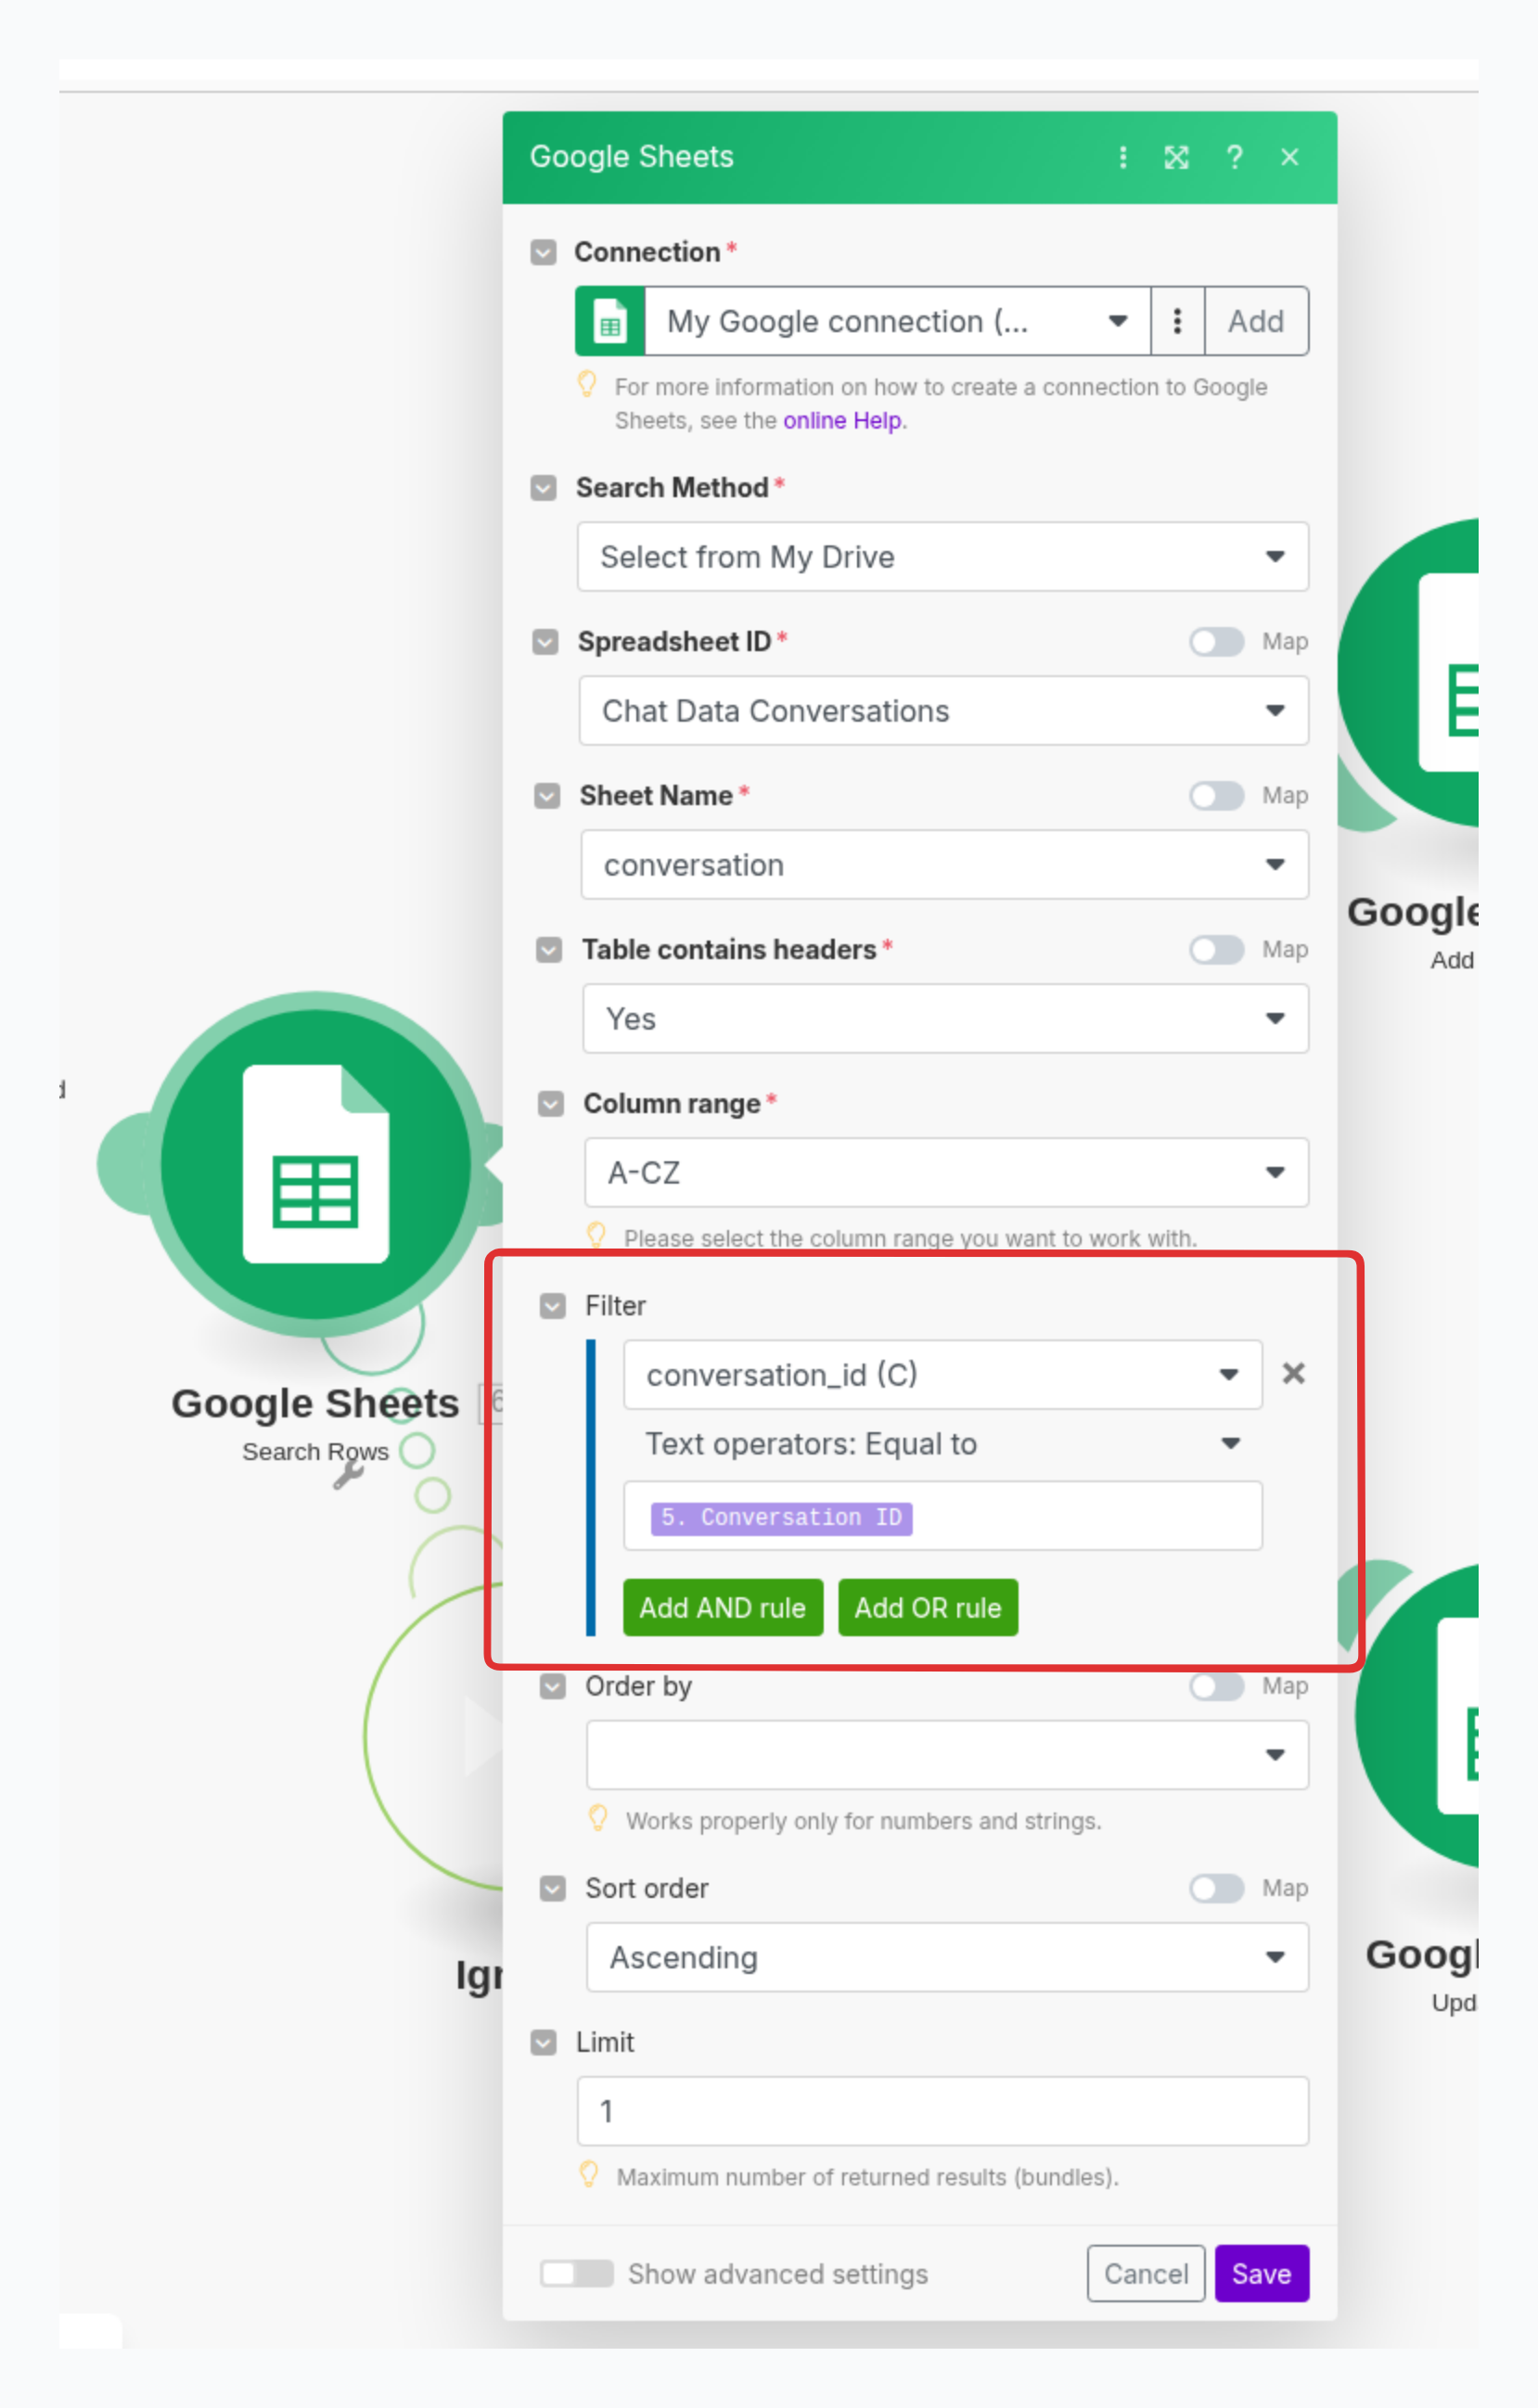
Search Google Sheet by Conversation ID
After filtering qualified events, you'll save them to Google Spreadsheet. To determine whether to add a new row or update an existing one, search for previous records of the same conversation. Use the conversation_id field to find if an existing row exists for the conversation.
Update Or Insert the Conversation
Depending on whether the conversation ID is found, you'll either insert the conversation as a new row or update the existing row with the new conversation data. 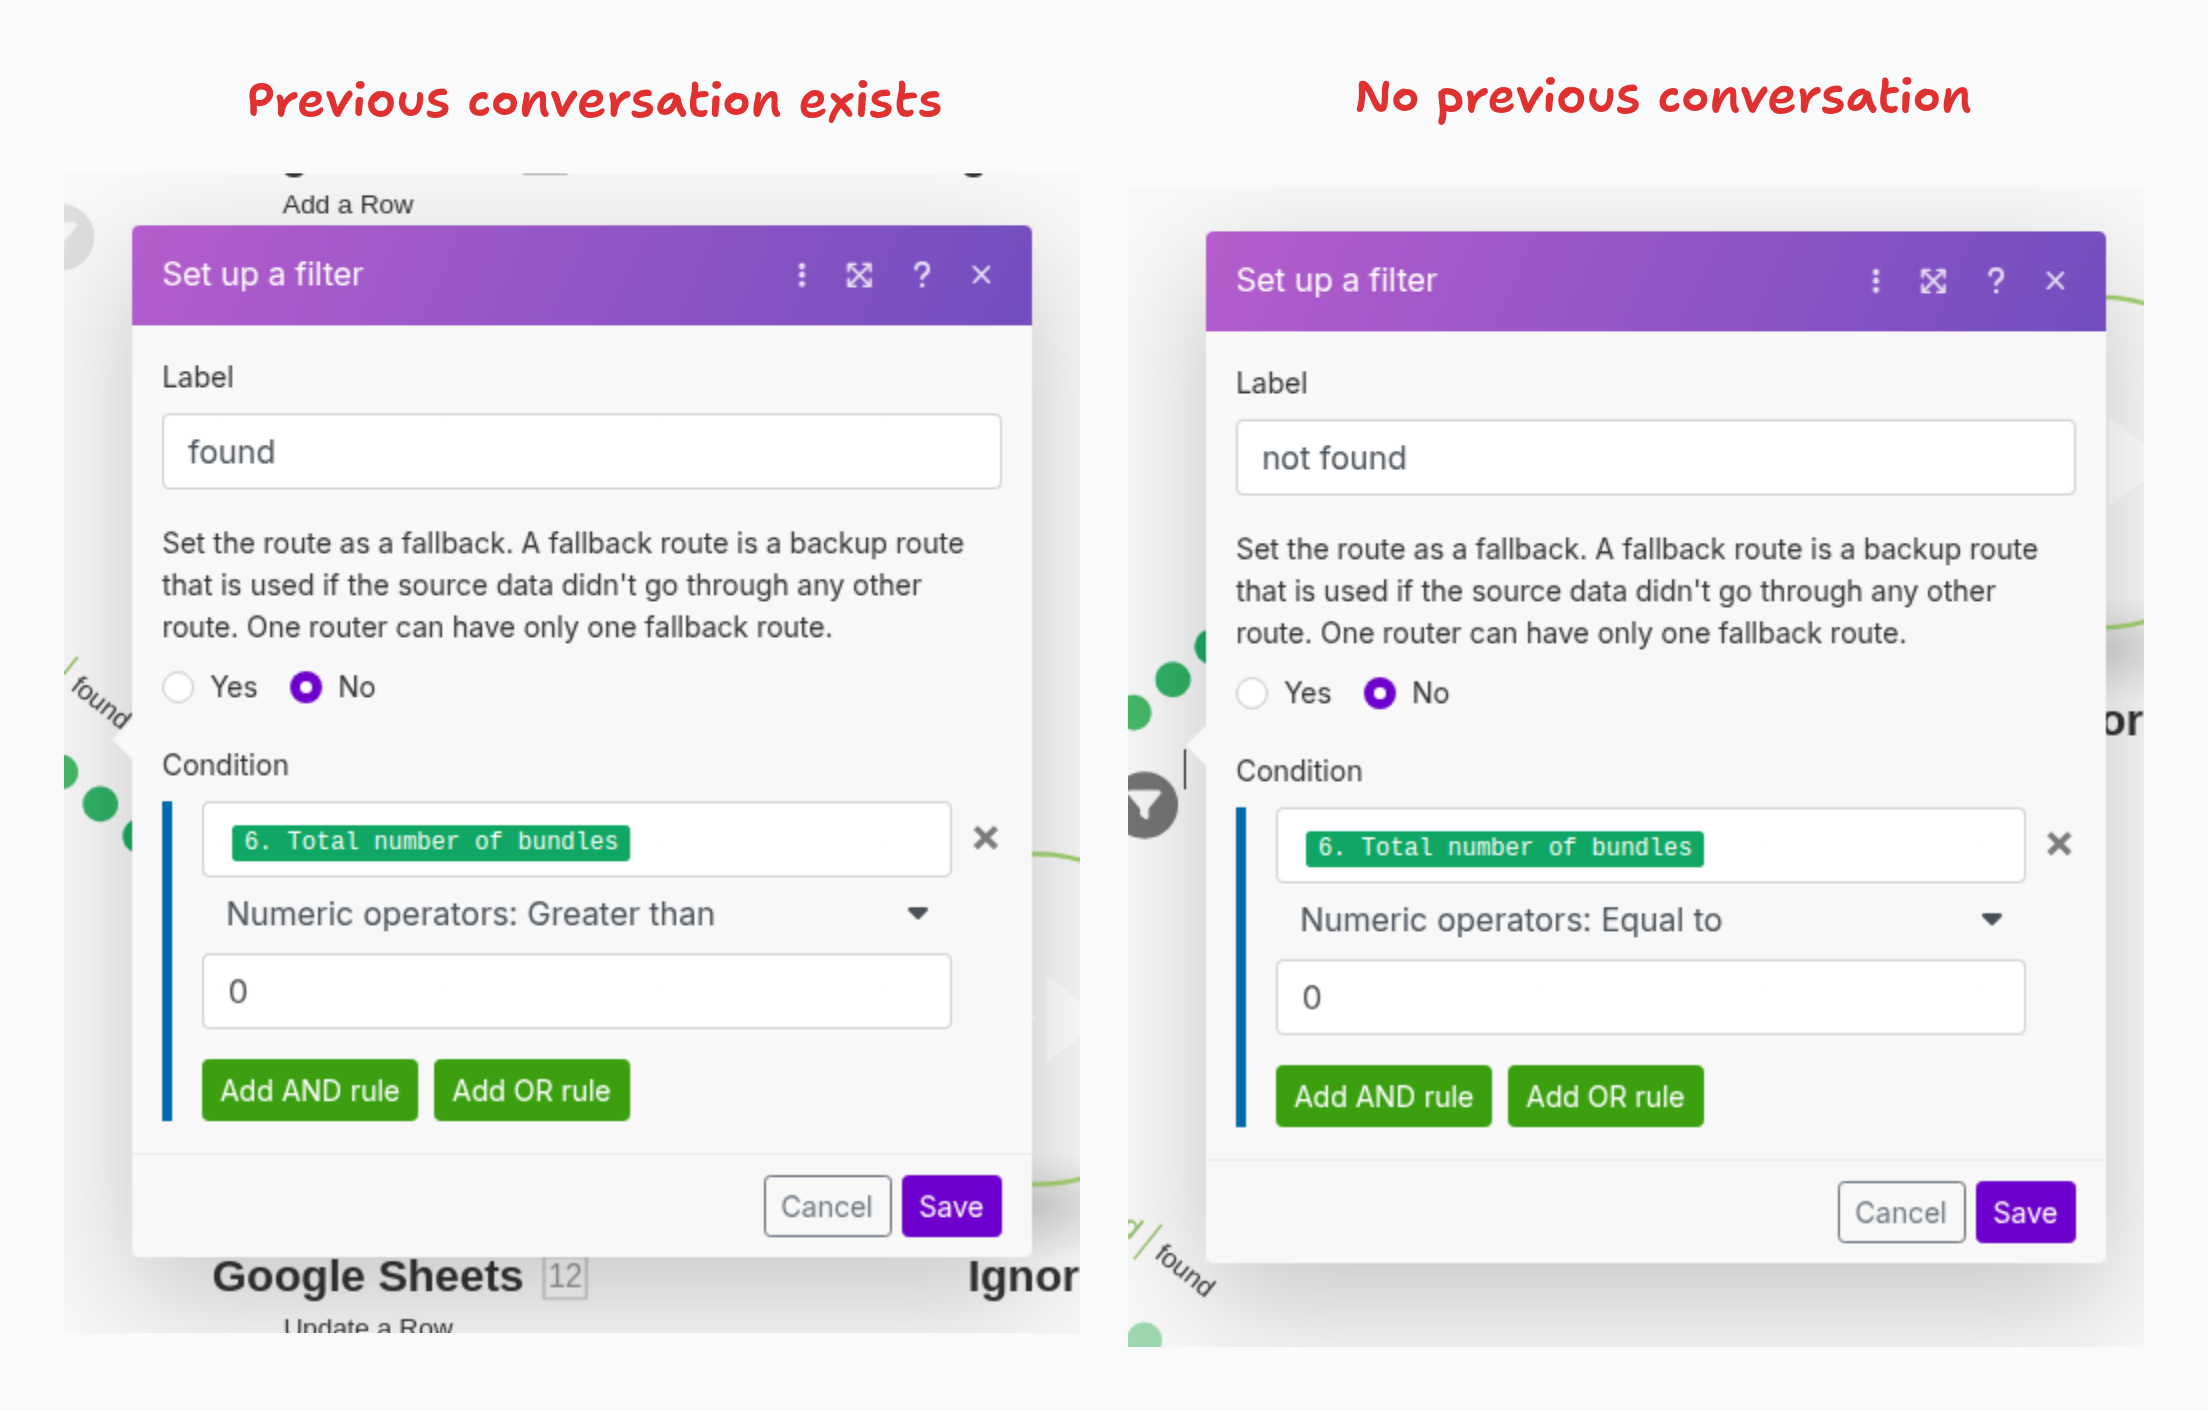
When inserting a conversation as a new row, configure the module as follows: 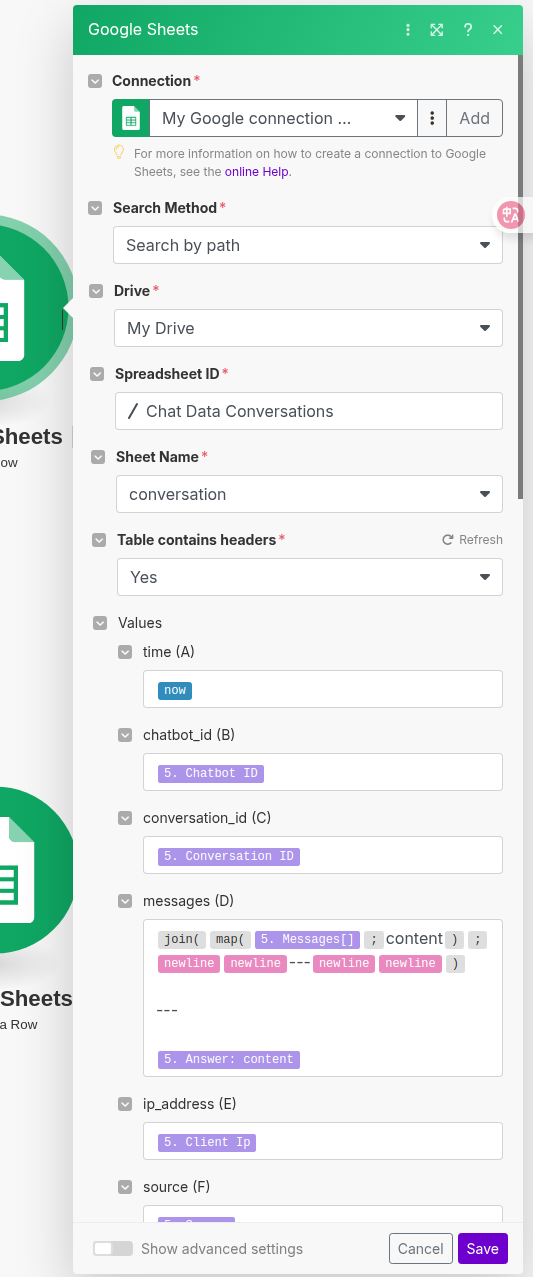 When updating an existing conversation row, configure the module like this:
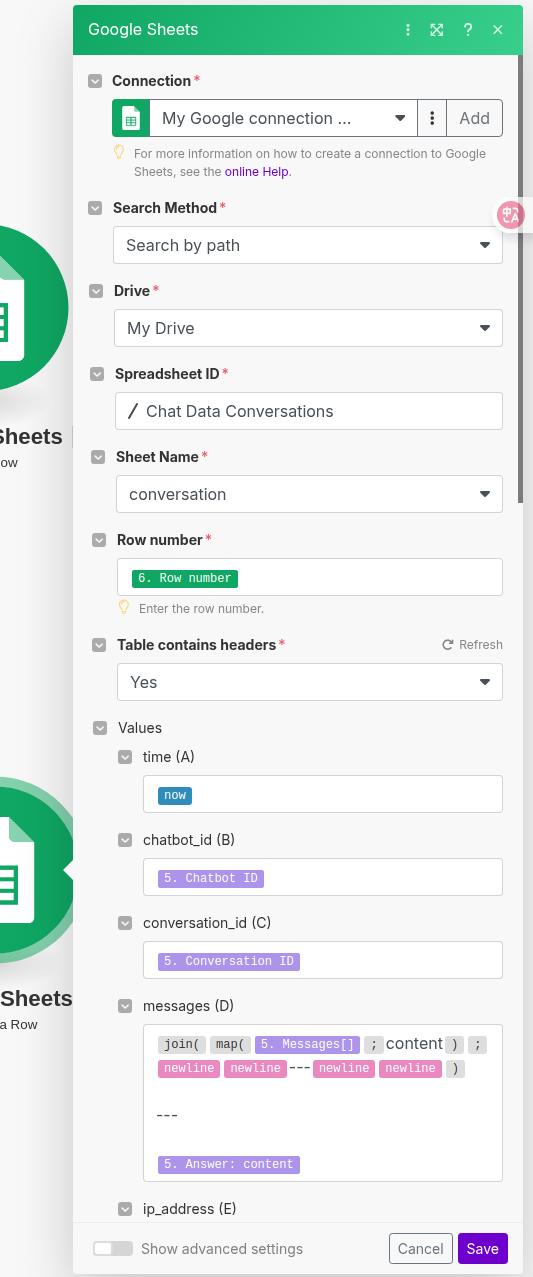
In both cases, set the processed column to FALSE so the next scenario flow recognizes that this row hasn't yet had an email generated based on the latest conversation.
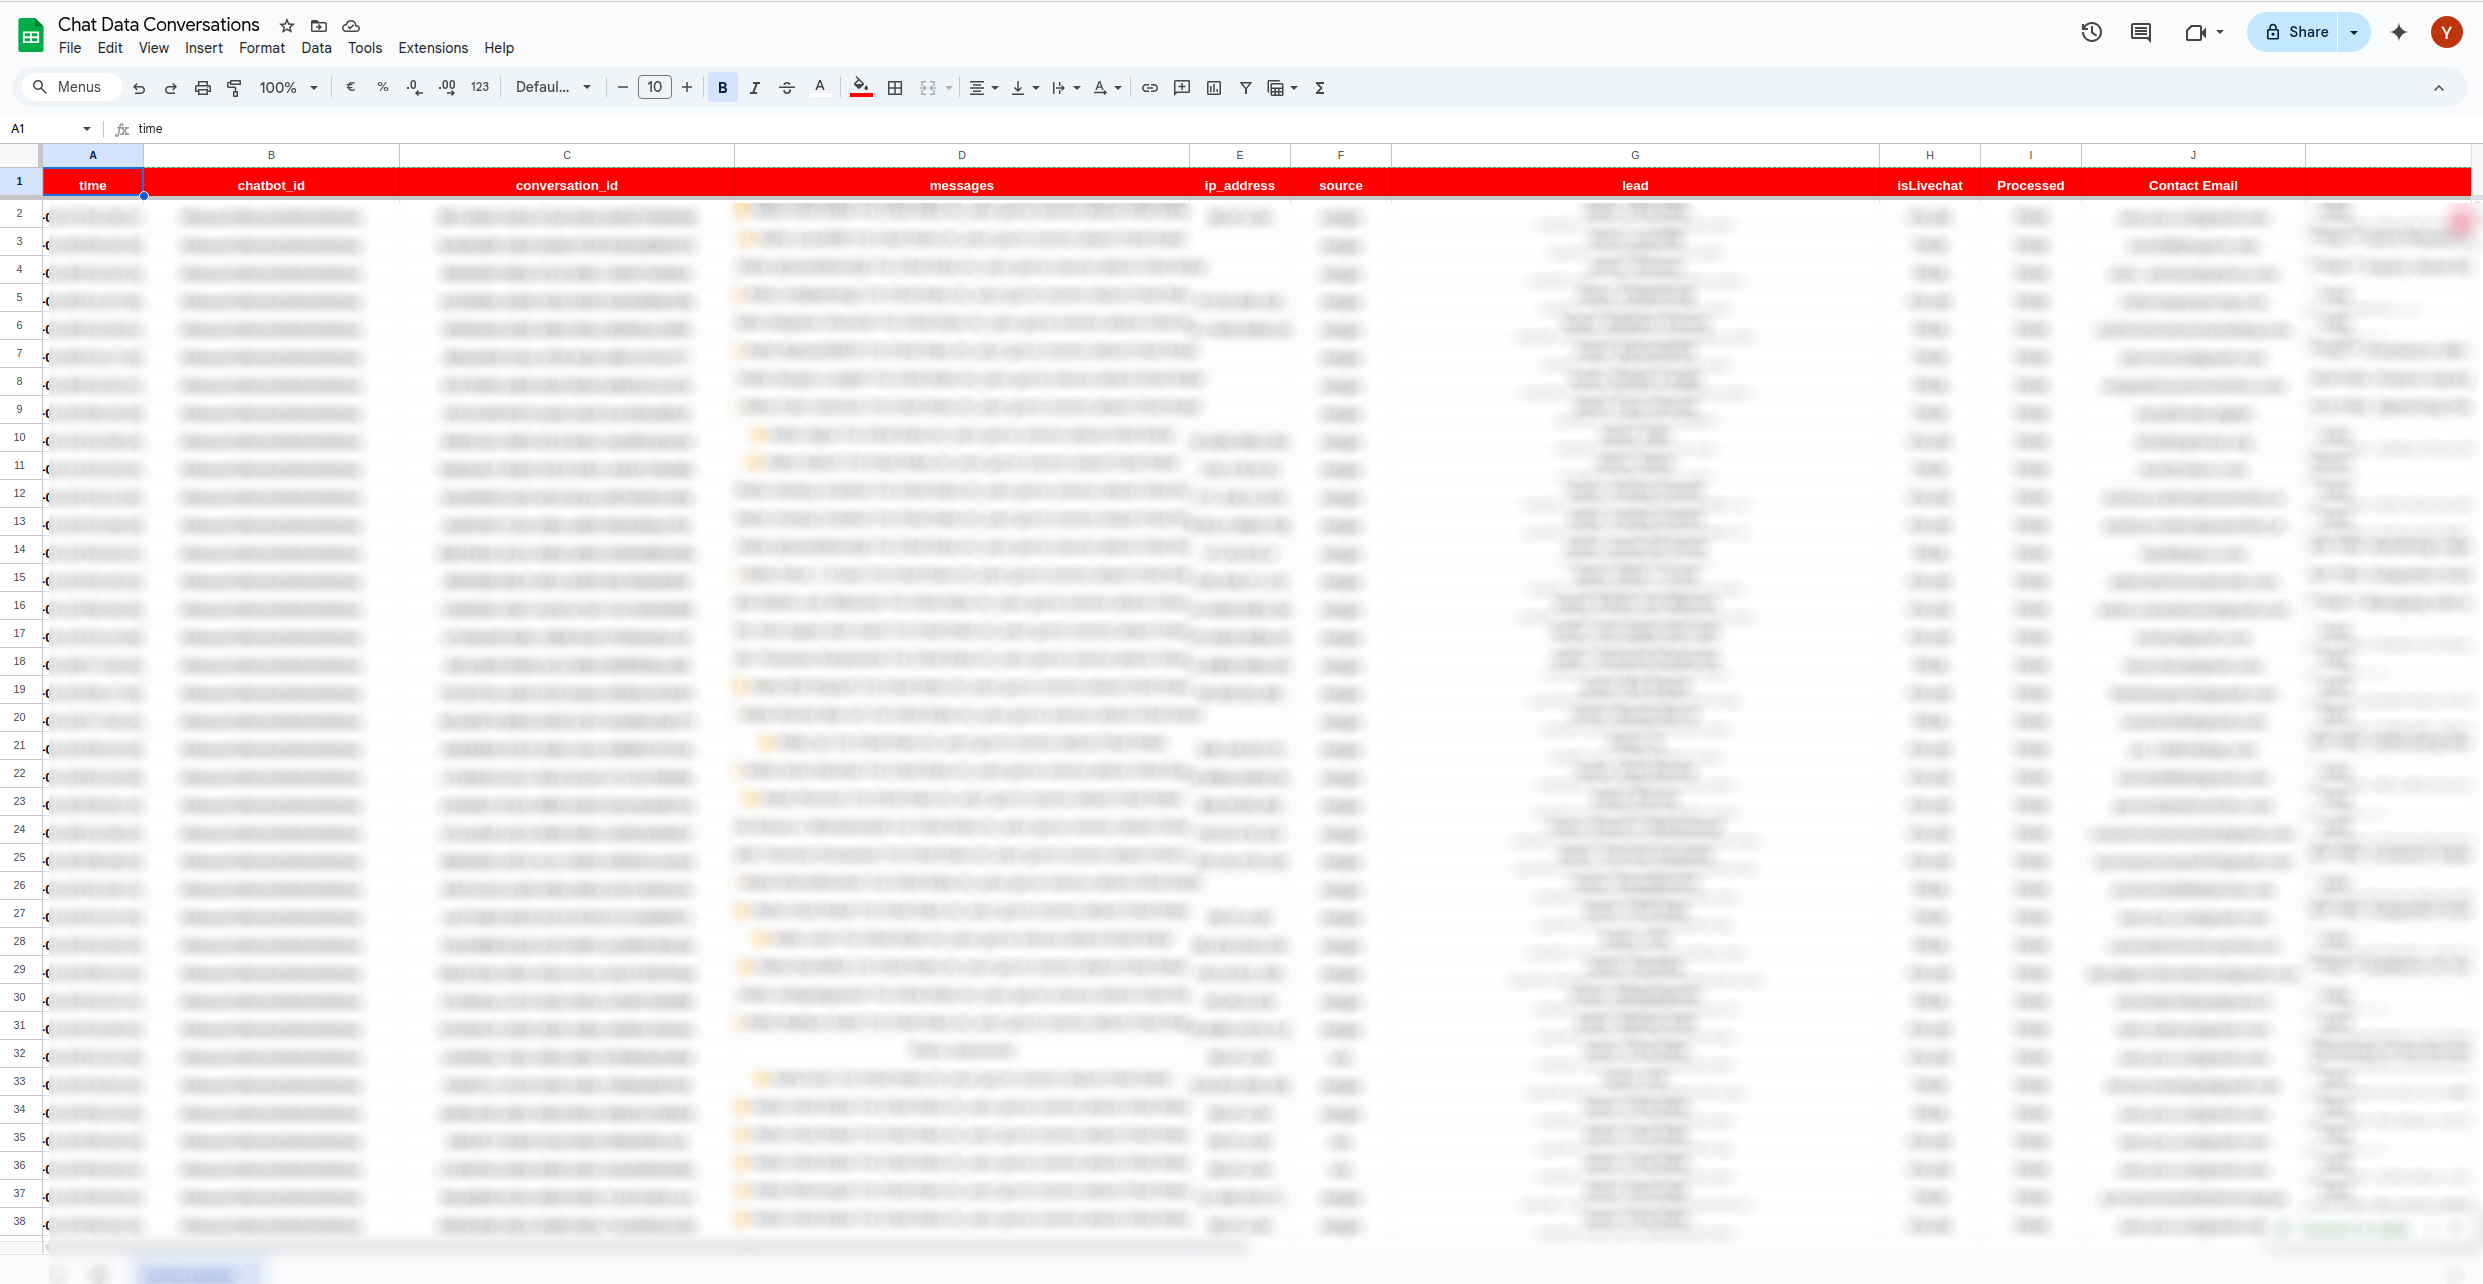
After configuring this flow, you can activate it and test by chatting with the AI agent. When the flow completes, your Google Spreadsheet should contain a new row with the conversation messages and lead contact information.
Now, let's build the next flow to process the saved messages and draft followup emails.
The Followup Email Generation Flow
This flow runs at regular intervals (for example, every 12 hours). During each run, it checks for unprocessed rows in the Google Spreadsheet from the previous flow and uses the messages column content to generate draft emails in HTML format via the email writing agent.
Search Unprocessed Conversations
Configure your module to search for unprocessed conversations as shown:

Use this filter to identify unprocessed conversations:

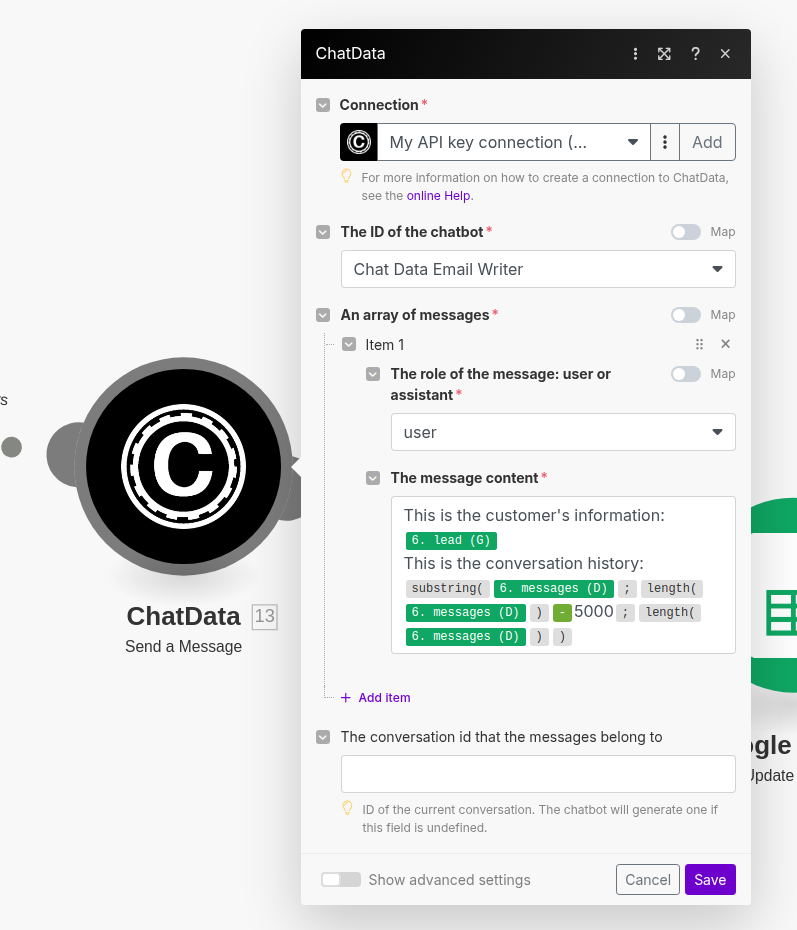
Build the Email Writing AI Agent
Create an email writing AI agent in Chat Data, trained with your company's knowledge base so it can draft relevant emails based on your products and features discussed in conversations.
Here's a recommended base prompt configuration:
You are a technical advisor using AI and capable of responding in multiple languages. A customer will ask questions, and a full conversation will be generated between you and the customer. The user will provide the conversation history to you.

In the conversation history, messages are separated by '-----'. Sometimes, the same person can write consecutively two times in a row; please be aware. You represent YOUR_COMPANY, and the other person is the customer.

Your mission is to:

Provide a clear and concise summary (maximum 2 lines) of the key points discussed during the exchange.

Write a sample email to the customer, written in the first person ("I"). This email must include:

1. Feature recommendations based on the conversation history, with key arguments explaining how they differ from competitors.

2. The strengths of YOUR_COMPANY discussed in the conversation history. You can find additional strengths in the CONTEXT INFORMATION.

3. Any additional tips or advice related to solving the issue of the user.

Create a relevant title summarizing the exchange, to facilitate internal management.

The goal is to provide these elements to the human advisor, who will use this work to finalize the customer follow-up in a personalized and efficient manner. Our email is: [email protected]

Use HTML tags for all the content in the response.
Example:
Use the <br> tag for line breaks, the <p> tag for paragraphs, the <li> tag for lists, the <strong> tag to bold important information,
and use the tag <a href="https://www.exemple.com" target="_blank">example</a> to create

The customer name is provided by the user. You can address yourself by Your Name.
Configure the input to the email writing agent in the Chat Data module as follows:
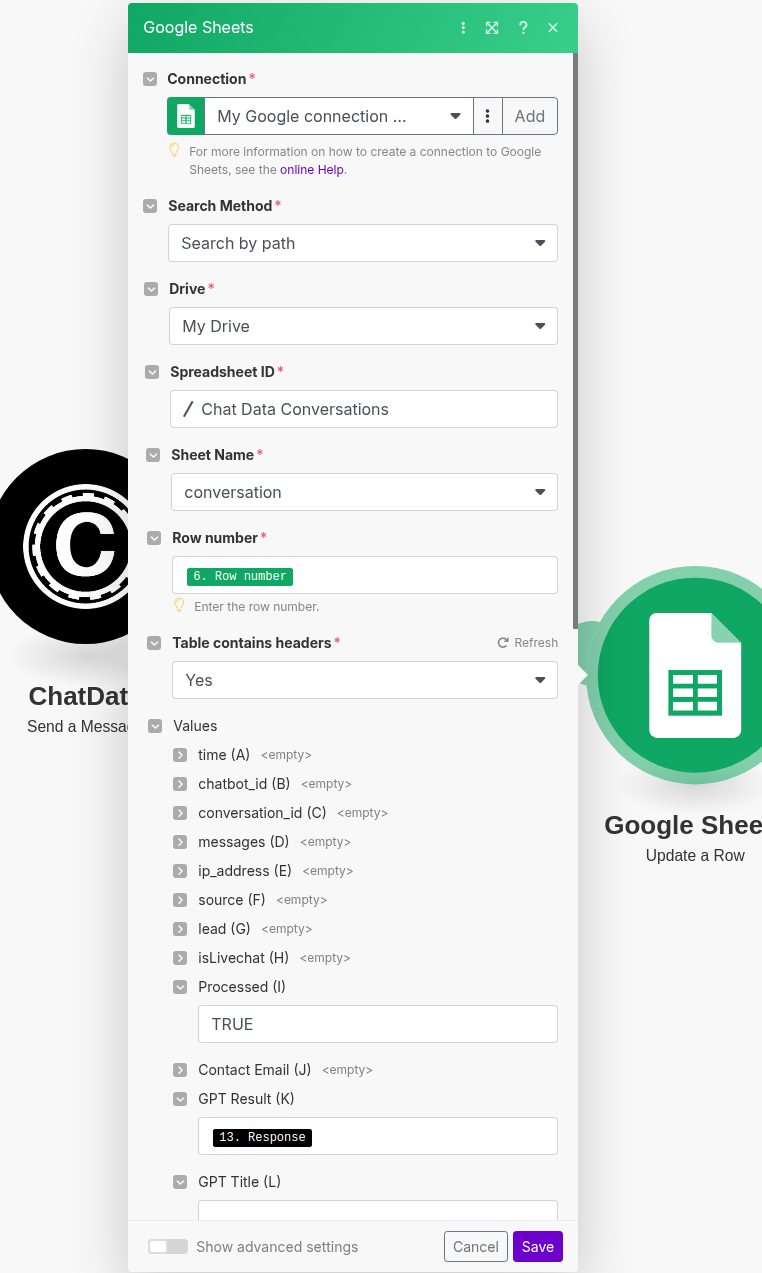
Write Email Content Back to Google Spreadsheet
Use the following Google Spreadsheet update module to add the email content to the Result column and set the processed column to TRUE to prevent reprocessing the same row unless it's updated again.
Testing Your Scenario
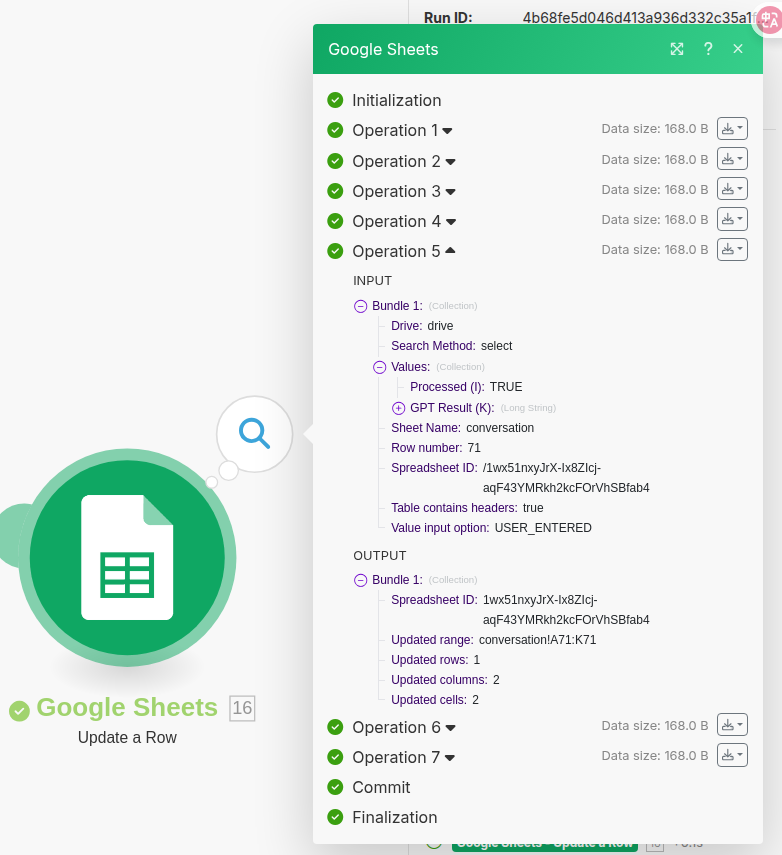
Verify your automation works correctly by using the "Run once" button in the scenario builder.
Setting Up Automated Scheduling
Once you've confirmed your scenario functions properly, configure it to run automatically at your preferred intervals.
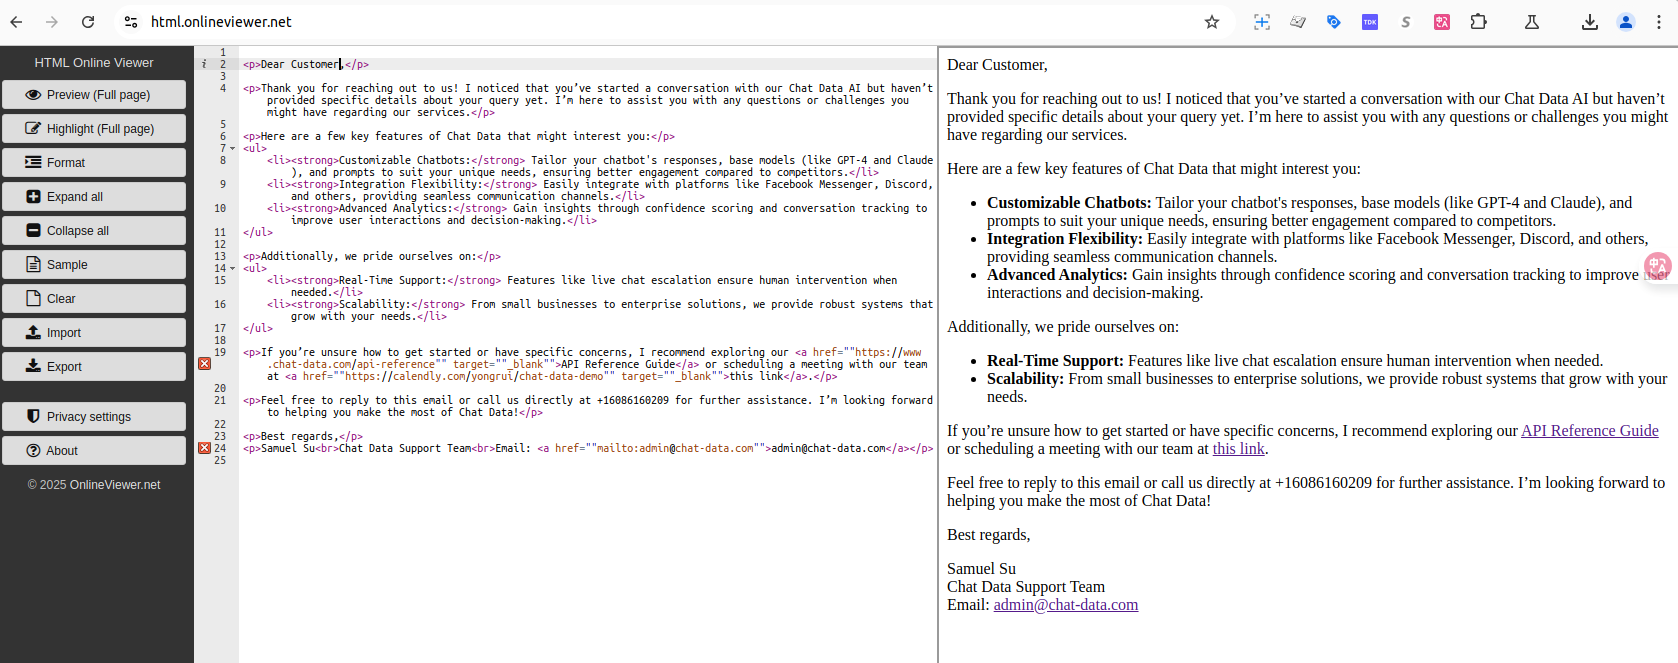
Sending Emails
After your automated flow generates email drafts, you can use any HTML viewer such as Online HTML Viewer to preview the formatted content. This allows you to see exactly how your email will appear to recipients before sending.
Simply copy the HTML content from your Google Spreadsheet into the viewer to render it. Once satisfied with the appearance, you can copy the rendered content directly into your email client's composer. The recipient's email address can also be copied from the Google Spreadsheet, streamlining your workflow.