Advanced Features
Live Chat Escalation
While AI chatbots excel at handling general inquiries, there are instances where human intervention becomes necessary. This could involve tasks like issuing refunds, modifying orders, or addressing queries beyond the chatbot's knowledge base. In such cases, enabling human escalation within the chatbot interface offers a smoother experience compared to redirecting users to email support. This guide outlines how to set up live chat escalation using Chat Data, enhancing your customer support capabilities.
Setting Up Live Chat Escalation
Live chat is not enabled by default but is freely available for both Standard and Professional plan users. Entry plan customers can also purchase the Live Chat package separately. Once Live Chat is part of your plan, access the Live Chat section under Settings to activate the Live Chat button, as illustrated below: 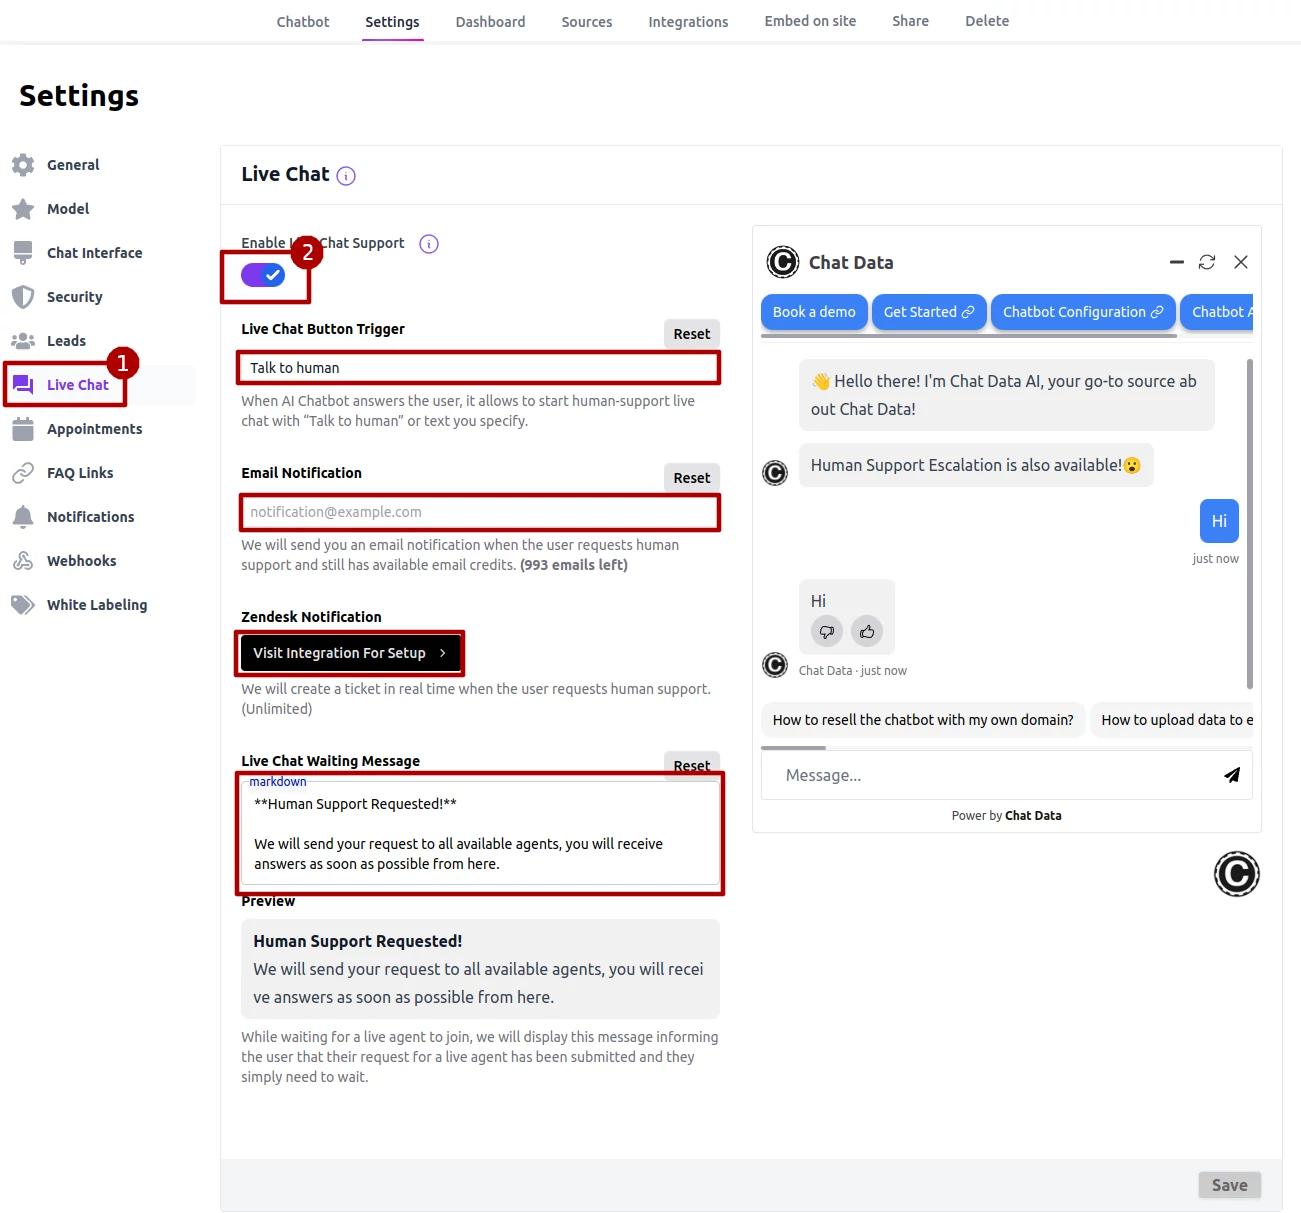 Several parameters can be configured for live chat, including:
- Live Chat Button Trigger: This button appears to users after an AI-generated response. It offers an escalation path to human support for users dissatisfied with the AI response or in need of further assistance.
- Email Notification: Upon escalation, we'll send an email containing the chat history and relevant metadata to a designated address, keeping you informed of the escalation.
- Zendesk Notification: For those with a Zendesk integration, an escalation will automatically generate a support ticket. For integration details, see Zendesk integration.
- Live Chat Waiting Message: This message informs users that their request for human support has been acknowledged and advises them to await a response.
Lazy Live Chat Triggering
In some cases, you don't want to trigger the live chat escalation immediately. For example, you might want to wait for the user to send a few messages before deciding whether to escalate the conversation. In this case, you can use the Lazy Live Chat Triggering feature. With this feature, the live chat escalation will only be triggered after the conversation has met some conditions set by you. For example, you can allow the live chat to be available if the chatbot doesn't know the answer to the user's question. Or you can allow the live chat to be available if the user explicitly asks for human support.
Lazy Live Chat Triggering Set-up
You can set up lazy live chat triggering by going to the Live Chat section under Settings and then turning on the Lazy Live Chat Triggering toggle button. Optionally, you can modify the default lazy live chat triggering condition, as shown below: 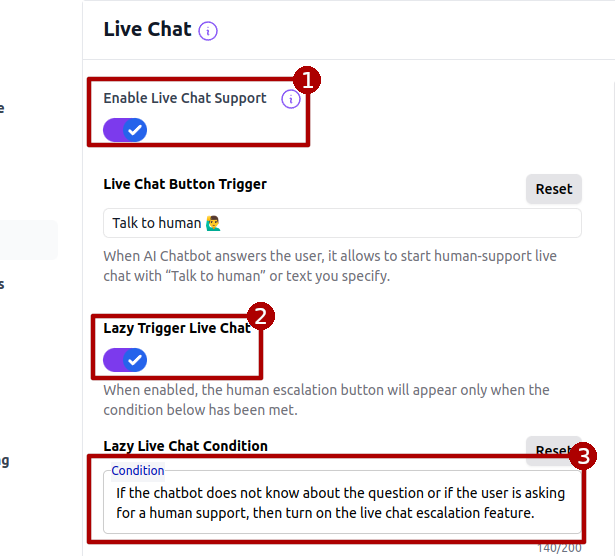
Lazy Live Chat Triggering Effect
As illustrated below, the live chat escalation button is no longer visible. Instead, the live chat escalation request is automatically triggered when the user's query satisfies the lazy live chat triggering condition set by you. 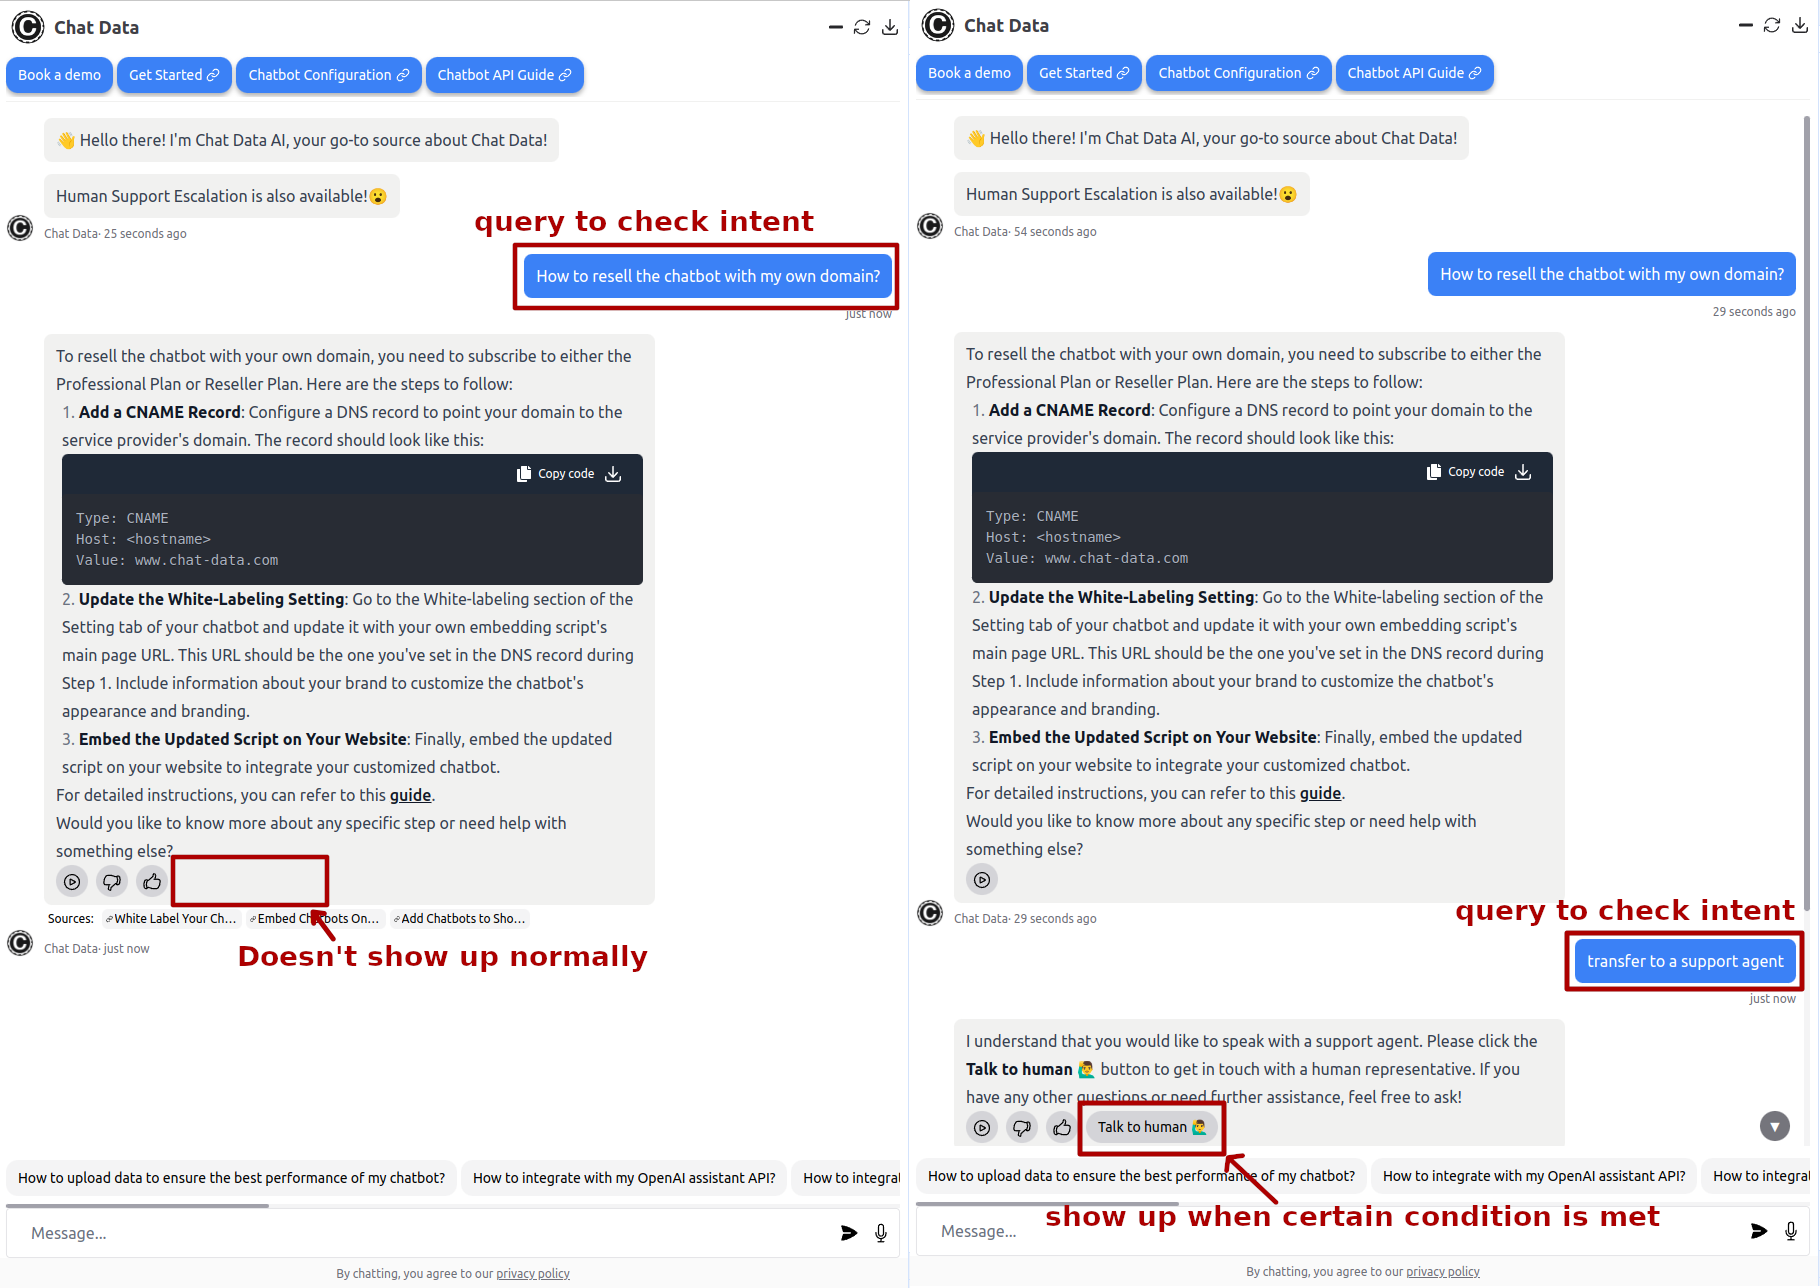
If no agent responds to the initial escalation request, users can continue interacting with the AI chatbot and trigger additional escalation requests by expressing their need for human assistance. These repeated escalation requests will continue to be sent until an agent joins the conversation. This ensures that urgent matters receive attention even if the first escalation attempt goes unanswered.
Note that this multiple-request behavior is specific to the lazy triggering mode. When using the explicit live chat escalation button (non-lazy mode), users can only trigger the escalation once per conversation.
Closed State Message
Once you close the live chat conversation, the end customer will no longer be able to continue chatting within that same conversation. You have the option to display a Closed State Message to the customer after the conversation concludes. This message can serve as a reminder for the customer to refresh the chatbot widget if they wish to initiate a new conversation thread. 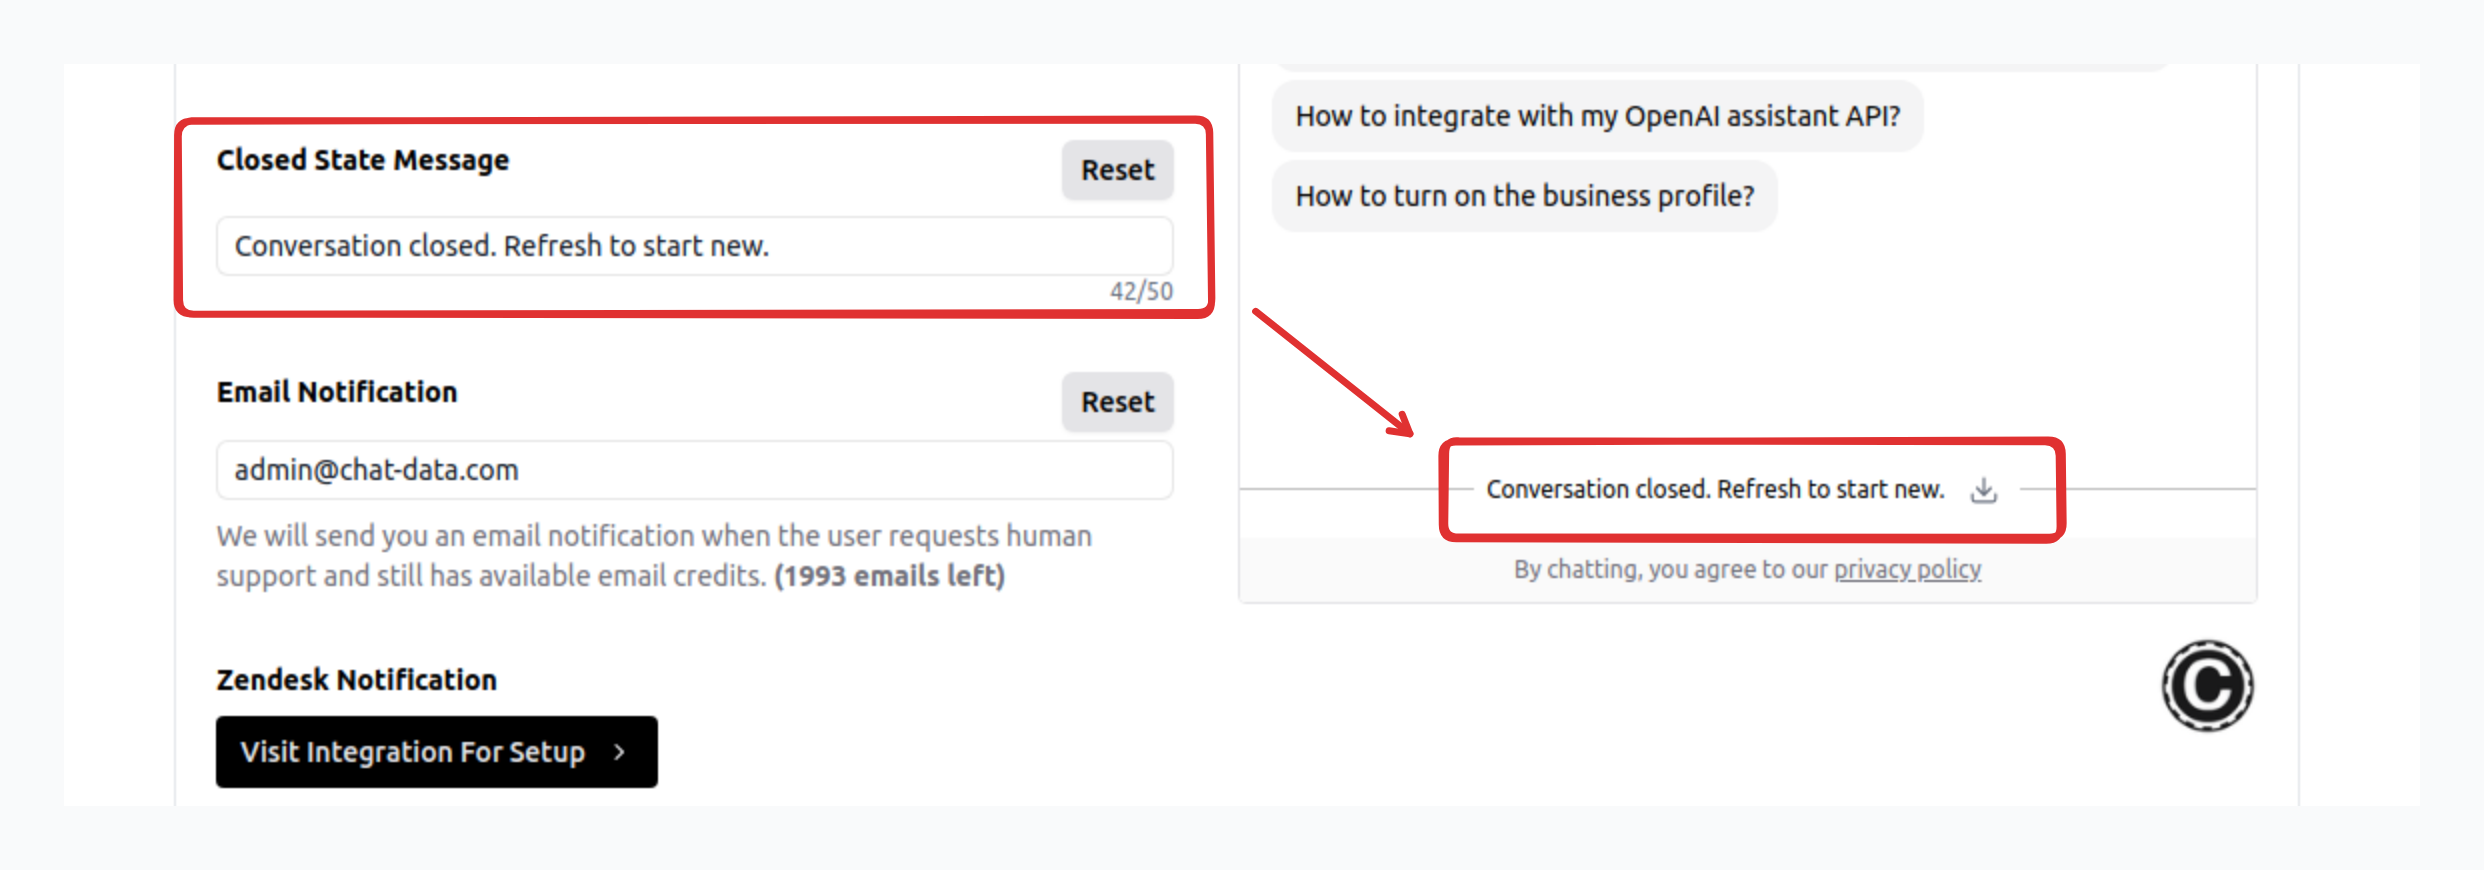
Handling Live Chat Escalation
Upon a user initiating a live chat escalation, you'll be notified via email or Zendesk ticket. Future updates will introduce SMS and app notifications for even more immediate alerts. Access your live chat dashboard through https://www.chat-data.com/chatbot/{chatbotId}/dashboard/live-chats to manage live chats as depicted below: 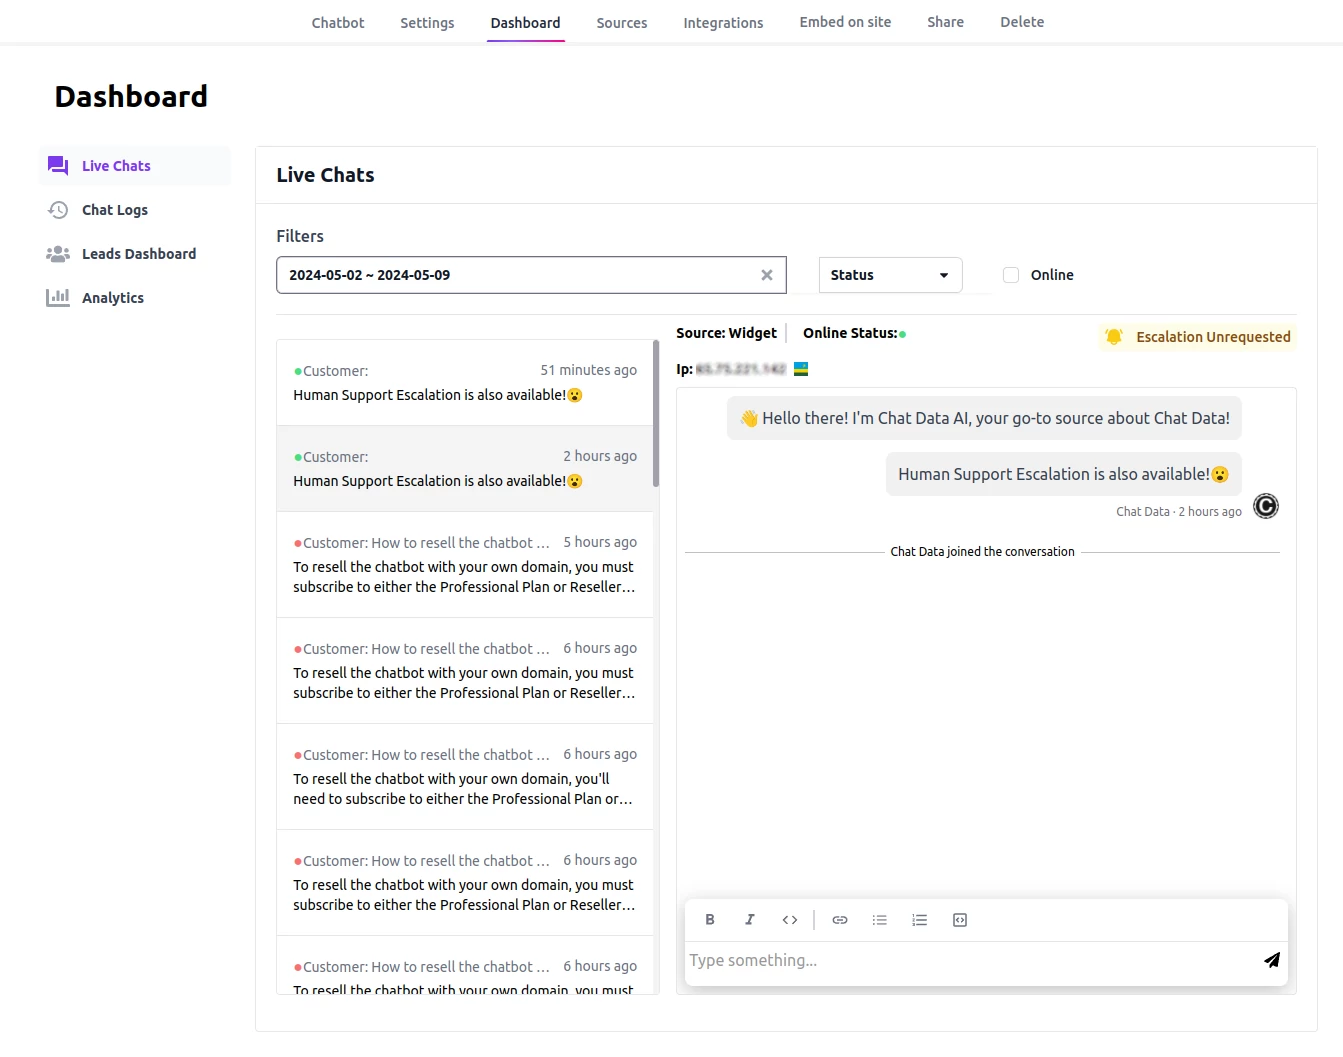 The dashboard enables you to:
- Retrieve chat history within a specified date range.
- Filter chats by status (escalated, unassigned, in progress, or ended) or view only ongoing conversations.
- Understand conversation statuses:
- Unrequested: The customer has not sought human support, and the AI chatbot manages the conversation.
- Unassigned: The customer has requested escalation but no active conversation with support has commenced.
- Open: An active conversation between support and the customer is underway, bypassing the AI chatbot.
- Ended: The conversation is marked as concluded, though it can be reopened if either party resumes chatting.
- Directly initiate conversations without requiring a formal escalation request from the customer, immediately setting the status to Open.
The dashboard also displays each conversation's online status, with a green dot indicating an active customer and a red dot signifying they are offline. Customers can also see your availability status, enhancing transparency. Additionally, you can view customer IP addresses, countries, and submitted lead information.
Email Notification
We currently support email and Zendesk notifications to ensure timely management of live chat escalations. For immediate alerts, consider enabling push notifications for your designated email or through the Zendesk app. While email notifications are plan-dependent, Zendesk ticket creation is unlimited. We are also developing SMS and app notifications to further streamline the notification process, though this requires intricate design and development efforts.
Live Chat Email Notification
When a live chat escalation is requested, we will send an email notification to the designated agent email address with details of the conversation, as shown below: 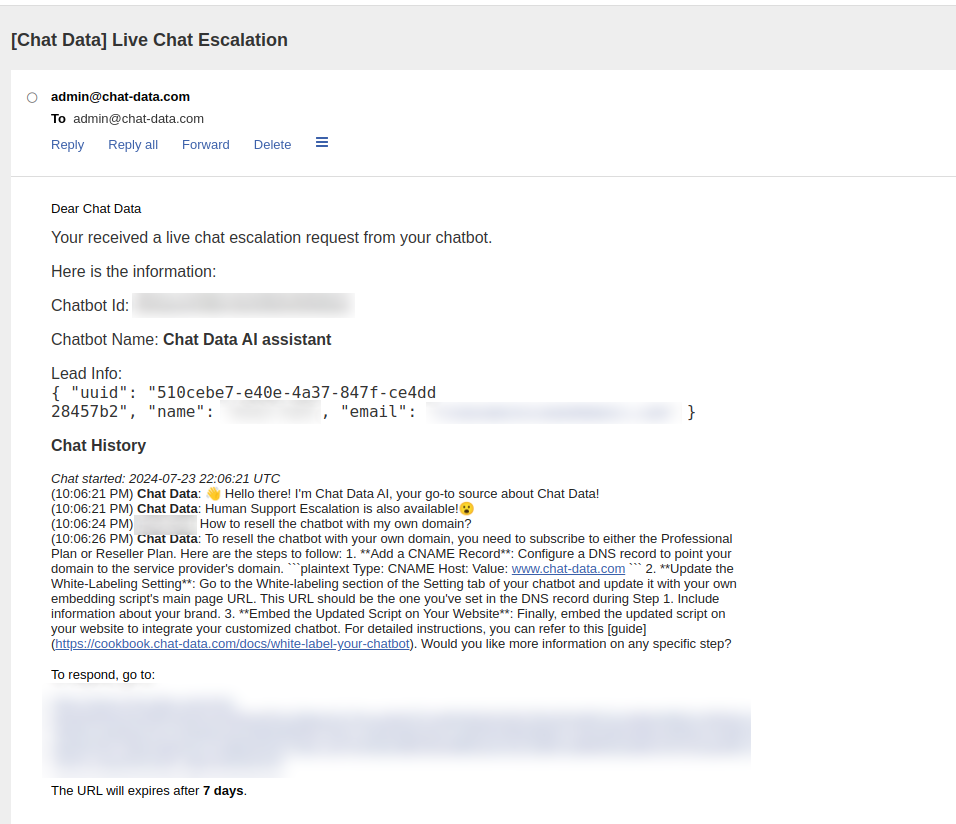
New Message to the Customer
When the agent responds to a message and the customer has left the chat widget, we will send an email notification to the customer’s provided email address with the new message from the agent. (Currently, only email notifications are supported, but we plan to add SMS notifications in the future.) Example: 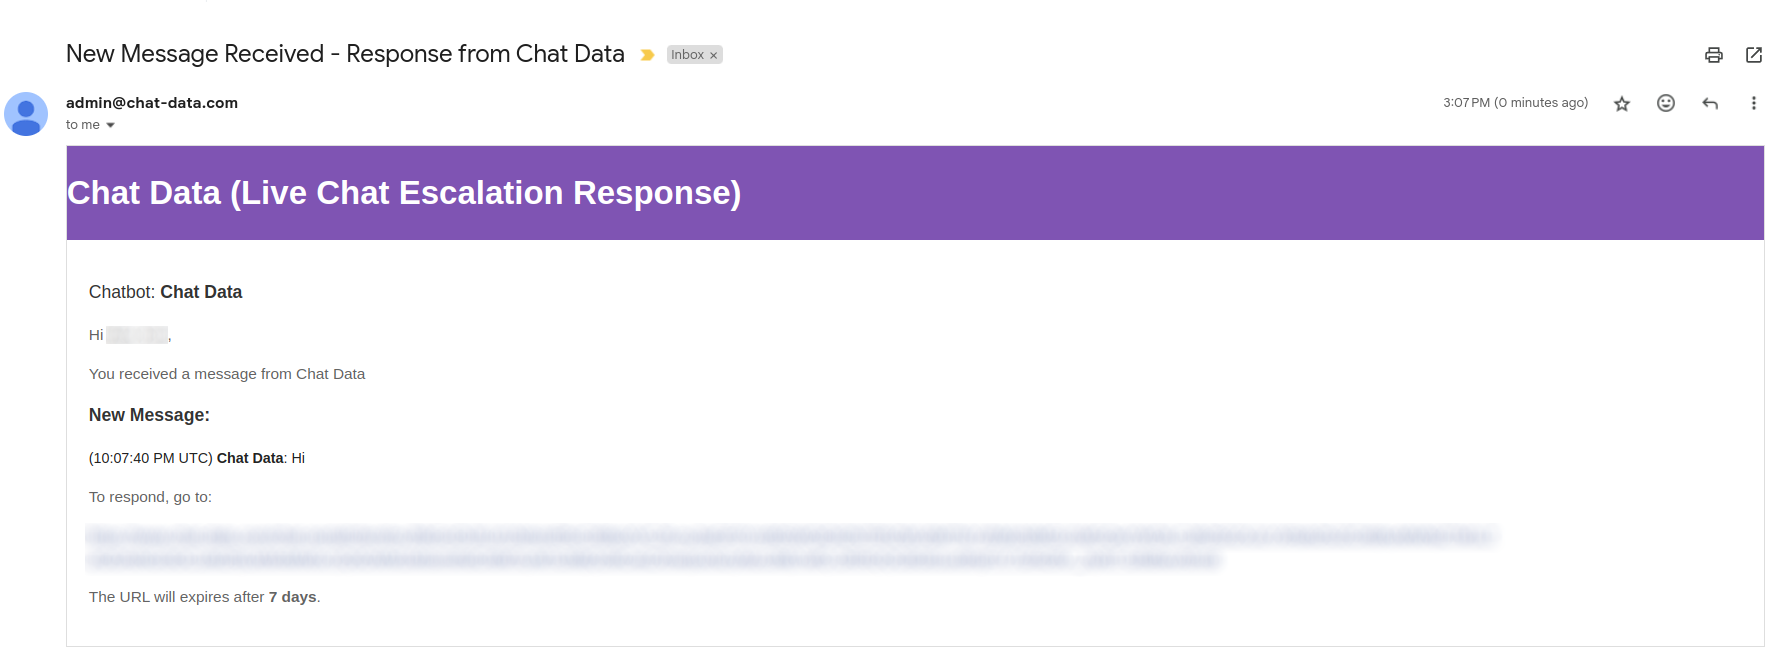
New Message to the Agent
When the customer responds to a message and the agent has left the admin chat portal, we will send an email notification to the agent’s notification email with the new message from the customer. Example: 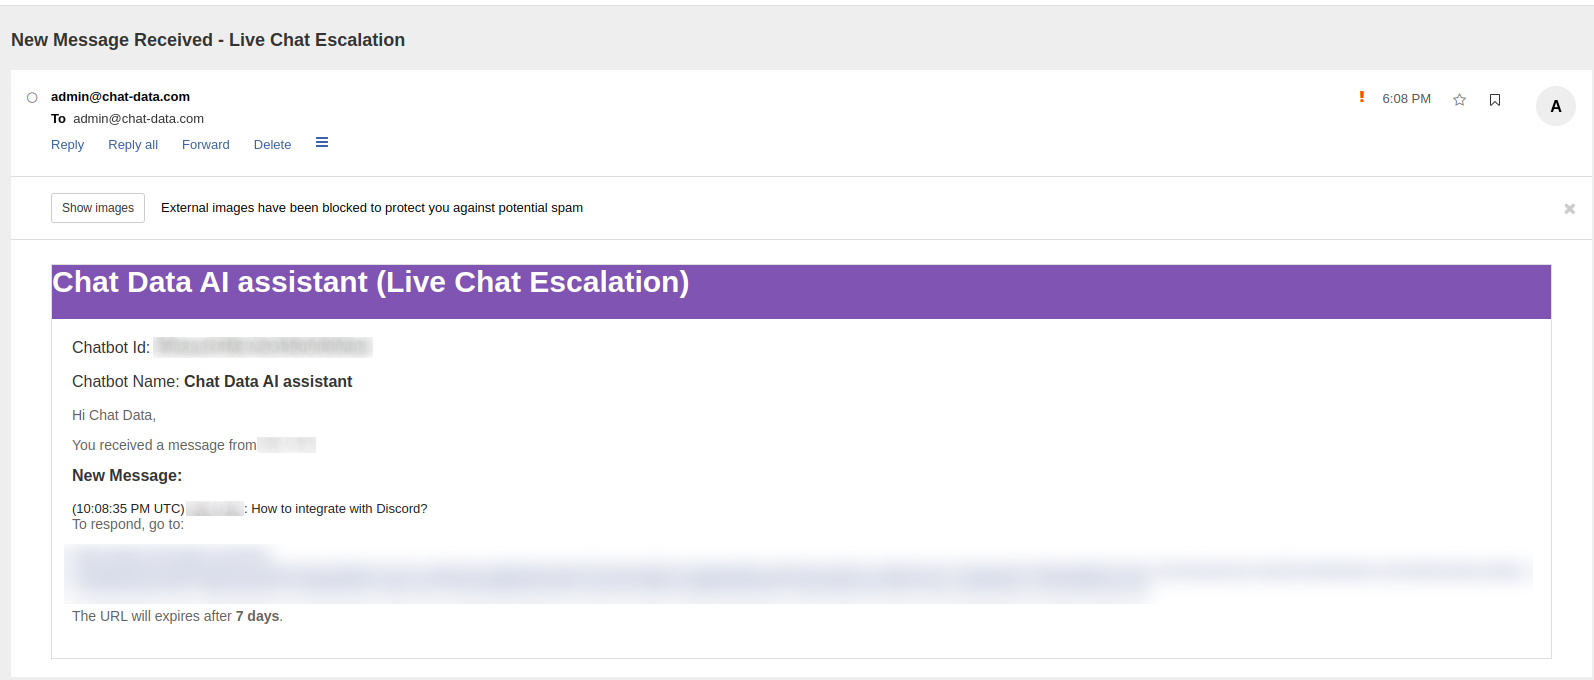
New Message Handling
Agent
The agent can use the uniquely constructed URL provided in the notification to handle the live chat in a dedicated admin portal for the conversation, as shown below: 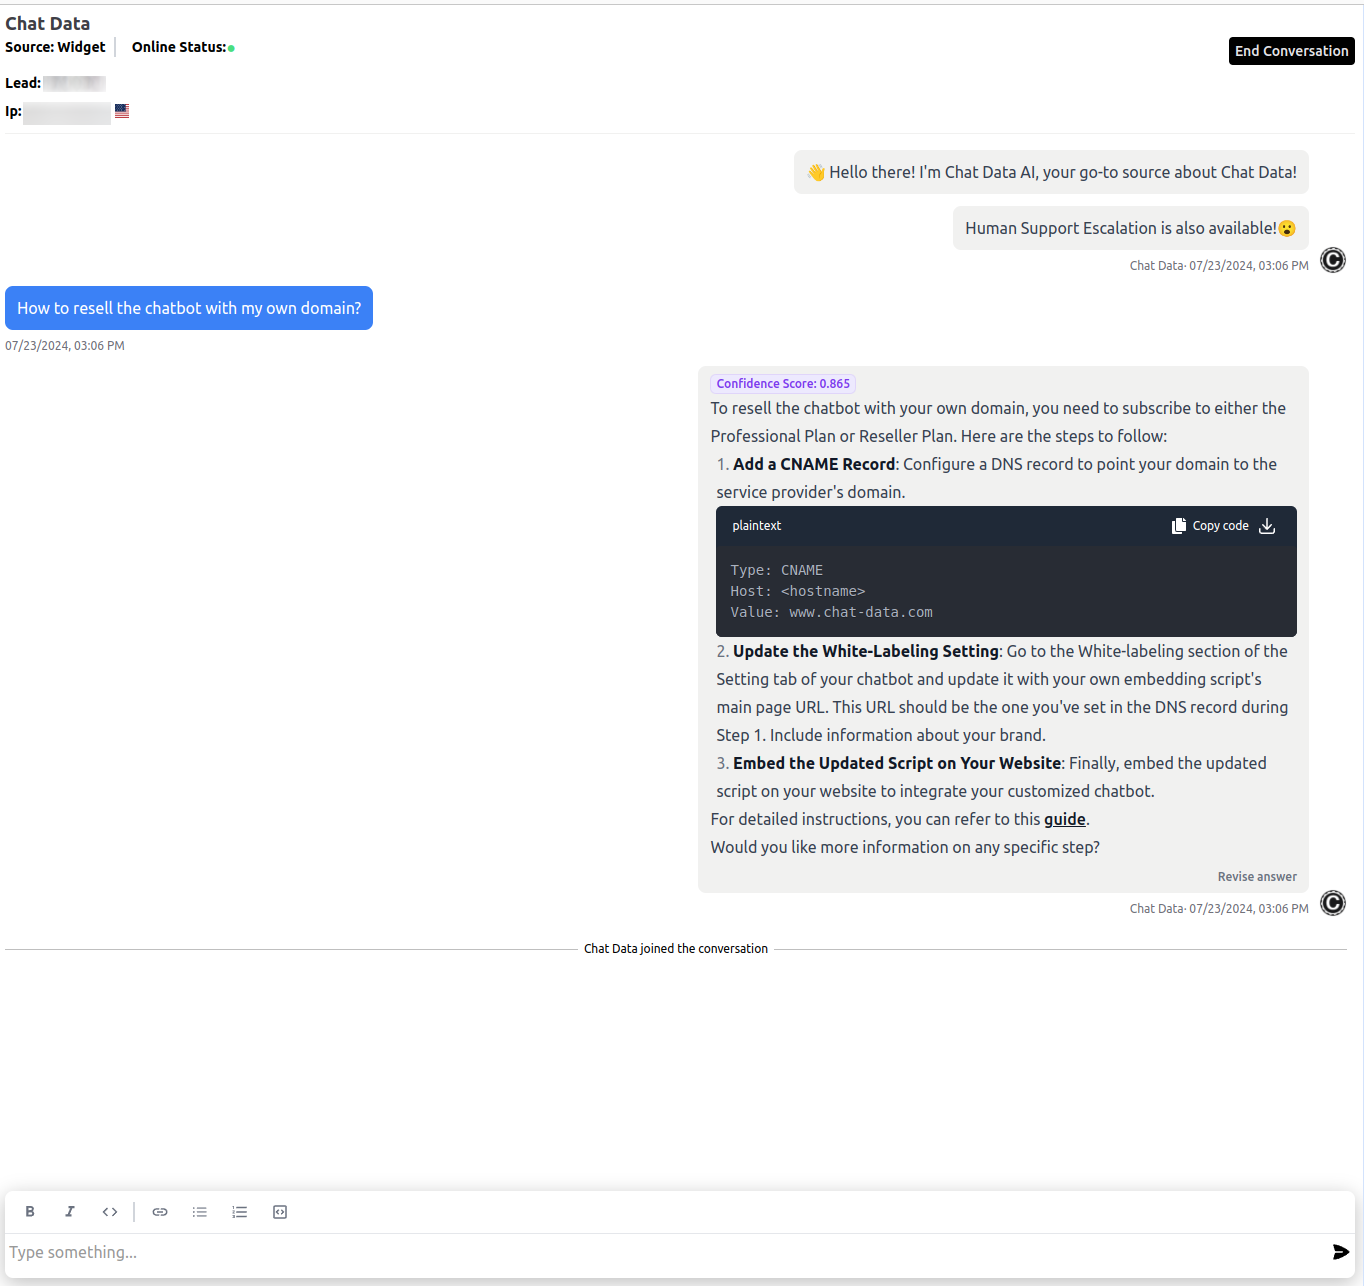
This portal does not require login and can be white-labeled to your own domain.
Besides the above admin portal, the agent also can use the SendLiveChatMessage API endpoint to send respond the live chat message.
Customer
The customer can use the uniquely constructed URL provided in the notification to handle the live chat in a dedicated customer portal for the conversation, as shown below: 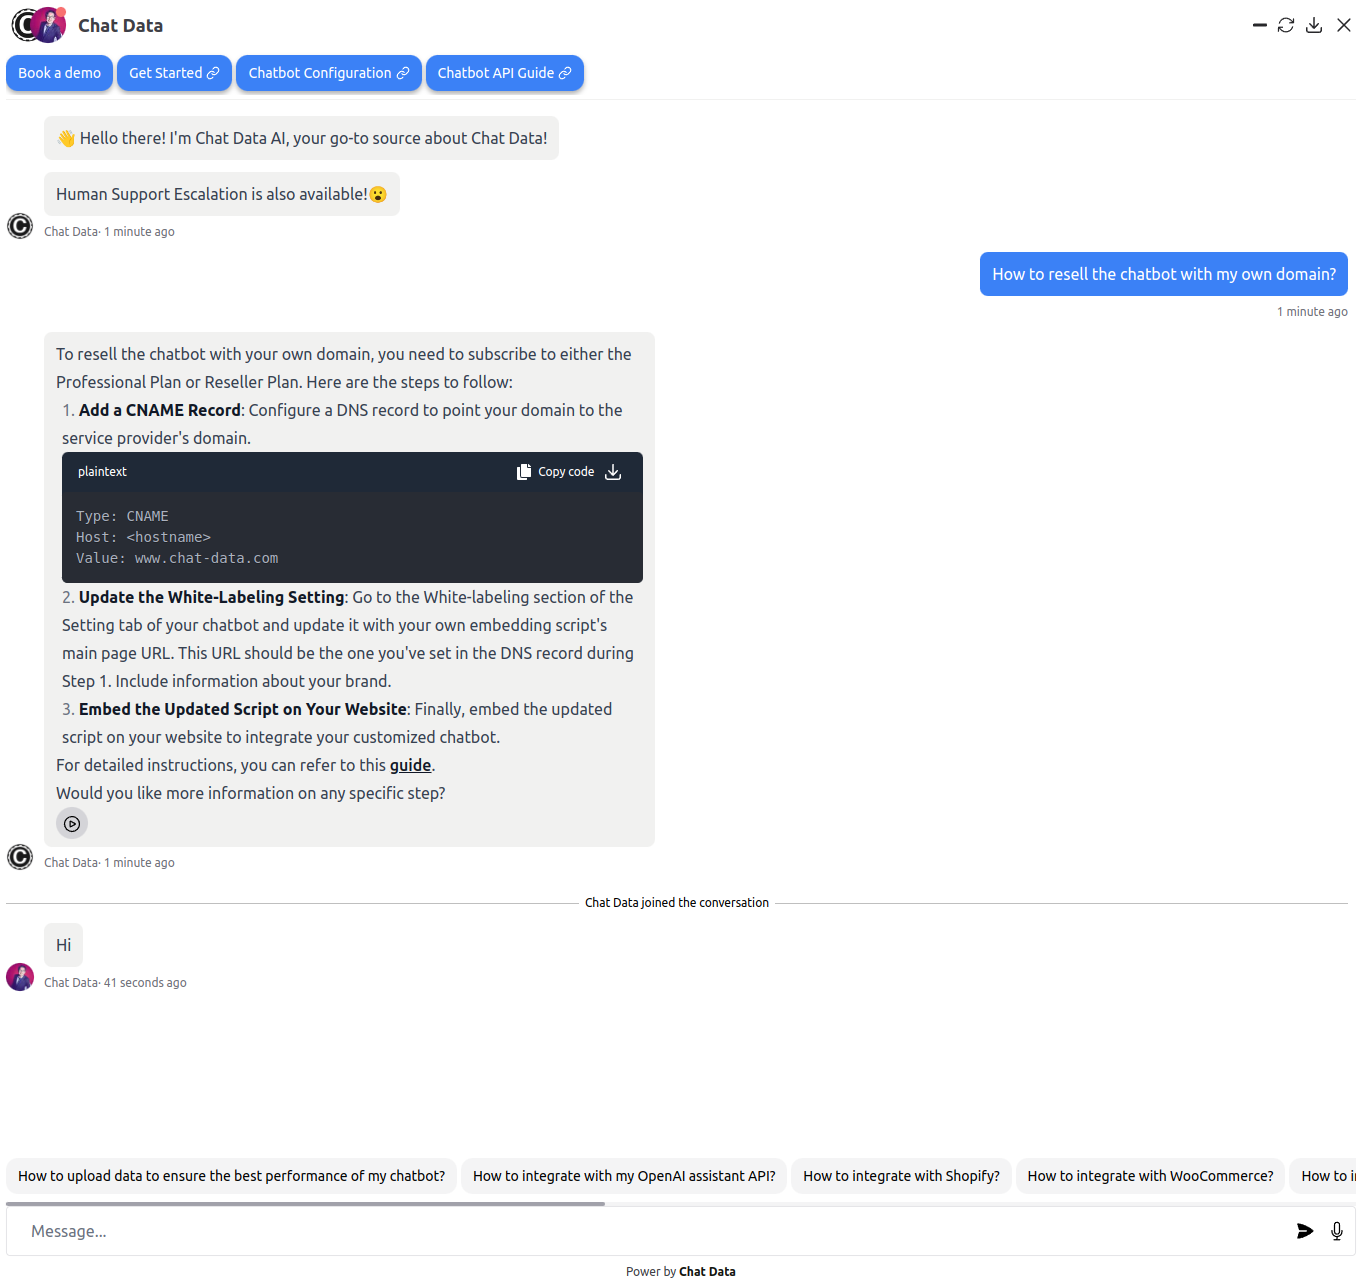
This portal does not require login and can be white-labeled to your own domain.
SMS Notification
You can also choose to use SMS to notify the agent or the lead by following the SMS Notification guide. We will also send the three types of live chat escalation notifications via SMS:
- New offline message from the customer to the agent
- New offline message from the agent to the customer
- New live chat escalation request
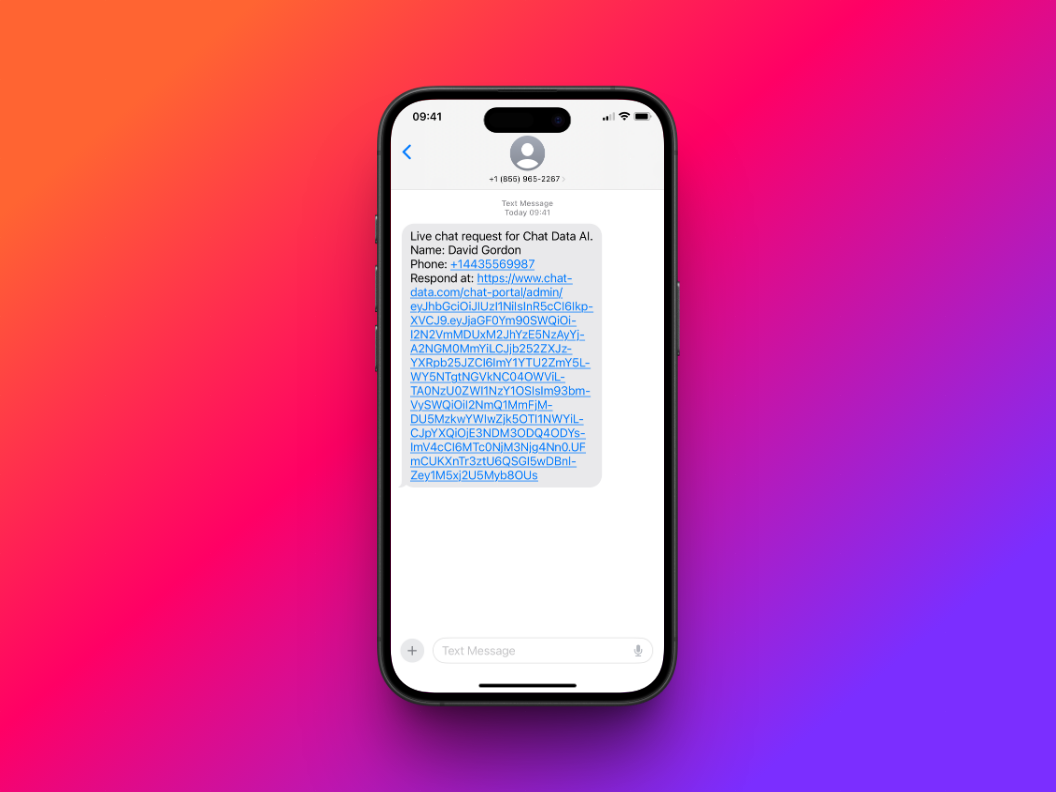
After receiving the SMS notifications, directly reply to the SMS will also send the message to the corresponding conversation thread.
Update Webhook Configuration
If you are using your own Twilio phone number and want customers to be able to reply to SMS messages directly to send messages to the live chat conversation, you will need to update the webhook configuration as shown in the screenshot below:
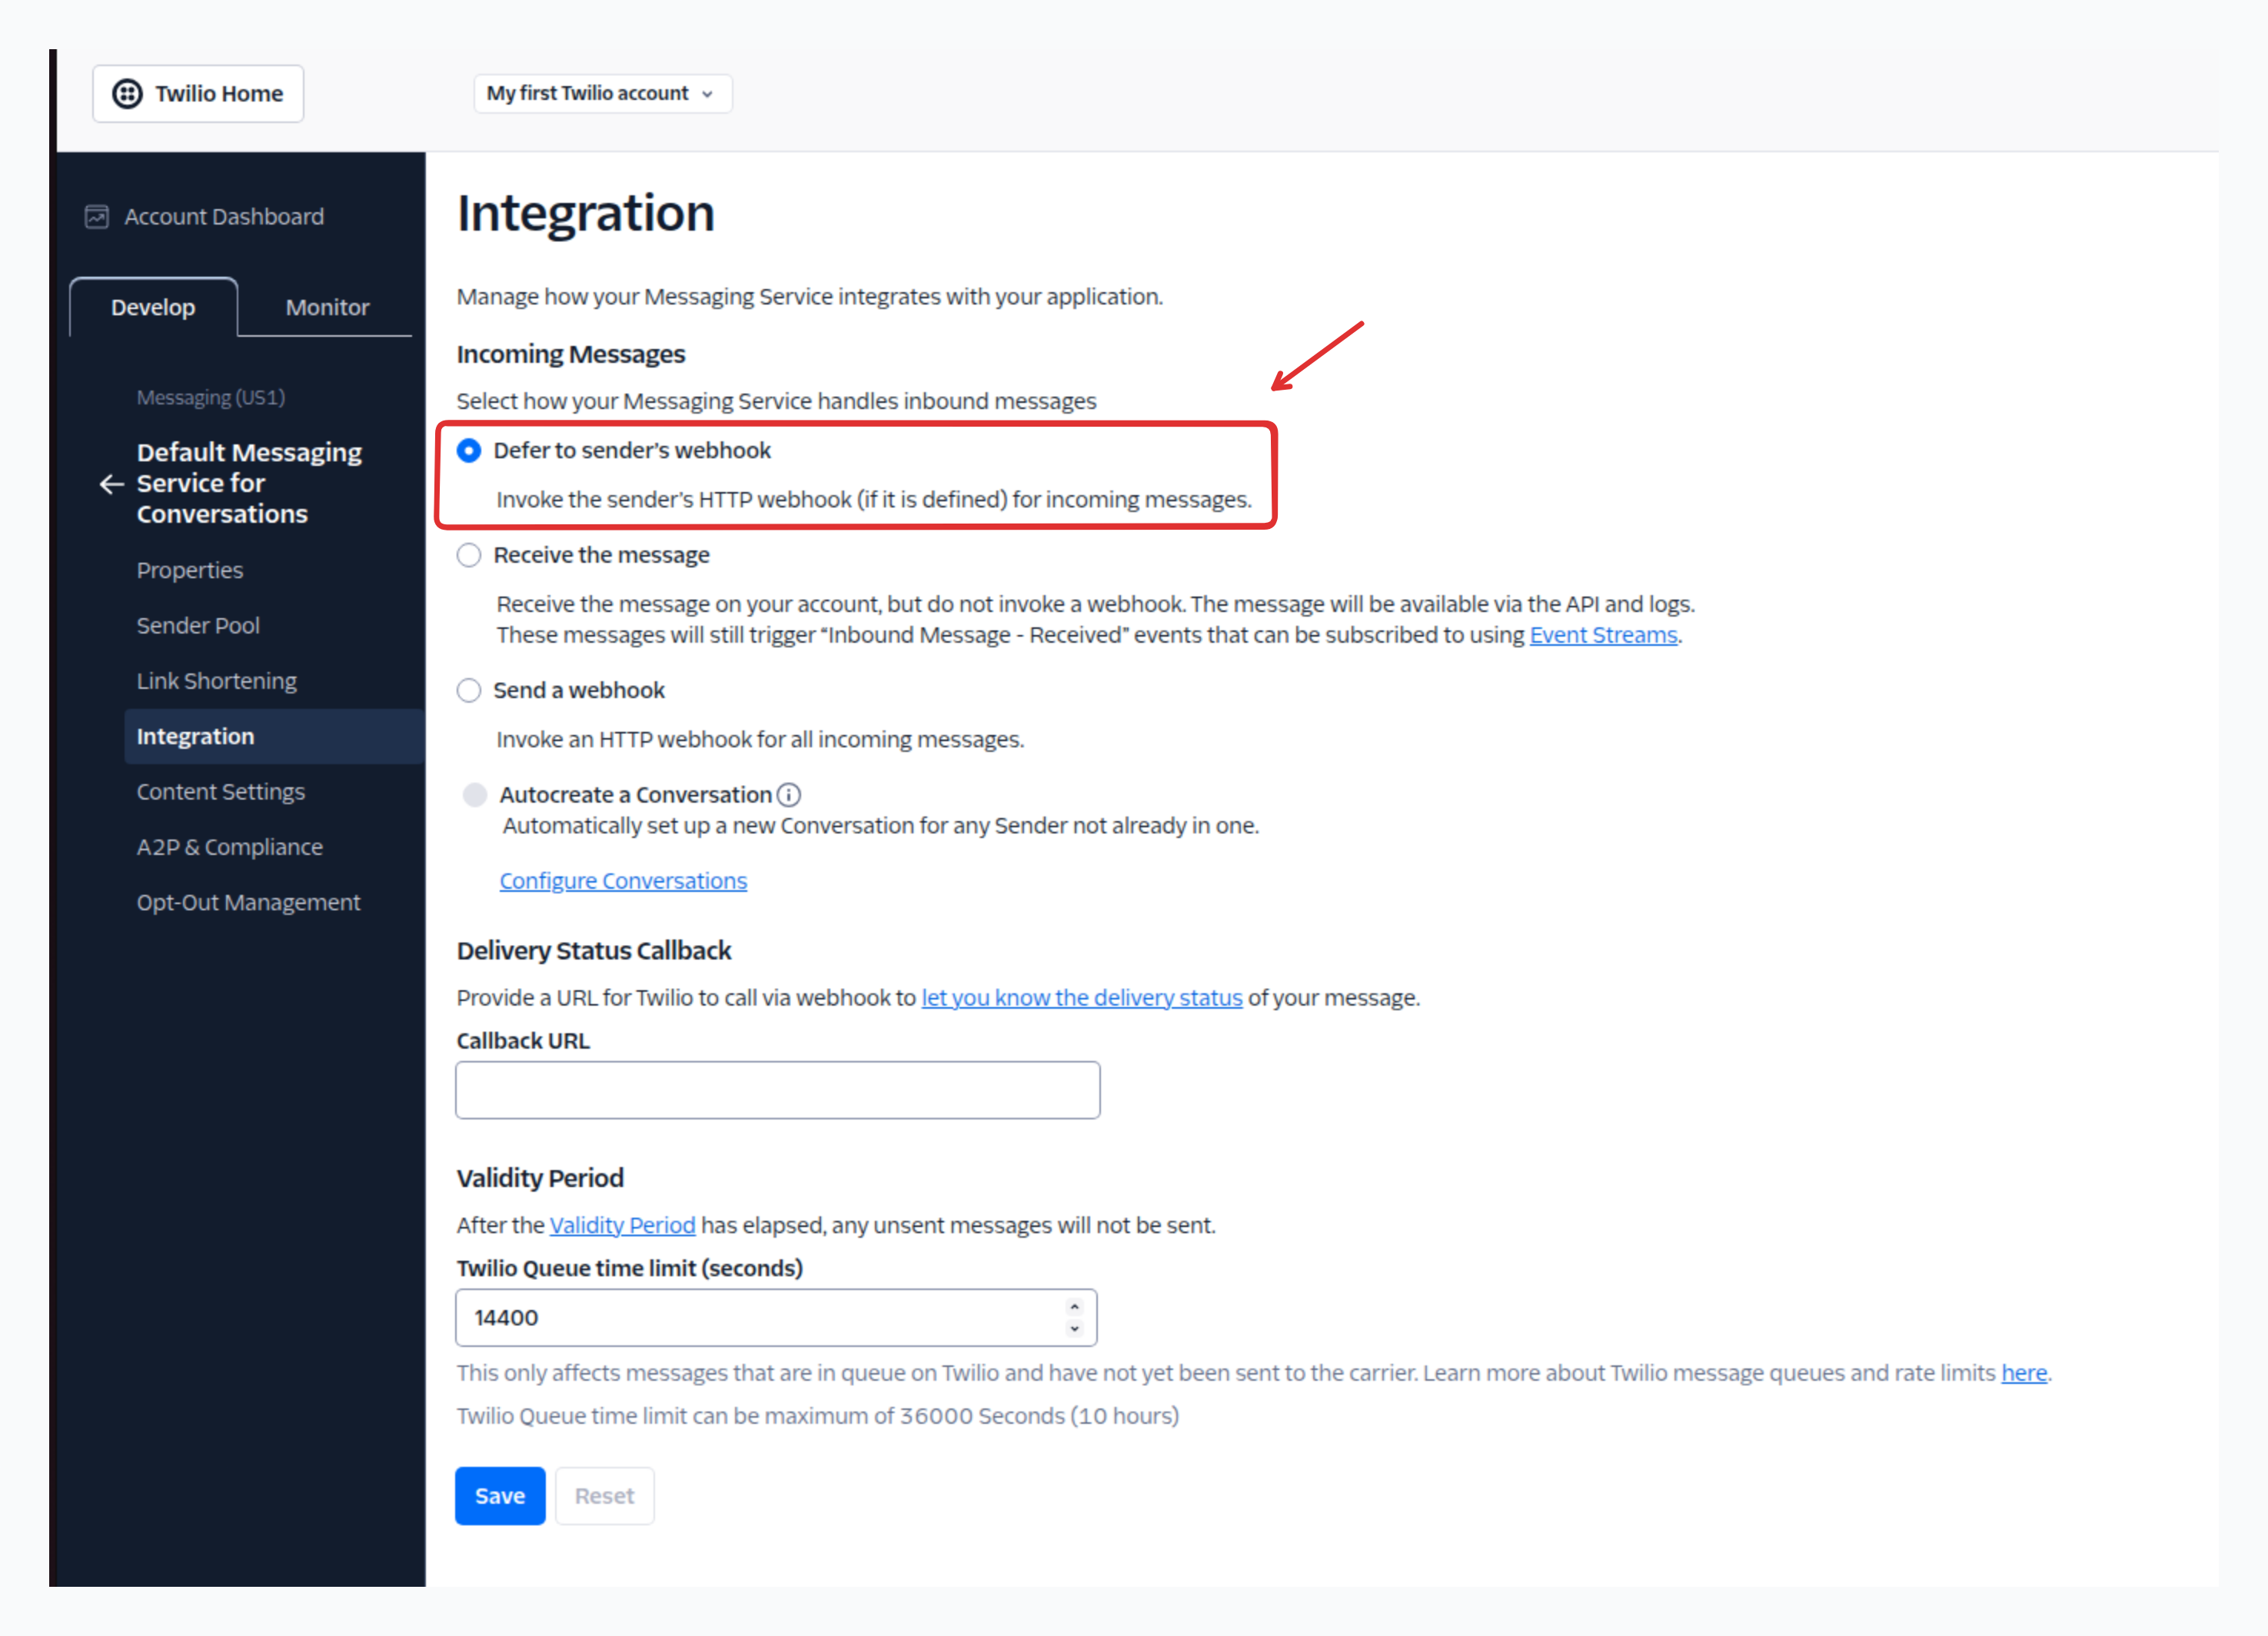
The webhook configuration is already set up if you are using a platform-provided Twilio phone number.
Auto Close With Survey
The Auto Close with Survey feature enables you to automatically manage conversation lifecycles while gathering valuable customer feedback. This feature helps maintain organized chat records and provides insights into customer satisfaction levels through automated survey collection.
Configuration
To set up Auto Close with Survey, navigate to the Live Chat section under Settings and locate the Enable Auto Close configuration panel. Here you can configure the following parameters:
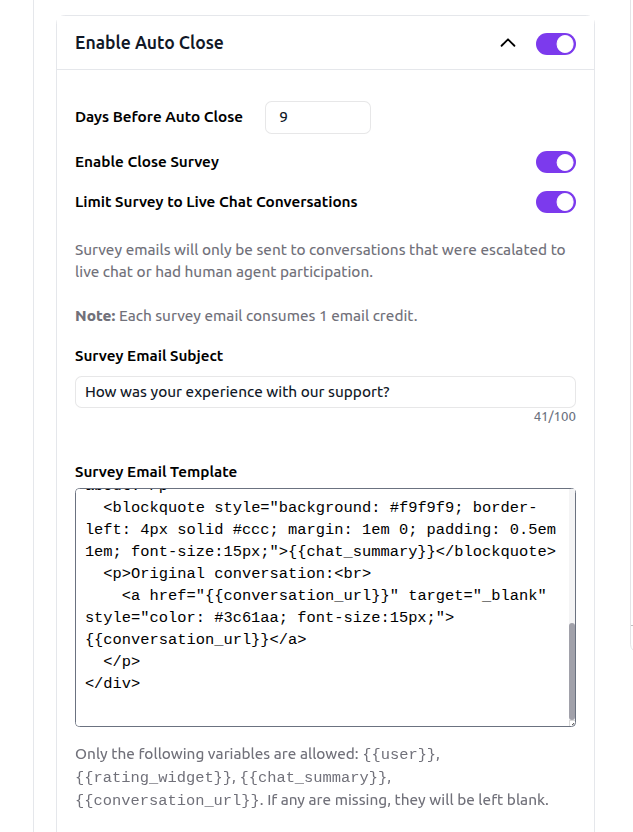
Auto Close Settings
- Days Before Auto Close: Set the number of days after the last agent message before the conversation automatically closes (e.g., 3, 7, or 14 days)
- Enable Close Survey: Choose when to send the survey:
- Limit Survey to Live Chat Conversations:
- If enabled, we only send surveys for conversations where a human agent was involved.
- Otherwise, we send surveys for all conversations after the specified number of days (Note: This option may consume more email credits)
- Limit Survey to Live Chat Conversations:
Survey Email Customization
- Survey Email Subject: Customize the subject line for the survey email sent to customers
- Survey Email Content: Personalize the email body content that accompanies the survey request
- Survey Reminder: The system automatically sends the survey one day before the scheduled conversation closure
Survey Email Content
You can fully customize both the subject and body of the survey email to match your brand voice and requirements. The email content supports dynamic variables that will be automatically replaced with actual values when sent to customers.
Available Template Variables
The following variables can be included in your email content and will be replaced with the corresponding values:
{{user}}: Replaced with the customer's name (if provided during the conversation){{rating_widget}}: Replaced with an interactive rating widget allowing customers to select from: Very Poor, Poor, Average, Good, Very Good{{chat_summary}}: Replaced with a conversation preview showing the actual messages exchanged between the customer and agent to remind the customer of the discussion. The language of the preview is controlled by the language setting in your Live Chat configuration.{{conversation_url}}: Replaced with a direct link to the conversation, allowing the customer to continue asking questions or view the full chat history
Using Template Variables
Simply include any of these variables in your email content where you want the dynamic content to appear. The email template must be written in HTML format. For example:
<div style="font-size:16px; font-family:sans-serif;">
  <p>Hello {{user}},</p>
  <p>We'd love to hear what you think of our customer service. Please take a moment to answer one simple question by clicking one of the emojis below:</p>
  <p style="font-size:16px; color:#444; margin-top:18px; margin-bottom:10px;">
    How would you rate the support you received?
  </p>
  {{rating_widget}}
  <p>Here's a reminder of what your ticket was about:</p>
  <blockquote style="background: #f9f9f9; border-left: 4px solid #ccc; margin: 1em 0; padding: 0.5em 1em; font-size:15px;">{{chat_summary}}</blockquote>
  <p>Original conversation:<br>
    <a href="{{conversation_url}}" target="_blank" style="color: #3c61aa; font-size:15px;">{{conversation_url}}</a>
  </p>
</div>
Template Variables
If you don't want to include any of these dynamic elements, simply omit the corresponding variables from your email template. Any missing variables will be left blank in the final email.
Test Email Feature
Before activating the survey feature, you can send a test email to preview how the survey will appear to customers:
- Click the Send Test Email button
- The test email will be sent directly to your registered account email address
- Review the survey format and content in your inbox (template variables will be populated with placeholder values)
- Make any necessary adjustments to the email content or subject
Survey Results and Analytics
Individual Conversation Results
Once a customer completes the survey, the rating is automatically attached to the corresponding conversation record. You can view these results in the live chat dashboard:
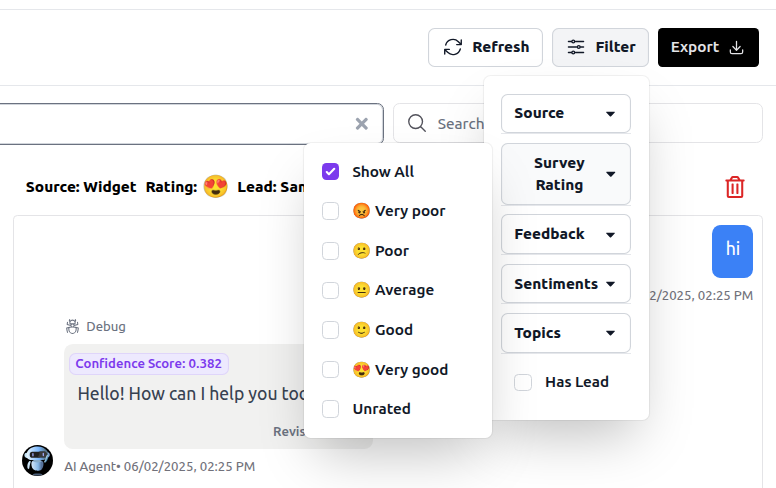
The survey results display the rating text directly: Very Poor, Poor, Average, Good, or Very Good.
You can also filter conversations by their ratings in the conversation dashboard for further analysis, allowing you to:
- View only conversations with specific rating levels
- Identify high-performing support interactions
Analytics Dashboard Integration
Survey results are integrated into both your private analytics dashboard and the public analytics dashboard (if enabled). The analytics provide:
Rating Distribution:
- Breakdown of each rating level (1-5 stars) displayed in a pie chart
- Trend analysis over time
Public Analytics Dashboard
If you have the public analytics dashboard enabled, you can choose to display aggregated satisfaction scores to website visitors, demonstrating your commitment to customer service quality.
Best Practices
Email Credits Management:
- Use Limit Survey to Live Chat Conversations mode to conserve email credits while focusing on human-assisted conversations. Customers who find AI responses helpful typically don't escalate to human agents, while only those requiring additional assistance will initiate live chat escalations.
- Monitor your email credit usage when disabling Limit Survey to Live Chat Conversations mode . Additional email credits can be purchased if needed.
Survey Timing:
- Consider your typical resolution timeframe when setting auto-close days
- Shorter timeframes (3-5 days) work well for simple inquiries
- Longer timeframes (7-14 days) are better for complex support cases
Email Content Optimization:
- Keep survey emails concise and professional
- Include your brand elements in the email template
- Clearly explain the purpose of the survey and upcoming conversation closure
Analytics Utilization:
- Review survey results regularly to identify improvement opportunities
- Use rating trends to measure the impact of support process changes
- Consider following up on poor ratings for service recovery opportunities