Advanced Use Cases
Using n8n, Make.com, or Zapier as Custom Backend
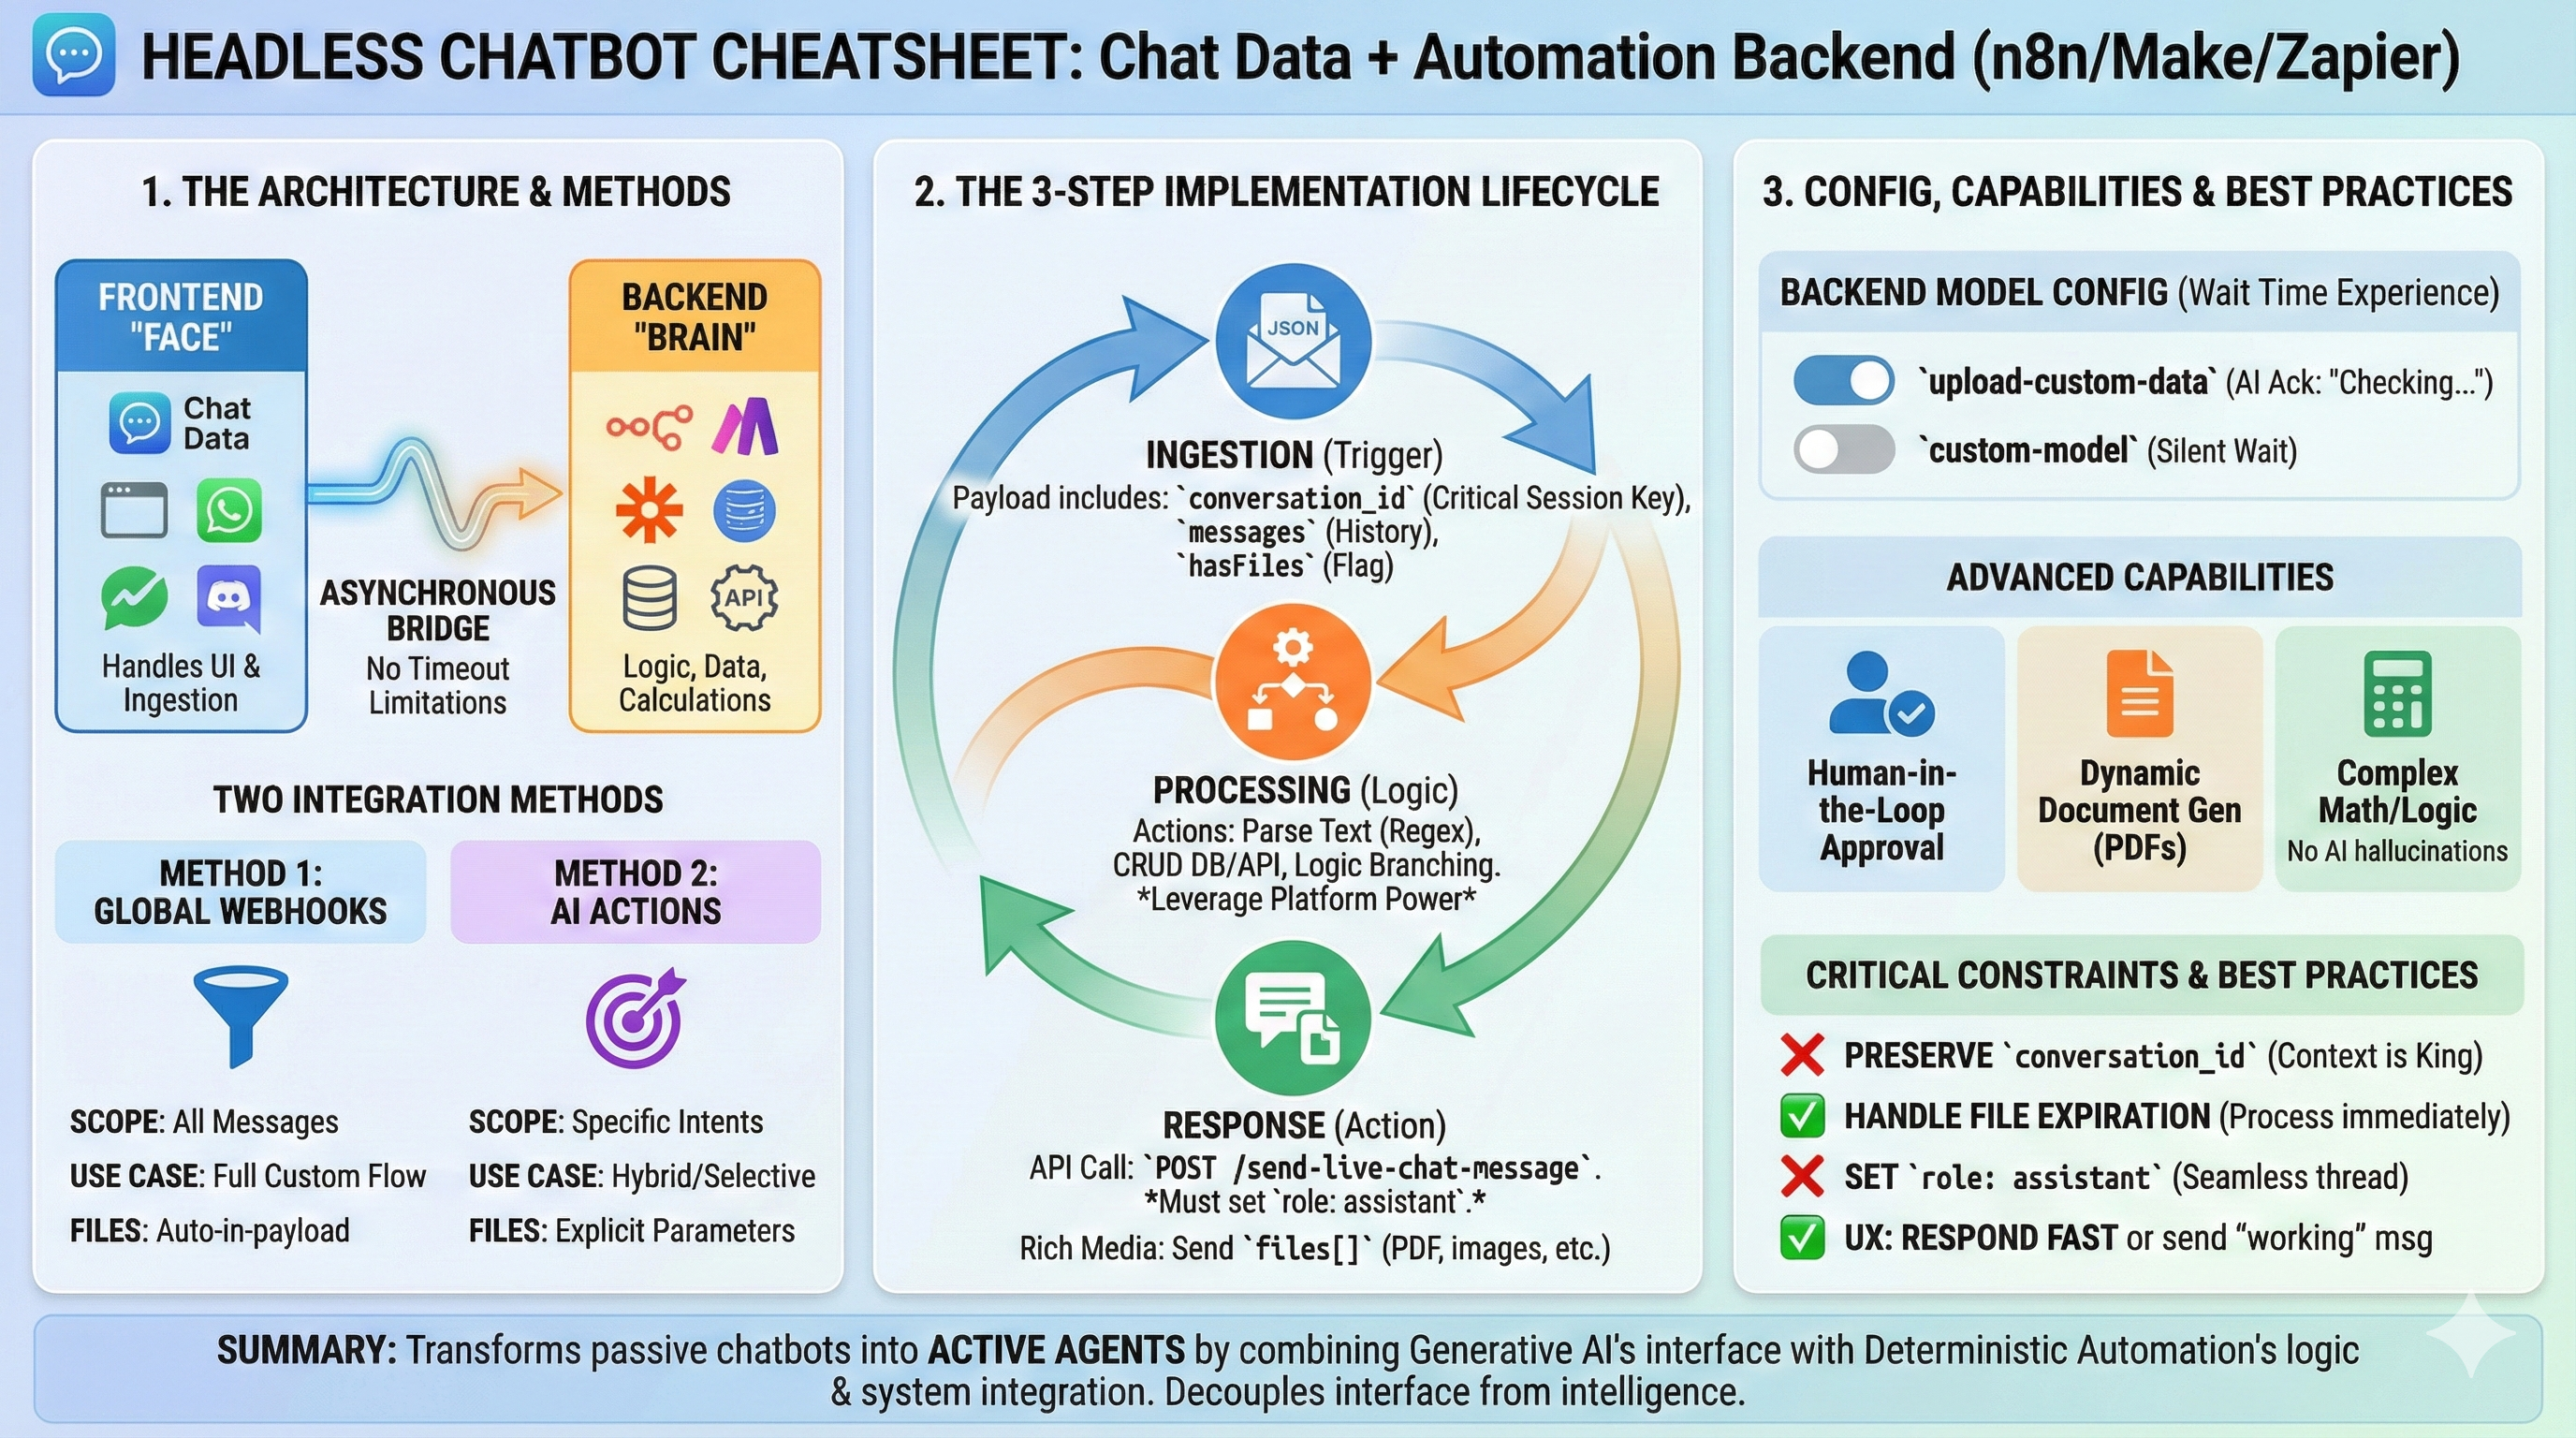
This guide shows you how to use Chat Data as a conversational frontend while leveraging automation platforms like n8n, Make.com, or Zapier as your custom backend. This architecture enables complex message processing, multi-step workflows, and deep integrations with your existing systems.
Overview
With this setup, Chat Data handles the conversational interface across all platforms (website widget, WhatsApp, Discord, etc.), while your automation platform processes messages and sends responses back asynchronously. This eliminates timeout issues and enables sophisticated backend logic.
Prerequisites
Before starting, ensure you have:
Chat Data Account with Live Chat Feature
- Available in Standard and Professional plans
- Entry plan users can purchase the Live Chat add-on
- Enable Live Chat in Settings > Live Chat
Automation Platform Account
- n8n: Official Chat Data nodes pre-installed in n8n cloud - See integration guide
- Make.com: Chat Data integration available - See integration guide
- Zapier: Chat Data app in the directory - See integration guide
- Others (Pipedream, etc.): Manual webhook setup required
API Key
- Obtain from your Chat Data account page
Two Methods to Trigger Backend Processing
Method 1: Process ALL Messages (Webhooks)
Use this method when you want every user message to be processed by your backend:
- Enable webhooks in Chat Data Settings > Webhooks - See webhook setup guide
- Configure the webhook URL from your automation platform
- Every message will trigger your backend workflow
Method 2: Process SPECIFIC Messages (AI Actions)
Use this method for selective processing based on conditions:
- Create an AI Action in Settings > Actions - See AI Actions guide
- Define triggering conditions (e.g., "when user asks about order status")
- Point to your automation platform's webhook URL
- Only matching messages trigger your backend
Backend Model Configuration
You can control the AI's behavior:
upload-custom-data: AI sends an acknowledgment response while your backend processescustom-model: No AI response - only your backend's response appears (return empty string)
This configuration determines whether users see an immediate AI acknowledgment or wait for your backend's response only.
Step-by-Step Implementation
Step 1: Set Up Message Reception
For n8n
// Use the "On New Message" trigger node
// It's pre-installed in n8n cloud
{
  "trigger": "On New Message",
  "chatbotId": "your-chatbot-id"
}
For Make.com
Use the "Watch New Message" module:
- Add Chat Data > Watch New Message
- Authenticate with your API key
- Select your chatbot
For Zapier
- Choose Chat Data as your trigger app
- Select "New Message" as the event
- Connect your account and select chatbot
For Other Platforms
Set up a webhook endpoint to receive the 'chat' event:
// Example webhook payload
{
  "messages": [
    {
      "role": "user",
      "content": "What's my order status?",
      "files": [  // Present when user attaches files
        {
          "url": "https://storage.chat-data.com/temp/file123.png",
          "name": "order_screenshot.png",
          "type": "image/png"
        }
      ]
    }
  ],
  "hasFiles": true,  // Indicates if last message contains files (Method 1 only)
  "conversation_id": "dbf24043-83a6-47fb-b241-9865de3877c9",
  "chatbot_id": "654aee418bc9a33b0e50d0ad",
  "event": "chat"
}
Step 2: Process Messages in Your Automation Platform
Extract key data from the webhook payload:
conversation_id: Required for sending responsesmessages: Chat history (check forfilesarray whenhasFilesis true)chatbot_id: Your chatbot identifierhasFiles: Boolean indicating file attachments (Method 1 only)
Process with your custom logic:
- Handle file attachments from users
- Query databases
- Call external APIs
- Perform calculations
- Execute multi-step workflows
- Generate personalized responses
Handling User File Attachments
Method 1 (Webhooks)
When users attach files through the Chat Data interface, they appear in the webhook payload:
- Files are included in the
filesarray within the message object - The
hasFilesfield indicates if the last message contains files - File URLs are temporary - download and process them promptly
Method 2 (AI Actions)
For AI Actions, you must configure file parameters in your API body:
- Add file fields as parameters in your AI Action configuration
- The AI will extract file information and pass it to your endpoint
- Configure your automation platform to handle these file parameters
File URL Expiration
File URLs provided in webhooks are temporary. Download and process files immediately to avoid expiration issues.
Step 3: Send Response via Live Chat Message API
Use the Send Live Chat Message API to deliver your response:
POST https://www.chat-data.com/api/v2/chatbots/{chatbotId}/send-live-chat-message
Authorization: Bearer YOUR_API_KEY
Content-Type: application/json

{
  "chatbotId": "654aee418bc9a33b0e50d0ad",
  "message": "Your order #12345 has been shipped and will arrive tomorrow.",
  "conversationId": "dbf24043-83a6-47fb-b241-9865de3877c9",
  "role": "assistant",
  "files": []
}
Important
Always use "role": "assistant" to maintain the AI conversation context. This ensures your backend responses appear as AI assistant messages.
Platform-Specific Examples
For detailed setup instructions, refer to our integration guides:
n8n Workflow Example
[On New Message] → [Function: Process Order] → [HTTP Request: Send Response]
Function node example:
// Extract order number from message
const message = $input.first().json.messages[0].content;
const orderMatch = message.match(/#(\d+)/);
const orderNumber = orderMatch ? orderMatch[1] : null;

// Query your database (example)
const orderStatus = await queryOrderDatabase(orderNumber);

return {
  response: `Order #${orderNumber} status: ${orderStatus}`,
  conversationId: $input.first().json.conversation_id
};
Make.com Scenario Example
- Watch New Message (Chat Data)
- HTTP Request (Query your API)
- Text Parser (Format response)
- HTTP Request (Send Live Chat Message)
Zapier Zap Example
- Trigger: New Message in Chat Data
- Action: Find Record (your database)
- Action: Format Text (build response)
- Action: Webhooks by Zapier (POST to Live Chat API)
Advanced Use Cases
1. Multi-Step Approval Workflow
User: "I need approval for $5000 expense"
Backend: Creates approval ticket → Notifies manager → Waits for approval → Sends result
2. Real-Time Data Integration
User: "Show me current inventory for SKU-123"
Backend: Queries inventory system → Formats data → Sends with availability status
3. Document Generation
User: "Generate my invoice for last month"
Backend: Pulls billing data → Creates PDF → Sends as file attachment
4. Complex Calculations
User: "Calculate my loan payment for $200k at 5%"
Backend: Runs financial calculations → Generates amortization → Sends detailed breakdown
Sending Files, Images, and Videos
The Send Live Chat Message API supports sending any type of file attachment back to users, including:
- Videos (mp4, mov, avi, etc.)
- Images (png, jpg, gif, etc.)
- Documents (pdf, docx, xlsx, etc.)
- Audio files (mp3, wav, etc.)
- Any other file type
{
  "chatbotId": "xxx",
  "message": "Here are your requested files:",
  "conversationId": "xxx",
  "role": "assistant",
  "files": [
    {
      "type": "application/pdf",
      "url": "https://your-storage.com/invoice.pdf",
      "name": "Invoice_March_2024.pdf"
    },
    {
      "type": "video/mp4",
      "url": "https://your-storage.com/product-demo.mp4",
      "name": "Product_Demo.mp4"
    },
    {
      "type": "image/png",
      "url": "https://your-storage.com/chart.png",
      "name": "Analytics_Chart.png"
    }
  ]
}
Best Practices
- Error Handling: Always include try-catch blocks and send user-friendly error messages
- Response Time: While there's no timeout, aim to respond within 30 seconds for better UX
- Conversation Context: Store conversation_id to maintain context across messages
- Webhook Security: Verify webhook signatures for production use
- Rate Limiting: Implement appropriate delays for bulk operations
Troubleshooting
Common Issues
No response appearing:
- Verify Live Chat is enabled in Settings
- Check conversation_id matches an active conversation
- Ensure API key has correct permissions
Authentication errors:
- Confirm API key is valid and active
- Use Bearer token format in Authorization header
Messages not triggering backend:
- For webhooks: Check webhook URL and signing secret
- For AI Actions: Verify triggering conditions match user input
Platform Compatibility
This setup works across all Chat Data interfaces:
- Website widget and iframe
- WhatsApp Business
- Facebook Messenger
Offline users automatically receive email notifications when responses arrive after they've left.
Conclusion
Using Chat Data with automation platforms as custom backends provides unlimited flexibility for complex conversational workflows. Whether you need database integrations, multi-step processes, or connections to proprietary systems, this architecture enables powerful solutions while maintaining a seamless user experience.