Advanced Features
Workflow AI Actions
Workflow AI Actions are a powerful feature that allows you to build customized, multi-step conversational procedures using a visual node-based builder. Unlike standard chatbot responses or simple AI Actions, workflows maintain consistent memory across multiple steps, can wait for external events like webhook callbacks, call APIs in sequence, and persist critical data across conversations.
What Makes Workflows Special
Workflows are built from a set of specialized nodes—each designed for specific purposes like sending messages, collecting form data, calling APIs, running custom code, or making logical decisions. When you publish a workflow and connect it to an AI Action, your chatbot gains the ability to execute that exact procedure whenever the conditions you specify are met.
Here's the complete lifecycle:
- Create your workflow in Chatbot → Settings → Workflows using the visual workflow builder
- Test your workflow thoroughly using manual testing or AI simulation
- Publish the workflow to make it available as an AI Action
- Add as AI Action in Settings → Actions, selecting "Workflow Action" type and choosing your published workflow
- Configure triggering in your chatbot's base prompt by specifying when the AI should trigger this workflow
When the workflow is triggered in production:
- Your base prompt hands control to the workflow
- The workflow executes exactly as designed, following the node connections you've created
- The workflow can store variables throughout its execution journey
- When the workflow exits (reaches an unconnected node or completes), control returns to your base prompt
- Any data you've saved to
VISITORfields via the Create or Update Lead node persists for future conversations
Why Workflows Matter
Unlike simple one-off AI actions, workflows maintain contextual memory across the whole execution. They're ideal for stateful procedures that require:
- Collecting data over several steps
- Waiting for webhook callbacks or external events
- Calling multiple APIs in sequence with conditional logic
- Persisting lead data that needs to be available across conversations
- Handling strict procedures like authentication, payment collection, or ticket creation
Real-World Use Cases
Example 1: Authentication Workflow Your chatbot can handle general customer service questions, but when a user asks to view their account details, the base prompt triggers an authentication workflow. This workflow:
- Requests the user's email and password
- Calls your authentication API
- Stores the authentication token and expiration date in
VISITOR.INFO - Uses Create or Update Lead to persist this data
- Returns control to the base prompt
Later, when the user asks to make a payment, the base prompt checks VISITOR.INFO for a valid authentication token. If expired, it triggers the authentication workflow again. If valid, it triggers the payment workflow.
Example 2: Support Ticket Creation
- User describes their issue to the base chatbot
- Chatbot determines this needs a ticket and triggers the ticket workflow
- Workflow uses AI Capture to extract issue details, priority, and category
- Calls your ticketing API to create the ticket
- Waits for webhook confirmation with ticket number
- Sends email confirmation to the user with the ticket details
- Returns to normal chat
This level of coordination—with variable persistence, external API calls, webhook waits, and conditional logic—is what makes workflows uniquely powerful.
Getting Started with the Workflow Builder
Navigate to Chatbot → Settings → Workflows to access the workflow builder interface. The builder consists of several key components:
Builder Interface Components
Canvas (Center) The main workspace where you build your workflow by dragging nodes from the sidebar and connecting them with arrows. Every workflow starts with a Start node. Any path that reaches a node without an outgoing connection will exit the workflow and return control to your base prompt.
Tools Sidebar (Left) A collapsible panel with organized categories:
- Add Message: AI Conversation, Static Text, Image, Video, Audio, File, Carousel
- Capture Information: Form, AI Capture, Static Capture
- Actions: Close Conversation, Create or Update Lead, Send Email, Live Chat Escalation
- Logic: Condition, Validate, Wait
- Advanced: API Call, Set, Code
Each tool can be dragged onto the canvas. The sidebar also contains a Variables button to open the Variable Manager.
Configuration Panel (Right) When you select a node on the canvas, this panel displays all configuration options for that specific node type—prompts, URLs, field mappings, conditions, code editors, etc.
Top Toolbar Contains workflow-level actions:
- Save: Save your current work as a draft
- Publish: Make the workflow available for use in AI Actions
- Auto Prompt: AI-powered workflow generation and modification
- File: Import, export, or clear the workflow
- Test Flow: Open the testing interface
Flow Toolbar (Middle Bottom of Canvas)
- Pointer Mode: Select and configure nodes
- Pan Mode: Navigate large workflows
- Text Annotation: Add rich-text documentation notes
- Image Annotation: Add inline images for documentation
Canvas Annotations
Text and Image annotation nodes are for internal documentation only—they never appear to users. Use them to:
- Describe the purpose of complex branches ("Payment escalation path for failed transactions")
- Add process diagrams or screenshots of expected UI flows
- Document business rules or compliance requirements
- Leave notes for team members
Complete Node Reference
Nodes are the building blocks of your workflow. Each node type serves a specific purpose and has unique configuration options.
Message Nodes
Message nodes send content to the user. All message nodes support the Skip Response option, which controls whether the workflow waits for user input before continuing.
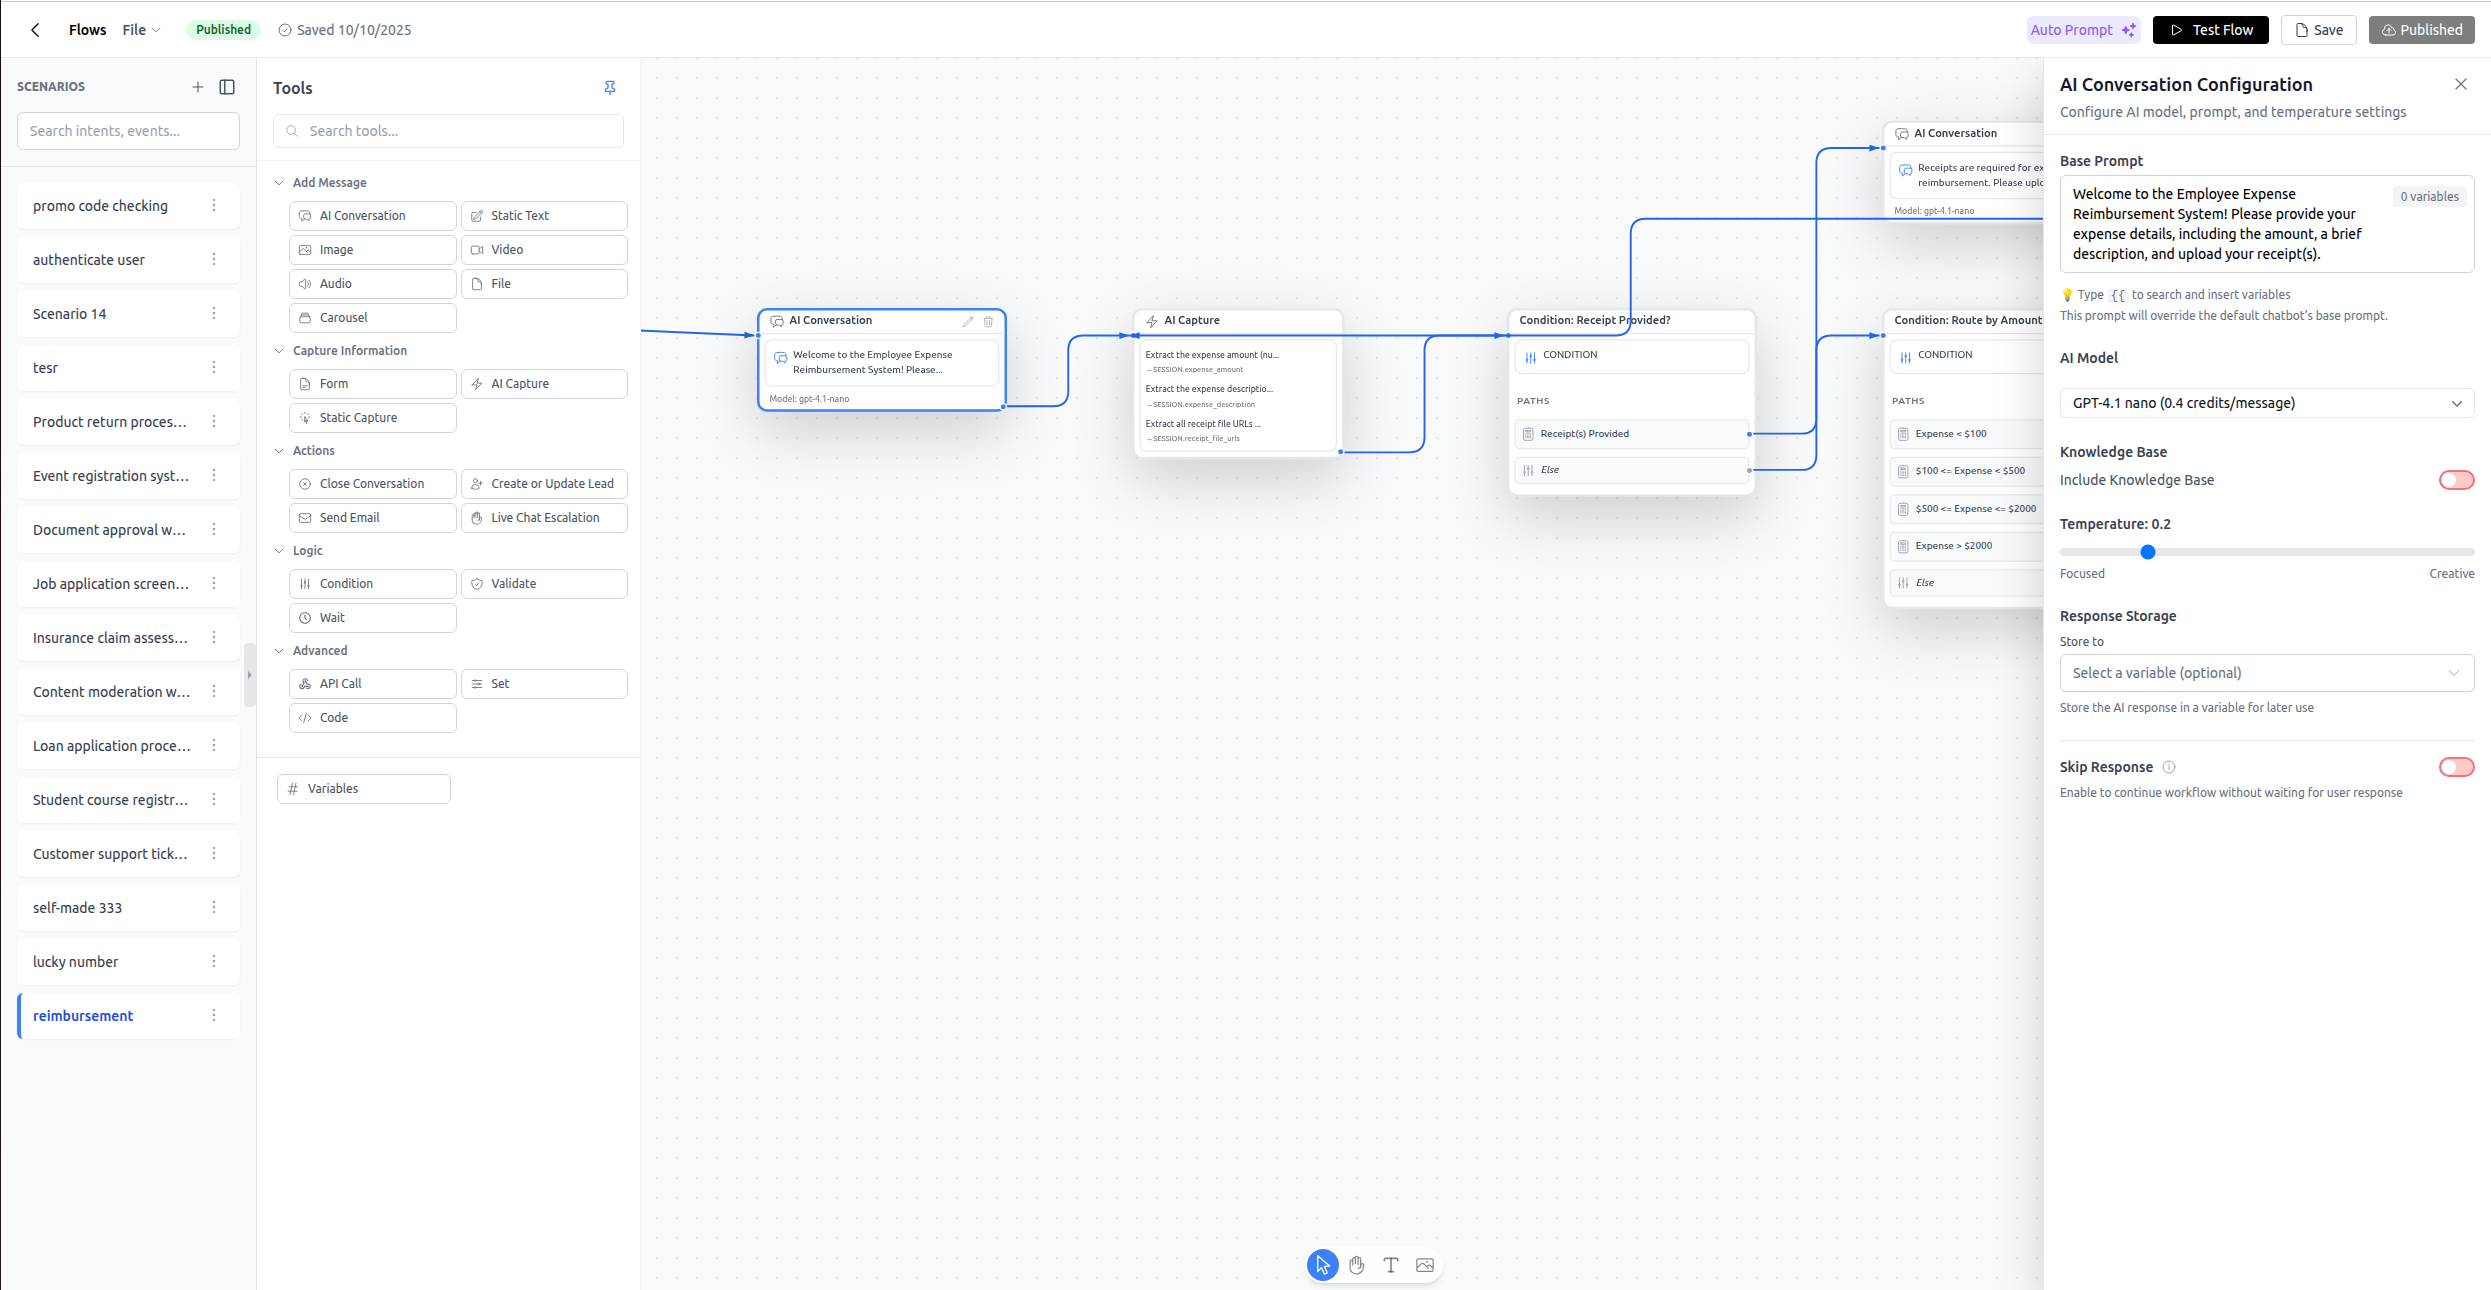
AI Conversation
Sends an AI-generated message using a custom prompt. This is the most versatile message node for dynamic, contextual responses.
Configuration:
- Label: Node name for identification (e.g., "Greet User")
- Prompt: The system prompt that guides the AI's response
- Model: AI model selection (default: gpt-4.1-nano)
- Temperature: 0-1, controls response randomness (lower = more focused)
- Include Knowledge Base: Toggle to allow access to your chatbot's knowledge base
- RAG Enhancement: Enable reranking for better knowledge base results (costs extra credits)
- Skip Response: If enabled, workflow continues immediately without waiting for user reply
- Store Response To: Optional variable to save the AI's response (e.g.,
SESSION.greeting)
When to Use:
- Dynamic greetings that adapt to conversation context
- Answering user questions during the workflow
- Providing contextual help or explanations
- Any time you need AI-powered, flexible responses
Credits: Consumes message credits (same as your main chatbot)
Example Use Case:
Label: Welcome Message
Prompt: Greet the user warmly and ask how you can help them with their insurance claim today.
Include Knowledge Base: Yes
Skip Response: No (wait for user to describe their issue)
Store Response To: SESSION.welcome_message
Dynamic UI Composer
The Dynamic UI Composer block allows your chatbot to generate interactive visual components—such as forms, product cards, and carousels—instead of just plain text.
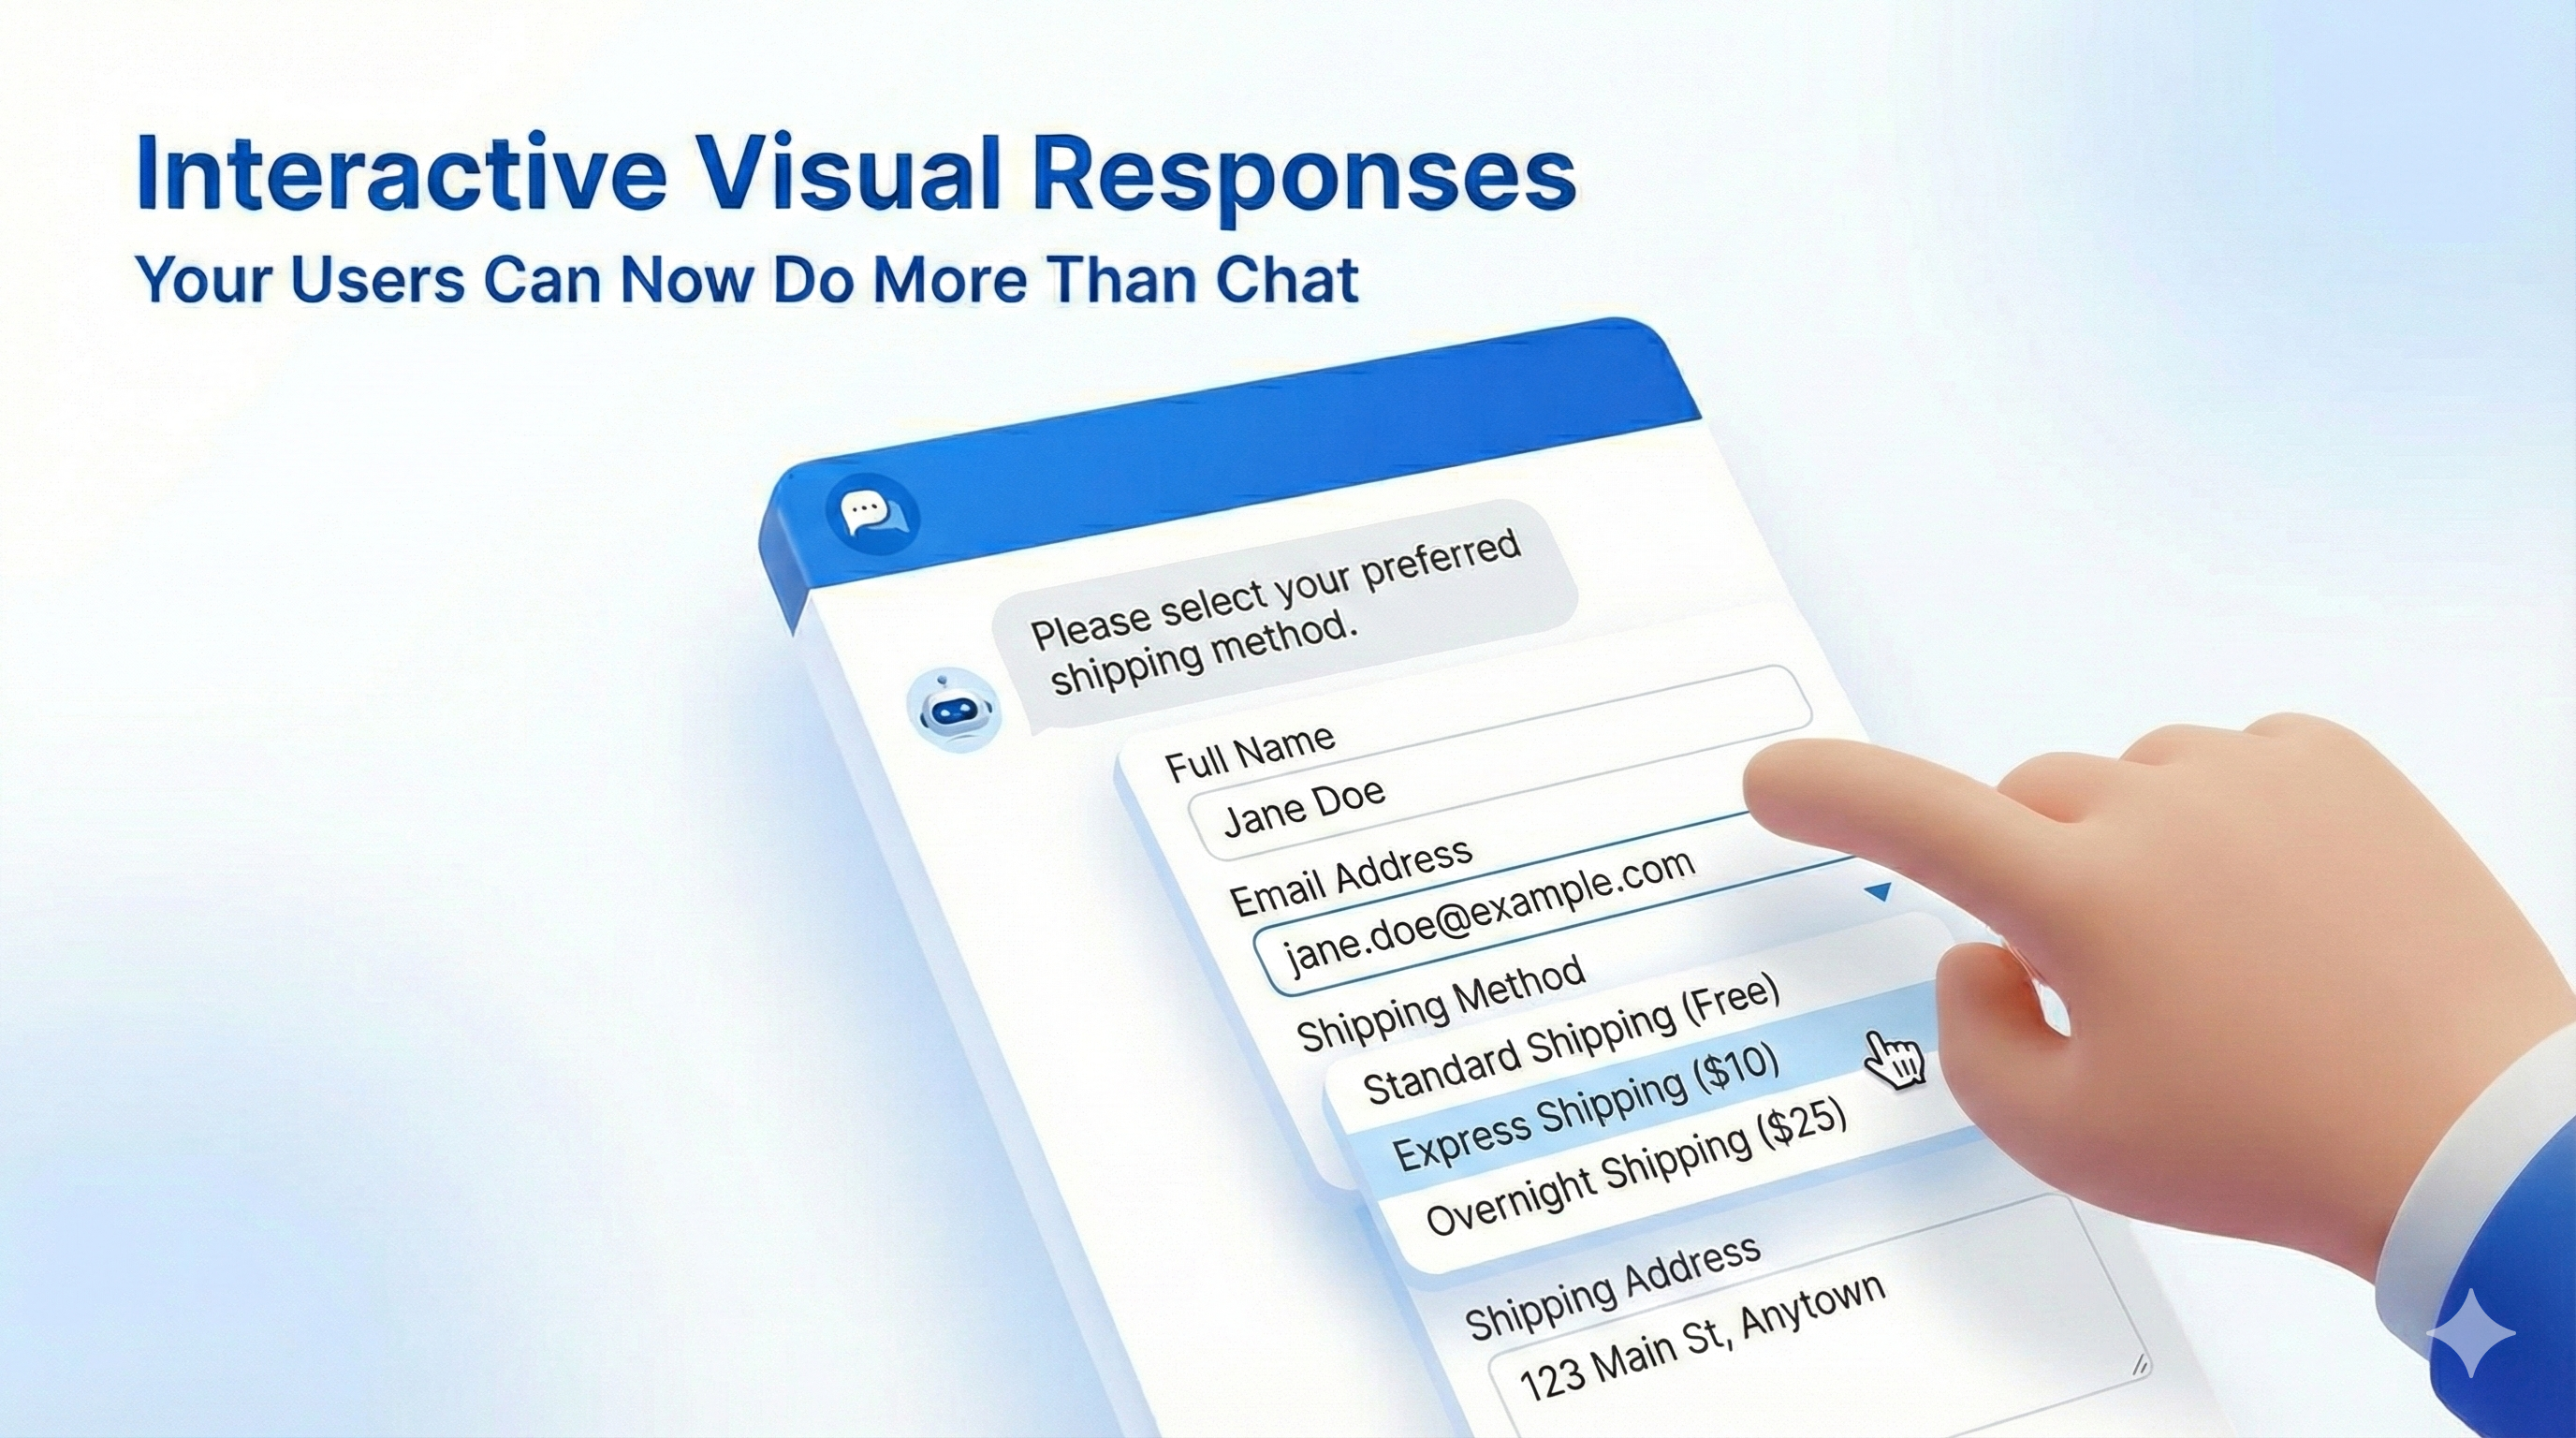
When to Use It
- Data Collection: Use forms to collect structured data (leads, surveys).
- Showcasing: Display products or items in a scrollable carousel.
- Structured Info: Show confirmations, summaries, or tables.
- Navigation: Provide clear action buttons for next steps.
Configuration
- Add the Block: Drag the "Dynamic UI Composer" block into your workflow.
- Define UI Formats (Optional): Click "UI Formats" to specify the structure (e.g., "Product card with image, title, and price"). This helps guide the AI to generate UI close to what you have in mind. If not specified, the AI will create the UI elements by itself based on the conversation context.
- Write Instructions: In the prompt area, tell the AI what to generate (e.g., "Create a product recommendation card based on the user's preference").
- Connect Data: You can feed data into this block from a Knowledge Base search, API call, or previous steps.
Note: To handle user interactions (like clicking a button or submitting a form), follow this block with an AI Condition or AI Capture block to process the user's input.
Static Text
Sends a fixed text message, optionally with a call-to-action button.
Configuration:
- Label: Node name
- Text Content: The message text (supports
{{variable}}interpolation) - Button Label: Optional button text (e.g., "Learn More")
- Button URL: Optional button link (supports
{{variable}}interpolation) - Skip Response: Whether to wait for user reply
When to Use:
- Fixed confirmations ("Your request has been submitted")
- Standard instructions that don't need AI variation
- Sending links or CTAs with dynamic URLs
Credits: Free (no AI involved)
Example:
Text Content: Thank you, {{VISITOR.NAME}}! Your application ID is {{SESSION.applicationId}}.
Button Label: View Status
Button URL: https://portal.example.com/status/{{SESSION.applicationId}}
Skip Response: No
Image Message
Sends an image with an optional caption.
Configuration:
- Image URL: Either a static URL or dynamic with
{{variables}} - Message: Optional caption text
- Skip Response: Whether to wait for user reply
When to Use:
- Displaying static images (logos, diagrams)
- Showing dynamic images generated by APIs (QR codes, charts)
- Visual instructions or confirmations
Credits: Free
Dynamic URL Example:
Image URL: https://api.qr-server.com/v1/create-qr-code/?data={{SESSION.ticket_url}}&size=300x300
Message: Scan this QR code to access your ticket
Video Message
Sends a video with an optional description.
Configuration:
- Video URL: Static or dynamic with
{{variables}} - Message: Optional description text
- Skip Response: Whether to wait for user reply
When to Use:
- Tutorial videos
- Product demonstrations
- Personalized video messages
Credits: Free
Audio Message
Sends an audio file with an optional description.
Configuration:
- Audio URL: Static or dynamic with
{{variables}} - Message: Optional description text
- Skip Response: Whether to wait for user reply
When to Use:
- Voice messages
- Audio instructions
- Podcasts or recordings
Credits: Free
File Message
Sends a downloadable file with an optional description.
Configuration:
- File URL: Static or dynamic with
{{variables}} - Message: Optional description text
- Skip Response: Whether to wait for user reply
When to Use:
- PDFs, documents, spreadsheets
- Download links for resources
- Dynamically generated reports
Credits: Free
Example:
File URL: https://api.example.com/reports/{{SESSION.reportId}}/download
Message: Here's your monthly report for {{SESSION.month}}
Carousel
Displays multiple cards with images, titles, descriptions, and optional buttons. The carousel supports two modes: Manual (fixed cards with dynamic field values) and AI (AI generates cards from data sources). The carousel UI renders beautifully in the website widget/iframe. For third-party integrations (WhatsApp, Messenger, etc.), we adapt the content to send files, images, and buttons separately as supported by each platform.
Mode Selection:
- Manual (default): You define a fixed number of cards with static or variable-interpolated fields
- AI: AI automatically generates cards based on your knowledge base or custom context
Manual Mode Configuration:
- Message: Introductory text before the carousel
- Cards: Array of cards, each with:
- Title: Card heading
- Description: Card body text
- Type: image, video, audio, or file
- URL: Media URL (supports
{{variables}}) - Button Label: Optional CTA text
- Button URL: Optional CTA link (supports
{{variables}})
- Skip Response: Whether to wait for user reply
AI Mode Configuration:
- Prompt: Instructions for the AI on what kind of cards to generate (e.g., "Generate product cards for items matching the user's search query")
- Model: AI model selection (default: gpt-4.1-nano)
- Data Source: Choose where AI gets information from:
- Knowledge Base: Uses your chatbot's training data
- RAG Enhancement: Enable reranking for better retrieval accuracy (costs 1 extra credit per message)
- Custom: Provide your own context with variable support (e.g.,
{{SESSION.search_results}})
- Knowledge Base: Uses your chatbot's training data
- Generate Message: Whether AI should also generate the introductory message (unchecked by default)
- Card Types: Select which media types AI can generate (image, video, audio, file)
- Card Type Configs: For each enabled type, configure:
- Max Cards: Maximum number of cards of this type (e.g., 5 images)
- Available Fields: Which fields AI can populate (url, description, title, buttonLabel, buttonUrl)
- Skip Response: Whether to wait for user reply
When to Use:
Manual Mode:
- Product catalogs with a known, fixed set of items
- Service offerings with predefined visual cards
- Multi-option menus with consistent structure
AI Mode:
- Dynamic product recommendations from knowledge base
- Search results that vary based on user queries
- Content that needs to be generated based on conversation context
- When you don't know the number of items ahead of time
Credits:
- Manual Mode: Free (no AI involved)
- AI Mode: Consumes message credits (same as AI Conversation)
Important Notes:
- Manual Mode: The number of cards is fixed at design time, but all fields support dynamic variables for runtime customization
- AI Mode: AI determines both the number and content of cards within your configured limits. You control the constraints (max cards per type, available fields), and AI fills in the details
Manual Mode Example:
Message: Choose your plan
Card 1:
  Title: Premium Plan - ${{SESSION.premium_price}}/mo
  Description: {{SESSION.premium_features}}
  Type: image
  URL: https://cdn.example.com/plans/premium.jpg
  Button Label: Select Premium
  Button URL: https://checkout.example.com/premium?user={{VISITOR.EMAIL}}
AI Mode Example:
Prompt: Generate product cards for items that match the user's interest in {{SESSION.product_category}}. Include product images, descriptions, and purchase links.
Data Source: Knowledge Base
RAG Enhancement: Enabled
Generate Message: Yes
Card Types: [image]
Card Type Configs:
  image:
    Max Cards: 5
    Available Fields: [url, description, title, buttonLabel, buttonUrl]
In this AI mode example, the AI will:
- Search your knowledge base for products in the user's category
- Generate up to 5 image cards with titles, descriptions, URLs, and purchase buttons
- Also generate an appropriate introductory message
Data Collection Nodes
These nodes gather information from users or capture data from the conversation.
Form
Displays a custom form with multiple fields. Each field stores its value to a variable via the variablePath property.
Configuration:
- Title: Form heading shown to the user
- Message: Optional introductory text before the form
- Fields: Array of form fields, each with:
- Label: Field label shown to user
- Type: Field type (see below)
- Placeholder: Hint text (for text/textarea fields)
- Required: Whether the field must be filled
- Variable Path: Where to store the value (must start with VISITOR. or SESSION.)
- Options: Array of choices (for select/checkbox-group only)
- Multiple: Allow multiple selections (for checkbox-group only)
- Is Mandatory: Whether the entire form must be completed
- Mandatory Message: Message shown if user tries to skip required fields
- Continue After Submission: Whether to auto-continue after form submission (otherwise waits for next user message)
Field Types:
- text: Single-line text input
- textarea: Multi-line text input
- select: Dropdown menu (requires
optionsarray) - checkbox-group: Multiple checkboxes (requires
optionsarray, supportsmultiple)
When to Use:
- Collecting structured user information (name, email, phone, preferences)
- Surveys and feedback forms
- Registration or application forms
Credits: Free
Important: Form values are stored in variables. To persist this data after the workflow ends, you must:
- Store values to variables during form submission
- Call the Create or Update Lead node before exiting the workflow
- Map the important fields to
VISITOR.NAME,VISITOR.EMAIL,VISITOR.PHONE, or include them inVISITOR.INFO
Example:
Title: Contact Information
Fields:
  - Label: Full Name
    Type: text
    Required: true
    Variable Path: VISITOR.NAME

  - Label: Email Address
    Type: text
    Required: true
    Variable Path: VISITOR.EMAIL

  - Label: Preferred Contact Method
    Type: select
    Options: ["Email", "Phone", "Text"]
    Variable Path: SESSION.contact_method

Continue After Submission: false
AI Capture
Uses AI to extract structured information from the user's message. This is powerful for parsing unstructured input into specific fields.
Configuration:
- Label: Node name
- Model: AI model for extraction
- Fields: Array of extraction targets, each with:
- Description: Instruction for what to extract (e.g., "Extract the user's order number")
- Variable Path: Where to store the extracted value
When to Use:
- Extracting specific data from free-form user messages
- Parsing dates, numbers, or entities from natural language
- Converting informal input into structured formats (e.g., "tomorrow at 3pm" → "2024-01-15T15:00:00")
Credits: Consumes message credits
Best Practice: Consolidate multiple related extractions into one AI Capture node instead of creating separate nodes. For example, extract name, email, and phone number in a single AI Capture with three fields.
Example:
Fields:
  - Description: Extract the user's order number (format: ORD-XXXXX)
    Variable Path: SESSION.order_number

  - Description: Extract the issue description or complaint
    Variable Path: SESSION.issue_description

  - Description: Extract the preferred resolution date in YYYY-MM-DD format
    Variable Path: SESSION.preferred_date
Static Capture
Stores the exact text of the last user message into a variable, without any AI processing.
Configuration:
- Label: Node name
- Variable Path: Where to store the captured text
- Capture Type: Currently only "text" is supported
When to Use:
- Storing raw user input without modification
- Capturing complete message content for later reference
- Preserving original text before processing
Credits: Free
Note: You can also access the last user input directly using the default variable SESSION.LAST_USER_INPUT_TEXT without needing a Static Capture node.
Example:
Variable Path: SESSION.raw_feedback
Logic & Control Nodes
These nodes control the flow of your workflow with conditional branching, validation, waits, API calls, and custom code.
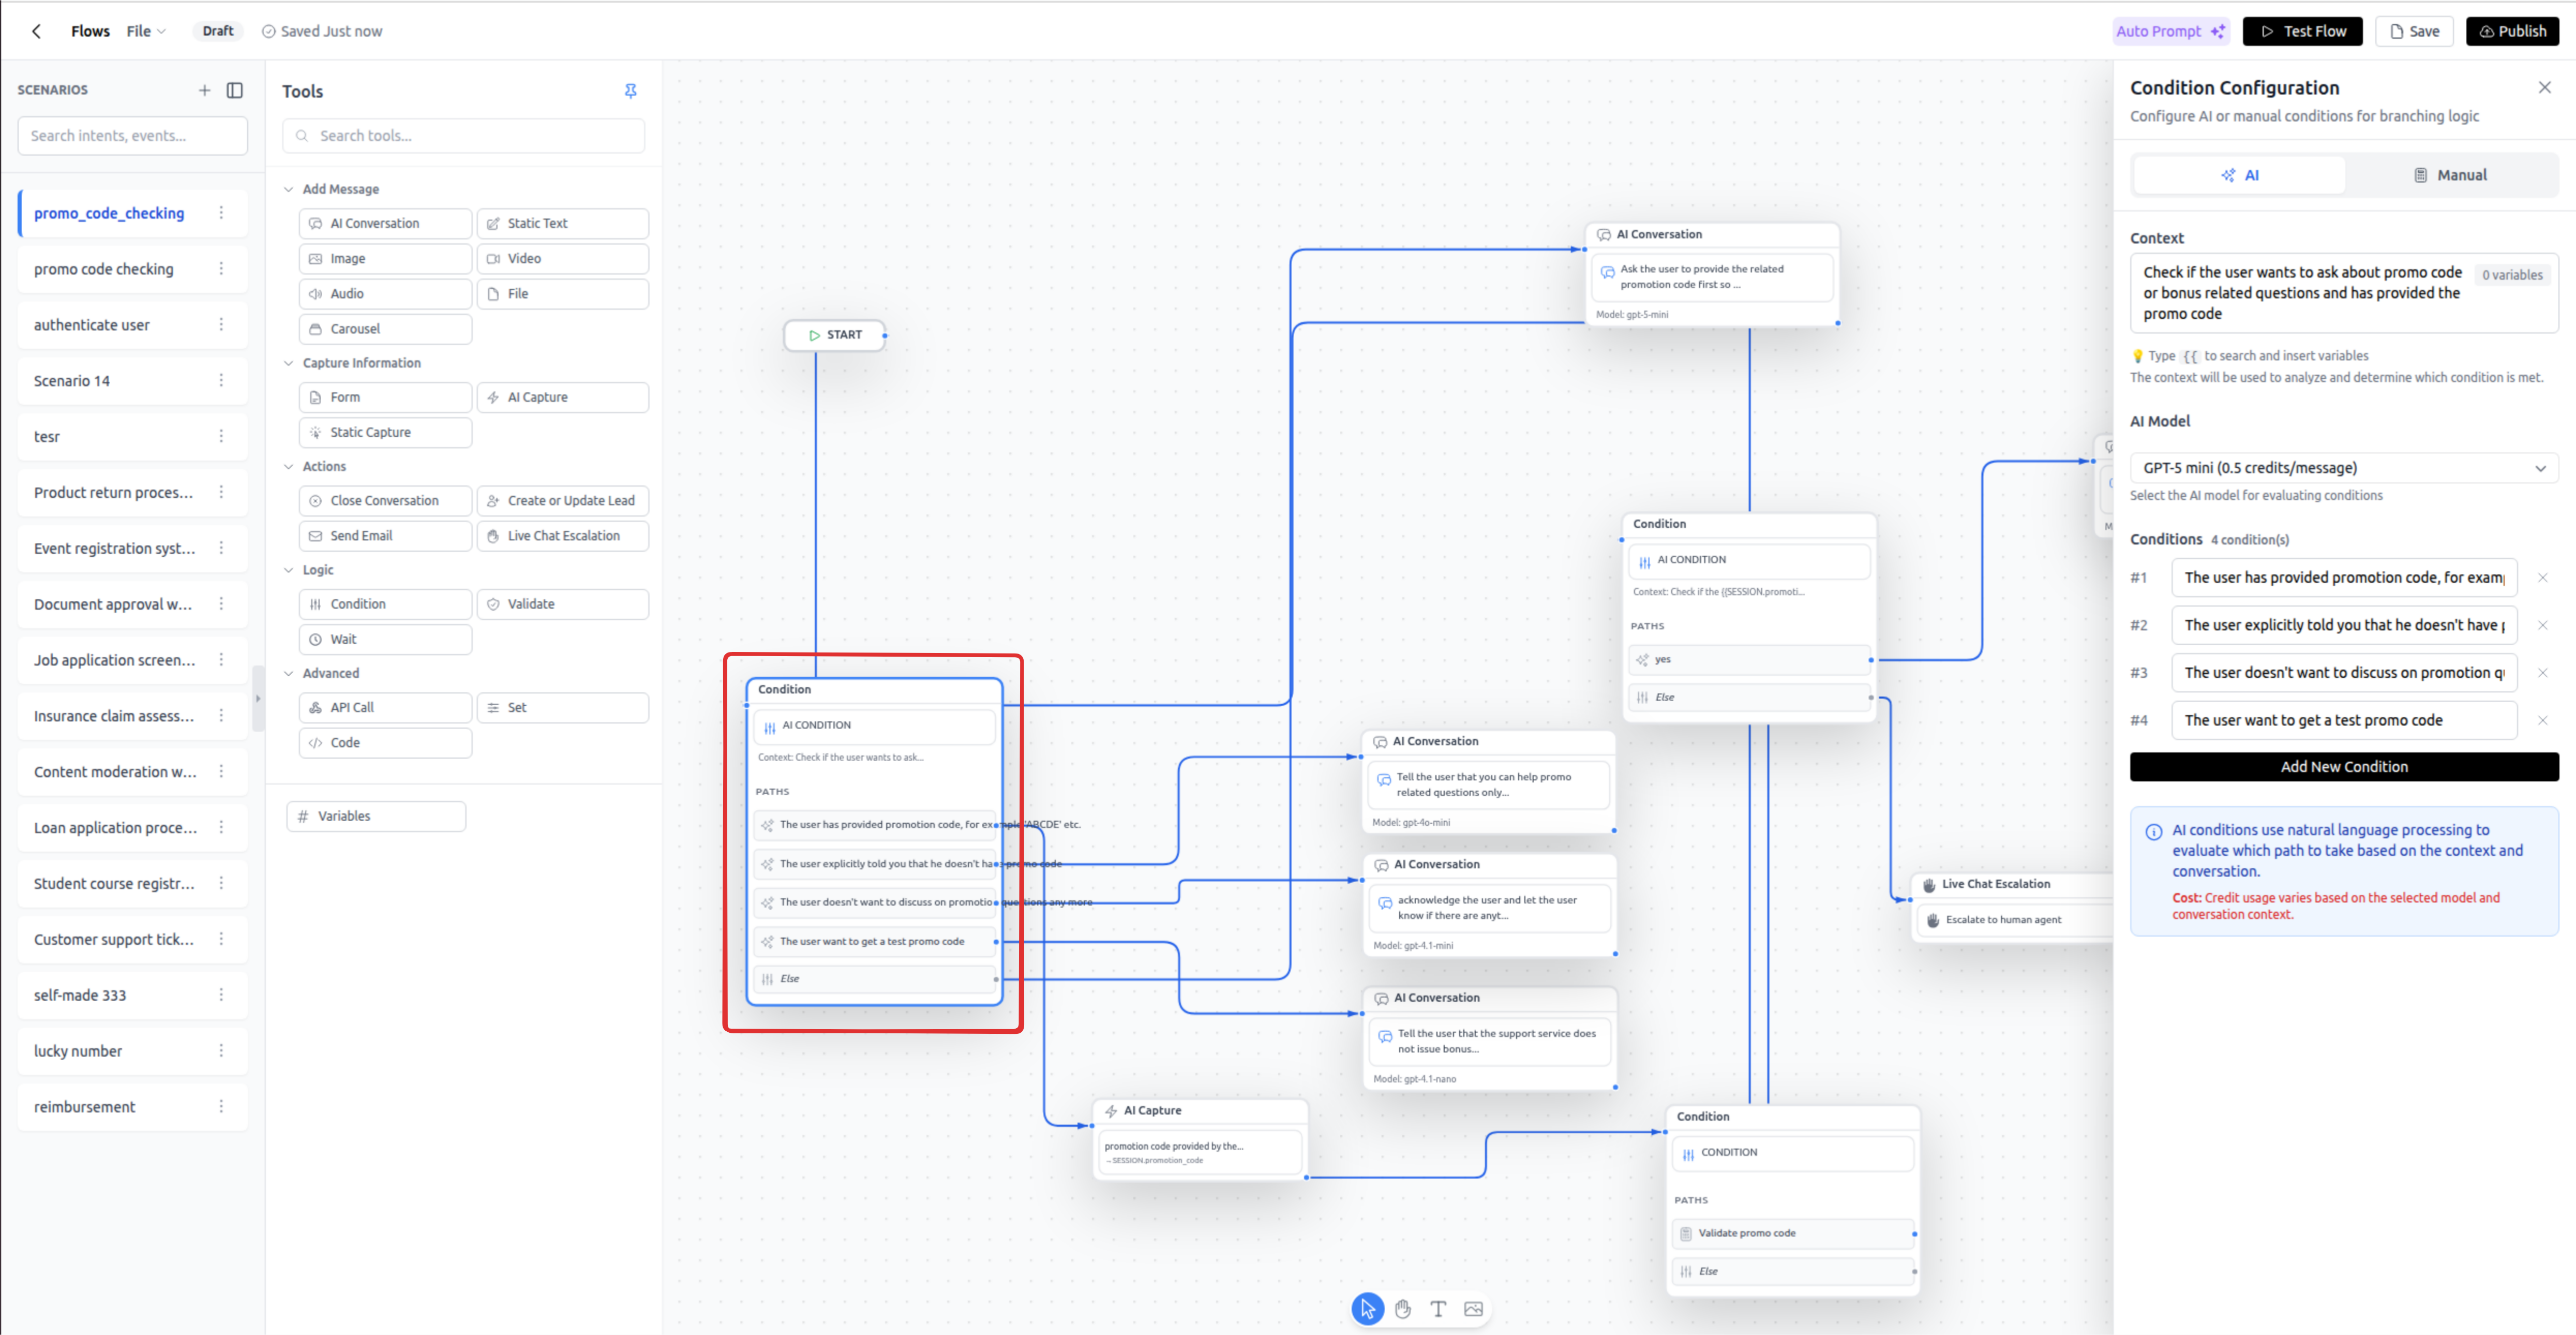
Condition
Creates conditional branches in your workflow. Supports two modes: AI-based (natural language) or Manual (rule-based logic).
AI Condition Mode:
- Context: Instructions for the AI to analyze user intent
- Model: AI model for decision-making
- AI Conditions: Array of possible outcomes, each with:
- Name: Description of the condition (e.g., "User wants refund")
- Else Path: Always included as fallback
Manual Condition Mode:
- Manual Conditions: Array of rule groups, each with:
- Name: Description of what this condition checks
- Match Type: "all" (AND logic) or "any" (OR logic)
- Expressions: Array of comparisons, each with:
- Left Value: Variable or text (supports
{{variable}}) - Operator: Comparison operator (see below)
- Right Value: Variable or text to compare against
- Left Value: Variable or text (supports
- Else Path: Always included as fallback
Supported Operators:
=: Equals!=: Not equals>: Greater than<: Less than>=: Greater than or equal<=: Less than or equalcontains: String containsstarts_with: String starts withends_with: String ends withis_empty: Value is empty/nullis_not_empty: Value exists and is not empty
When to Use:
- AI Condition: Natural language intent detection, sentiment analysis, complex decision-making
- Manual Condition: Exact value matching, numeric thresholds, variable state checks
Credits: AI Condition consumes message credits; Manual Condition is free
Important: Every condition branch (including the else path) must connect to a next node. Unconnected branches will cause the workflow to exit.
AI Condition Example:
Context: Analyze whether the user wants to make a purchase, ask a question, or file a complaint
AI Conditions:
  - Name: User wants to make a purchase
  - Name: User has a question
  - Name: User wants to file a complaint
(Plus automatic else path)
Manual Condition Example:
Condition 1:
  Name: Premium User Check
  Match Type: all
  Expressions:
    - Left Value: {{VISITOR.subscription_tier}}
      Operator: =
      Right Value: premium
    - Left Value: {{VISITOR.EMAIL}}
      Operator: is_not_empty

Condition 2:
  Name: Trial User Check
  Match Type: all
  Expressions:
    - Left Value: {{VISITOR.subscription_tier}}
      Operator: =
      Right Value: trial
Validate
Validates that a value matches a specific format: email, phone, or custom regex pattern.
Configuration:
- Label: Node name
- Validation Type: Choose from:
- email: Validates email format
- phone: Validates phone number format
- regex: Custom regex pattern
- Regex Pattern: Required only when type is "regex" (e.g.,
/^[A-Z]{3}-\d{4}$/) - Value to Validate: The text to check (supports mixed content with
{{variables}})
Outputs: Two paths:
- Success: Validation passed
- Fail: Validation failed
When to Use:
- Email format verification before sending emails or calling APIs
- Phone number validation before SMS operations
- Custom format validation (order IDs, promo codes, etc.)
Credits: Free
Value to Validate Examples:
- Single variable:
{{VISITOR.EMAIL}} - Static text:
[email protected] - Mixed interpolation:
user-{{VISITOR.id}}@{{SESSION.domain}}.com - Phone with prefix:
+1{{VISITOR.areaCode}}{{VISITOR.PHONE}}
Example:
Validation Type: regex
Regex Pattern: /^ORD-\d{6}$/
Value to Validate: {{SESSION.order_id}}
Wait
Pauses workflow execution for a specified time or until a webhook is received.
Time-Based Wait Configuration:
- Wait Type: "time"
- Duration: Time in seconds (platform limits apply, see below)
Webhook-Based Wait Configuration:
- Wait Type: "webhook"
- Duration: Timeout duration in seconds
- Webhook Capture: Array of payload fields to capture:
- Path: JSON path in webhook payload (e.g.,
$.status) - Store Into: Variable to store the value
- Path: JSON path in webhook payload (e.g.,
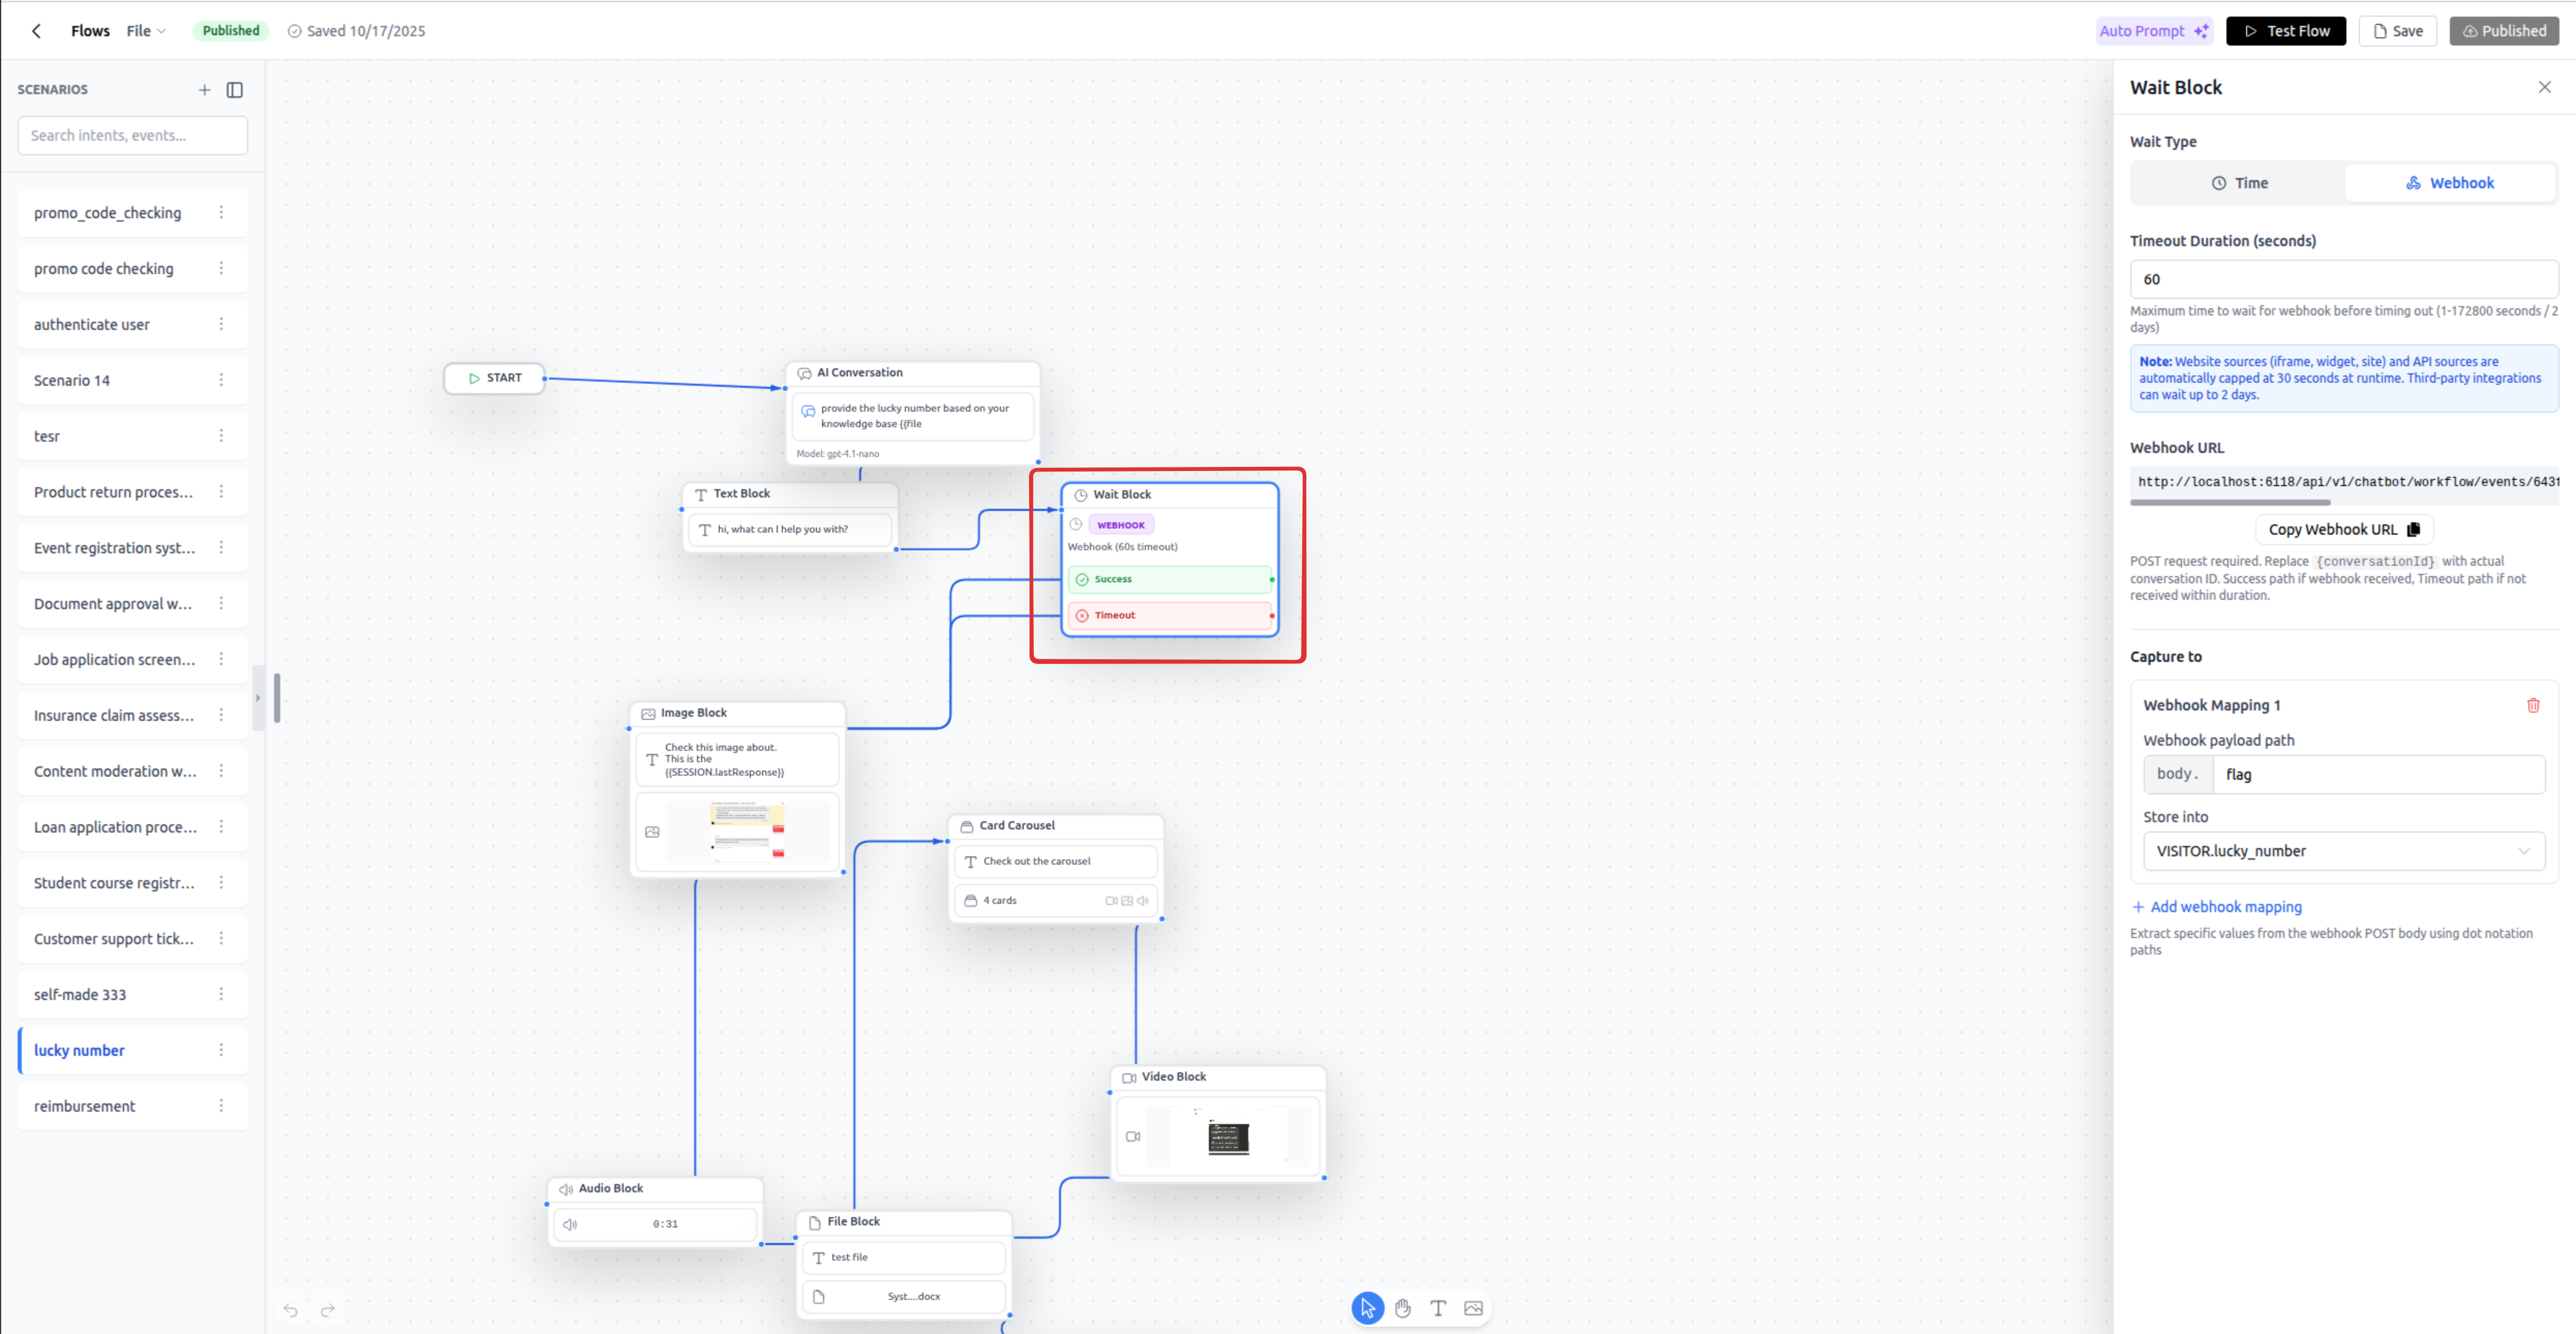 Outputs: Two paths:
- Success: Time elapsed or webhook received
- Timeout: Webhook wait timed out (only for webhook mode)
Platform-Specific Wait Limits:
- Website Widget/Iframe: Maximum 30 seconds
- Third-Party Integrations (Messenger, Instagram, Telegram, etc.): Maximum 2 days (172,800 seconds)
- WhatsApp Business: Maximum 1 day (86,400 seconds) - enforced by Facebook
Webhook URL Format:
https://yourdomain.com/api/v1/chatbot/workflow/events/{workflowId}?conversationId={conversationId}
The {conversationId} placeholder is dynamically replaced with the actual conversation ID at runtime. This ensures webhook payloads are delivered to the correct conversation.
When to Use:
- Time Wait: Rate limiting, giving users time to prepare, scheduled delays
- Webhook Wait: External API callbacks, payment confirmations, approval workflows, event-driven processes
Credits: Free
Important Notes:
- For website users, keep waits under 30 seconds to maintain good UX
- Longer processes should use webhook mode
- Webhook secret validation is planned for future releases
- Always connect the timeout path to handle cases where webhooks don't arrive
Time Wait Example:
Wait Type: time
Duration: 10
(Sends a message, waits 10 seconds, then continues)
Webhook Wait Example:
Wait Type: webhook
Duration: 3600 (1 hour timeout)
Webhook Capture:
  - Path: $.payment.status
    Store Into: SESSION.payment_status
  - Path: $.payment.transaction_id
    Store Into: SESSION.transaction_id
  - Path: $.payment.amount
    Store Into: SESSION.payment_amount
API Call
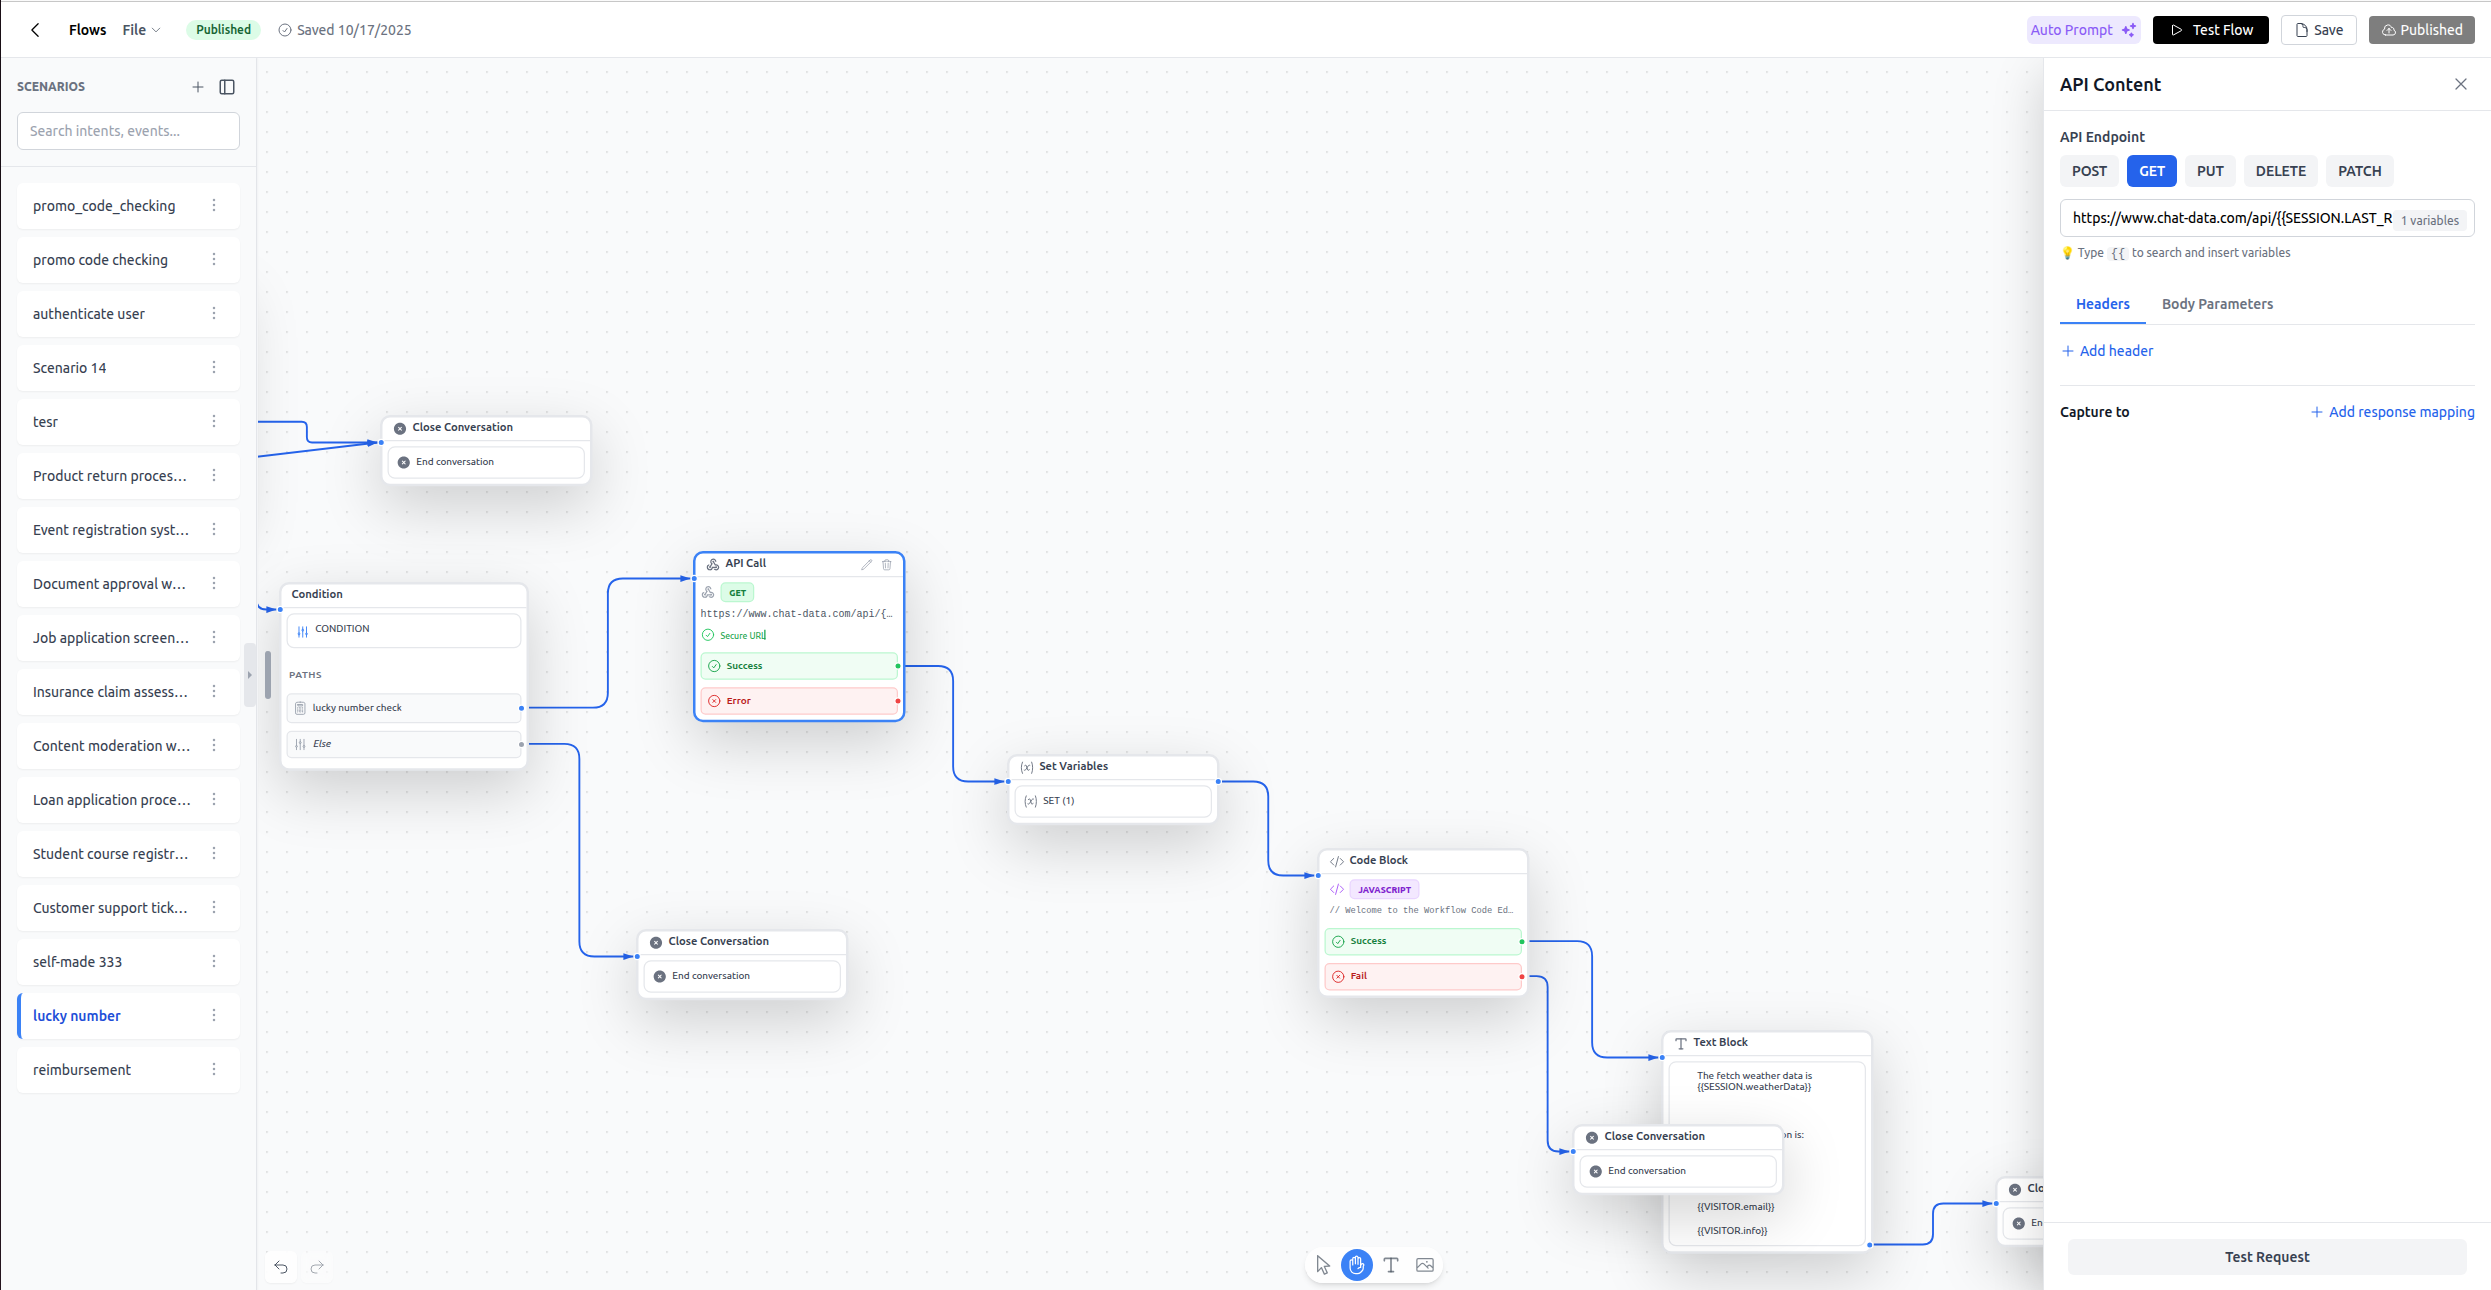
Makes HTTP requests to external APIs with full control over method, headers, and body.
Configuration:
- Label: Node name
- Method: GET, POST, PUT, DELETE, or PATCH
- URL: API endpoint (supports
{{variables}}) - Headers: Array of key-value pairs (supports
{{variables}}in values) - Body Type: application/json, application/x-www-form-urlencoded, or multipart/form-data
- Body Parameters: Array of parameters (for POST/PUT/PATCH)
- Response Capture: Array of response field mappings:
- Path: JSON path in response (e.g.,
$.data.user.id) - Store Into: Variable to store the value
- Path: JSON path in response (e.g.,
Outputs: Two paths:
- Success: HTTP 2xx response
- Error: HTTP 4xx or 5xx response
When to Use:
- Fetching data from your backend
- Creating records in external systems
- Validating information against APIs
- Triggering third-party services
Credits: Free
Testing: Use the "Test Request" button in the configuration panel to test your API call with default variable values before running the workflow.
Example:
Method: POST
URL: https://api.example.com/v1/users
Headers:
  - Name: Authorization
    Value: Bearer {{SESSION.api_token}}
  - Name: Content-Type
    Value: application/json
Body Parameters:
  - Key: email
    Value: {{VISITOR.EMAIL}}
  - Key: name
    Value: {{VISITOR.NAME}}
  - Key: subscription_tier
    Value: premium
Response Capture:
  - Path: $.data.user_id
    Store Into: SESSION.user_id
  - Path: $.data.created_at
    Store Into: SESSION.account_created_at
Code
Executes custom JavaScript or Python code for complex logic, calculations, or data transformations.
Configuration:
- Label: Node name
- Language: javascript or python
- Code Content: Your code (10-second execution limit)
Outputs: Two paths:
- Success: Code executed successfully and returned
{success: true} - Fail: Code threw an error or returned
{success: false}
Workflow Function API:
getVariable('VARIABLE_NAME'): Read a workflow variable (returns null if not found)setVariable('VARIABLE_NAME', value): Write a workflow variablereturnValue({success: true/false, ...}): Return data and determine which path to takeconsole.log(...): Output to execution logs (visible inSESSION.LAST_CODE_OUTPUT)
Special Session Variables After Execution:
SESSION.LAST_CODE_RETURN: The return value fromreturnValue()(max 5000 chars)SESSION.LAST_CODE_OUTPUT: Console log output (max 5000 chars)SESSION.LAST_CODE_ERROR: Error message if execution failed (max 5000 chars)
When to Use:
- Complex calculations (scoring, pricing, eligibility)
- Data transformations (formatting, parsing, combining)
- Custom business logic that can't be expressed with other nodes
- Validations with complex rules
Credits: Free
Limitations:
- 10-second maximum execution time
- Limited memory allocation
- No external network requests (use API Call node instead)
- No file system access
JavaScript Example - Calculate Eligibility Score:
// Read user data
const age = getVariable('VISITOR.age') || 0;
const income = getVariable('SESSION.annual_income') || 0;
const creditScore = getVariable('SESSION.credit_score') || 0;

// Calculate eligibility
const ageScore = age >= 21 && age <= 65 ? 25 : 0;
const incomeScore = income >= 50000 ? 35 : income >= 30000 ? 20 : 0;
const creditScore_points = creditScore >= 700 ? 40 : creditScore >= 650 ? 25 : 10;

const totalScore = ageScore + incomeScore + creditScore_points;
const isEligible = totalScore >= 70;

// Log for debugging
console.log(`Age Score: ${ageScore}, Income Score: ${incomeScore}, Credit Score: ${creditScore_points}`);
console.log(`Total: ${totalScore}, Eligible: ${isEligible}`);

// Store results
setVariable('SESSION.eligibility_score', totalScore);
setVariable('SESSION.is_eligible', isEligible);
setVariable('SESSION.eligibility_tier',
  totalScore >= 85 ? 'Platinum' :
  totalScore >= 70 ? 'Gold' :
  totalScore >= 50 ? 'Silver' : 'Bronze'
);

// Return success or failure path
if (totalScore >= 70) {
  returnValue({
    success: true,
    score: totalScore,
    message: 'Application approved'
  });
} else {
  returnValue({
    success: false,
    score: totalScore,
    message: 'Application requires review'
  });
}
Python Example - Parse and Format Data:
import json
from datetime import datetime

# Read form responses
responses = getVariable('SESSION.form_responses') or []
email = getVariable('VISITOR.EMAIL') or ''

try:
    # Parse and validate
    if len(responses) < 3:
        setVariable('SESSION.error', 'Incomplete form data')
        returnValue({'success': False, 'error': 'Missing responses'})

    # Format timestamp
    timestamp = datetime.now().isoformat()
    setVariable('SESSION.submission_time', timestamp)

    # Create structured data
    submission = {
        'email': email,
        'timestamp': timestamp,
        'responses': responses,
        'response_count': len(responses)
    }

    # Store as JSON string
    setVariable('SESSION.structured_submission', json.dumps(submission))

    print(f"Processed {len(responses)} responses for {email}")

    returnValue({
        'success': True,
        'count': len(responses),
        'timestamp': timestamp
    })

except Exception as e:
    setVariable('SESSION.error', str(e))
    print(f"Error: {str(e)}")
    returnValue({'success': False, 'error': str(e)})
Set
Simple variable assignment node for setting values without code.
Configuration:
- Label: Node name
- Assignments: Array of variable assignments:
- Variable: Variable name to set
- Value: Value to assign (supports
{{variables}})
When to Use:
- Setting flags (
SESSION.is_authenticated = true) - Copying variable values
- Setting default values
- Combining multiple variables into one
Credits: Free
Example:
Assignments:
  - Variable: SESSION.full_name
    Value: {{VISITOR.NAME}}

  - Variable: SESSION.contact_string
    Value: {{VISITOR.EMAIL}} - {{VISITOR.PHONE}}

  - Variable: SESSION.workflow_started
    Value: true
Action Nodes
These nodes perform system-level operations that affect the conversation, database, or external communications.
Create or Update Lead
Persists visitor information to the database, making it available across all future conversations and workflows. This is the ONLY way to persist custom data after a workflow exits.
Configuration:
- Label: Node name
- Email: Visitor email (supports
{{variables}}) - Phone: Visitor phone (supports
{{variables}}) - Name: Visitor name (supports
{{variables}}) - Info: Additional structured information (supports
{{variables}}, max 10,000 chars)
Important Behavior: When this node executes, it:
- Creates a new lead in the database (or updates existing if email/phone matches)
- Automatically populates
VISITOR.NAME,VISITOR.EMAIL,VISITOR.PHONE, andVISITOR.INFOwith the values you provided - Makes these VISITOR fields available to future workflows and the base chatbot
- Updates the visitor information in the live chat interface
When to Use:
- Saving contact information collected during the workflow
- Persisting authentication tokens or session data in
VISITOR.INFO - Recording user preferences or profile data
- Updating lead status or metadata
Credits: Free
Why This Matters: Only VISITOR.NAME, VISITOR.EMAIL, VISITOR.PHONE, and VISITOR.INFO persist after the workflow exits. All SESSION variables are cleared. To persist custom workflow data:
- Store it in
VISITOR.INFO(as JSON if needed) - Call Create or Update Lead
- Future workflows can read from
VISITOR.INFO
Example Use Case - Authentication Workflow:
// During authentication workflow:
// 1. User provides email/password
// 2. Call authentication API
// 3. API returns token and expiration

// In Create or Update Lead node:
Email: {{VISITOR.EMAIL}}
Name: {{VISITOR.NAME}}
Info: {"auth_token": "{{SESSION.api_token}}", "auth_expires": "{{SESSION.token_expiration}}", "authenticated_at": "{{SYSTEM.TIMESTAMP}}"}

// Later workflows can check:
// - Parse VISITOR.INFO to get auth_token
// - Check if auth_expires is still valid
// - Re-authenticate if expired
Example - Lead Capture:
Email: {{VISITOR.EMAIL}}
Phone: {{VISITOR.PHONE}}
Name: {{VISITOR.NAME}}
Info: {"interest": "{{SESSION.product_interest}}", "source": "workflow", "qualified": {{SESSION.is_qualified}}}
Send Email
Sends a custom email message with full formatting control.
Configuration:
- Label: Node name
- Subject: Email subject (supports
{{variables}}) - Recipients: Array of email addresses (supports
{{variables}}) - CC: Array of CC email addresses (supports
{{variables}}) - BCC: Array of BCC email addresses (supports
{{variables}}) - Reply To: Reply-to email address (supports
{{variables}}) - Email Body Type: "plain" (text) or "html"
- Email Body: Message content (supports
{{variables}}) - Send Test Email: Toggle to send a test email
When to Use:
- Sending confirmations to users
- Notifying team members
- Delivering receipts or summaries
- Follow-up communications
Credits: Consumes 1 email credit per send
Important: If you have zero email credits remaining, the node will not send the email but the workflow will continue to the next node (no error thrown).
Credits Info: Email credits are part of your live chat plan. Contact Chat Data to purchase additional email credits if needed.
Example:
Subject: Application Confirmation - {{SESSION.application_id}}
Recipients: [{{VISITOR.EMAIL}}]
CC: [[email protected]]
Reply To: [email protected]
Email Body Type: html
Email Body:
<html>
  <body>
    <h1>Thank you, {{VISITOR.NAME}}!</h1>
    <p>Your application has been received.</p>
    <p><strong>Application ID:</strong> {{SESSION.application_id}}</p>
    <p><strong>Status:</strong> {{SESSION.application_status}}</p>
    <p>We'll review your submission and get back to you within 2-3 business days.</p>
  </body>
</html>
Live Chat Escalation
Immediately transfers the conversation to a human agent using your configured live chat escalation settings.
Configuration:
- Label: Node name
- Message: Optional message to display to the user when escalating
When to Use:
- User explicitly requests human support
- AI cannot resolve the issue
- Complex situations requiring human judgment
- Fallback when workflow paths fail
Credits: Free
Behavior: This node triggers the same live chat escalation module that your base chatbot uses:
- Email notifications are sent to configured addresses
- Zendesk notifications are sent if configured
- Webhook notifications are sent if configured
- The conversation appears in your live chat inbox
- The workflow continues to the next node (or exits if no next node)
Important: The workflow does NOT pause when this node executes. If you want the workflow to end after escalation, don't connect this node to any other nodes.
Example:
Message: I'm connecting you with a live agent who can better assist you with this request. Please hold for a moment.
Close Conversation
Marks the conversation as closed, preventing the user from sending additional messages.
Configuration:
- None
When to Use:
- Ending a transaction or interaction
- After a completed workflow that should not continue
- Preventing further user input in specific scenarios
Credits: Free
Important Limitations:
- Website Widget/Iframe Only: This node only works on the Chat Data website widget or iframe integrations where we control the UI
- Third-Party Integrations: WhatsApp, Messenger, Instagram, Telegram, etc. will ignore this command—users can always send messages on these platforms unless you blocklist them
Note: Closing the conversation is NOT related to exiting the workflow. The workflow ends when it reaches a node without an outgoing connection. Close Conversation only affects whether the user can continue chatting.
Example:
// Workflow flow:
1. Send confirmation message
2. Create or Update Lead (save data)
3. Send Email (send receipt)
4. Close Conversation (prevent further messages)
5. No outgoing connection → workflow exits
Variable Management
Variables are the backbone of workflow memory and state management. They allow you to capture data, make decisions, and maintain context throughout the workflow execution.
Variable Categories
All workflow variables must use one of three category prefixes for organization: SYSTEM., SESSION., or VISITOR.
How Variable Categories Work:
These prefixes are namespace conventions that help you organize your variables. When you create custom variables, you choose which category prefix to use based on your organizational preference:
- SYSTEM. - Typically used for system-level or configuration data
- SESSION. - Typically used for temporary workflow data
- VISITOR. - Typically used for user/visitor-related information
Important: The category prefix you choose doesn't inherently affect variable behavior. However, there is one critical exception:
Variable Persistence Rule
Only these four specific variables persist after workflow exit:
VISITOR.NAMEVISITOR.EMAILVISITOR.PHONEVISITOR.INFO
All other variables (regardless of category prefix) are cleared when the workflow exits, unless you save them to the database using the Create or Update Lead node.
Default Read-Only Variables
The platform automatically provides the following read-only variables at runtime. These are pre-defined variables that the system populates with values during workflow execution. You cannot write to them directly, but you can read them using {{VARIABLE_NAME}} syntax in your workflow nodes.
Note that these default variables can be in any category (SYSTEM, SESSION, or VISITOR) - the category prefix simply indicates their organizational purpose.
Default SYSTEM Variables
| Variable Name | Type | Description |
|---|---|---|
SYSTEM.TIMESTAMP | date | Current system timestamp when the workflow node executes |
Default SESSION Variables - Conversation Data
| Variable Name | Type | Description |
|---|---|---|
SESSION.CONVERSATION_ID | string | Unique identifier for the current conversation |
SESSION.LAST_RESPONSE | string | The most recent AI-generated text response in the workflow |
SESSION.LAST_USER_INPUT_TEXT | string | Text content from the user's most recent message |
SESSION.LAST_USER_INPUT_FILES | JSON | File metadata (name, url, type) from the user's most recent upload |
SESSION.LIVE_CHAT_ADMIN_URL | string | URL for admins to access this conversation in the live chat interface |
SESSION.LIVE_CHAT_CLIENT_URL | string | URL for the user/client to access this conversation in live chat |
Default SESSION Variables - Code Execution
| Variable Name | Type | Description |
|---|---|---|
SESSION.LAST_CODE_RETURN | number | Return value from the most recently executed Code node (max 5000 chars) |
SESSION.LAST_CODE_OUTPUT | string | Console log output from the most recently executed Code node (max 5000 chars) |
SESSION.LAST_CODE_ERROR | string | Error message if the most recent Code node execution failed (max 5000 chars) |
Default VISITOR Variables
| Variable Name | Type | Description |
|---|---|---|
VISITOR.NAME | string | Visitor's full name |
VISITOR.EMAIL | string | Visitor's email address |
VISITOR.PHONE | string | Visitor's phone number |
VISITOR.INFO | string | Additional visitor information (can be JSON string, max 10,000 chars) |
Creating Custom Variables
Open the Variable Manager from the Tools sidebar to create your own variables.

Required Fields:
- Name: Must start with
VISITOR.,SESSION., orSYSTEM.followed by your variable name - Type: Choose from string, number, boolean, date, or JSON
- Category: Automatically determined from prefix (this is just for organization - choose whichever prefix makes sense for your use case)
- Default Value: Used for testing and as fallback if not set during execution
- Description: Explains the variable's purpose
Choosing a Category Prefix:
The category prefix you choose is purely organizational. Common conventions:
- Use
SESSION.for temporary data during workflow execution (e.g.,SESSION.api_response,SESSION.temp_calculation) - Use
VISITOR.for user-related data (e.g.,VISITOR.subscription_tier,VISITOR.preferences) - Use
SYSTEM.for configuration or system-level data (e.g.,SYSTEM.api_endpoint,SYSTEM.feature_flag)
Remember: Only the four default VISITOR variables (VISITOR.NAME, VISITOR.EMAIL, VISITOR.PHONE, VISITOR.INFO) persist after workflow exit. All other custom variables (regardless of prefix) are cleared unless you save them via Create or Update Lead.
Variable Types:
- string: Text data (names, IDs, descriptions, URLs)
- number: Numeric data (scores, counts, prices)
- boolean: True/false flags (is_authenticated, is_premium)
- date: Timestamps or dates (created_at, expiration_date)
- JSON: Complex objects or arrays (user_preferences, api_response)
Naming Conventions:
- Use snake_case after the prefix:
SESSION.user_score,VISITOR.company_name - Be descriptive:
SESSION.api_response_datanotSESSION.data - Avoid conflicts with default variables
Type Correctness is Critical: The type you assign affects how variables are evaluated in Manual Condition nodes. For example:
❌ Wrong: Variable type = string, value = "yes"
Condition: {{SESSION.is_approved}} = true
Result: FAILS because "yes" !== true
✅ Correct: Variable type = boolean, value = true
Condition: {{SESSION.is_approved}} = true
Result: SUCCEEDS because true === true
Example Custom Variables:
Name: SESSION.eligibility_score
Type: number
Default Value: 0
Description: Calculated eligibility score from 0-100

Name: SESSION.is_authenticated
Type: boolean
Default Value: false
Description: Whether user has successfully authenticated

Name: VISITOR.preferences
Type: JSON
Default Value: {}
Description: User preferences as JSON object

Name: SESSION.api_response_raw
Type: JSON
Default Value: {}
Description: Raw API response from external service
Variable Operations
Using Variables in Nodes:
Most node fields support variable interpolation using {{variableName}} syntax:
Text: Hello {{VISITOR.NAME}}, your score is {{SESSION.eligibility_score}}.
API URL: https://api.example.com/users/{{VISITOR.EMAIL}}/profile
Button URL: https://portal.example.com/dashboard?user={{SESSION.user_id}}&token={{SESSION.auth_token}}
Email Subject: Order Confirmation - {{SESSION.order_id}}
In Code Nodes:
// Reading
const userName = getVariable('VISITOR.NAME') || 'Guest';
const score = getVariable('SESSION.eligibility_score') || 0;

// Writing
setVariable('SESSION.final_score', 95);
setVariable('SESSION.is_eligible', true);
Renaming Variables: When you rename a variable in the Variable Manager, all references across all nodes are automatically updated. This ensures your workflow remains consistent.
Deleting Variables: The Variable Manager shows you how many variables are unused. You can safely delete unused variables to keep your workflow clean.
Variable Autocomplete: When editing most field types, type {{ to open the variable autocomplete menu. This shows all available variables categorized by SYSTEM, SESSION, and VISITOR.
Variable Persistence & Memory Strategy
Understanding variable persistence is crucial for building workflows that coordinate across multiple executions.
During Workflow Execution:
- All variables (default and custom) are available for reading
- Default read-only variables cannot be written to
- Custom variables (regardless of category prefix) can be read and written
When Workflow Exits:
- All custom variables are cleared (regardless of category prefix)
- Only these four default variables persist:
VISITOR.NAMEVISITOR.EMAILVISITOR.PHONEVISITOR.INFO
To Persist Custom Data Across Workflows:
- Store data in VISITOR.INFO as a JSON string:
// In a Code node
const authData = {
  token: getVariable('SESSION.api_token'),
  expiresAt: getVariable('SESSION.token_expiration'),
  authenticatedAt: new Date().toISOString()
};

setVariable('VISITOR.INFO', JSON.stringify(authData));
- Call Create or Update Lead to save to database:
Email: {{VISITOR.EMAIL}}
Name: {{VISITOR.NAME}}
Phone: {{VISITOR.PHONE}}
Info: {{VISITOR.INFO}}
- In future workflows, read from VISITOR.INFO:
// Parse the stored JSON
const storedInfo = getVariable('VISITOR.INFO') || '{}';
const authData = JSON.parse(storedInfo);

// Check if authenticated
const expiresAt = new Date(authData.expiresAt);
const now = new Date();
const isAuthenticated = authData.token && expiresAt > now;

setVariable('SESSION.is_authenticated', isAuthenticated);

if (isAuthenticated) {
  returnValue({success: true, message: 'User is authenticated'});
} else {
  returnValue({success: false, message: 'Authentication expired'});
}
Example Strategy - Multi-Workflow Coordination:
Workflow 1: Authentication
- User provides credentials
- Call authentication API
- Store token and expiration in VISITOR.INFO as JSON
- Call Create or Update Lead to persist
- Return to base chatbot
Base Chatbot:
- User asks to make a payment
- Base chatbot checks VISITOR.INFO for valid auth token
- If authenticated and not expired → Trigger Payment Workflow
- If not authenticated or expired → Trigger Authentication Workflow again
Workflow 2: Payment
- Read auth token from VISITOR.INFO
- Use token in API headers for payment API
- Process payment
- Update VISITOR.INFO with payment confirmation
- Call Create or Update Lead to persist
This pattern allows sophisticated state management across multiple workflow executions.
Special Workflow Behaviors
Skip Response Option
All message nodes (AI Conversation, Static Text, Image, Video, Audio, File, Carousel) and the Form node have a Skip Response toggle.
When Skip Response = false (default):
- The workflow sends the message or form to the user
- The workflow pauses and waits for the user's next message
- User sends a message
- Workflow continues to the next node
When Skip Response = true:
- The workflow sends the message or form to the user
- The workflow immediately continues to the next node without waiting
- User receives the message but the workflow is already proceeding
Use Skip Response = true for:
- Welcome messages that flow into the next step
- Sequential content delivery (multiple images/videos in a row)
- Informational messages that don't need acknowledgment
- Automated flows where user interaction isn't needed
Use Skip Response = false for:
- Questions that need answers
- Forms that need to be filled
- Menu options requiring selection
- Any point where user input drives the next decision
Example - Sequential Content:
Node 1: Static Text
  Text: "Let me show you our three service tiers."
  Skip Response: true
  ↓
Node 2: Carousel
  Cards: [Basic Plan, Premium Plan, Enterprise Plan]
  Skip Response: false  (wait for user to respond after seeing options)
Platform-Specific Wait Time Constraints
The Wait node has different maximum durations depending on the integration platform.
Website Widget & Iframe:
- Maximum Wait: 30 seconds
- Reason: HTTP request timeout and user experience
- Best Practice: Use webhook mode for longer waits
Third-Party Integrations (Messenger, Instagram, Telegram, Discord, Slack, WhatsApp Web):
- Maximum Wait: 2 days (172,800 seconds / 48 hours)
- Reason: We can send messages asynchronously after the initial request completes
WhatsApp Business API:
- Maximum Wait: 1 day (86,400 seconds / 24 hours)
- Reason: Facebook/Meta enforces a 24-hour messaging window
- Note: Even if you configure longer waits, WhatsApp Business will fail to send messages after 24 hours
Recommendations:
- For website users: Keep time-based waits under 30 seconds for good UX
- For longer processes: Use webhook mode to trigger continuation when events occur
- For cross-platform workflows: Design for the lowest common denominator (30 seconds for website, 1 day for WhatsApp Business)
Webhook Functionality
Webhook-based Wait nodes allow your workflow to pause until an external system sends a callback.
Webhook URL Format:
https://yourdomain.com/api/v1/chatbot/workflow/events/{workflowId}?conversationId={conversationId}
Obtaining the conversationId:
If you need to trigger workflow continuations from your own backend systems, you can obtain the conversationId from Chat Data's webhook events. The conversation ID is included in the following webhook event payloads:
- chat - Sent for every conversation exchange (see
conversation_idfield) - live-chat-escalation - Sent when a user triggers live chat (see
conversation_idfield) - user-online - Sent when a user comes online (see
conversation_idfield) - user-offline - Sent when a user goes offline (see
conversation_idfield)
By subscribing to these events in your Webhooks Setup, your backend can capture the conversationId and use it to make workflow webhook calls at the appropriate time.
Example Use Case:
- User starts a payment workflow
- Workflow collects payment details and sends them to your payment processor
- Your backend receives the Chat Data chat event webhook with the
conversation_id - Your payment processor processes the payment asynchronously
- When payment completes, your backend calls the workflow webhook URL with the captured
conversation_id - The workflow continues based on the payment result
Dynamic conversationId: The {conversationId} placeholder is automatically replaced with the actual conversation ID at runtime. This ensures the webhook payload is delivered to the correct user's conversation.
Capturing Webhook Payload: Configure the Webhook Capture fields to extract data from the incoming JSON payload:
Webhook Capture:
  - Path: $.payment.status
    Store Into: SESSION.payment_status

  - Path: $.payment.transaction_id
    Store Into: SESSION.transaction_id

  - Path: $.payment.amount
    Store Into: SESSION.amount_charged
JSON Path Syntax:
$.field- Top-level field$.nested.field- Nested field$.array[0]- First array element$.data.items[2].name- Complex nesting
Timeout Behavior: If the webhook doesn't arrive within the specified duration:
- The timeout path is taken
- You can handle this case differently (send reminder, escalate, retry, etc.)
Security Note: Webhook secret validation is planned for a future release. Currently, webhooks are not validated, so ensure your workflow IDs are not predictable or implement your own validation in the workflow logic.
Example Use Case - Payment Confirmation:
Workflow Flow:
1. Collect payment information via Form
2. API Call to payment gateway → Returns payment_intent_id
3. Wait (webhook mode)
   Duration: 3600 seconds (1 hour timeout)
   Webhook URL: https://app.example.com/api/v1/chatbot/workflow/events/wf-12345?conversationId={conversationId}
   Webhook Capture:
     - Path: $.status
       Store Into: SESSION.payment_status
     - Path: $.transaction_id
       Store Into: SESSION.transaction_id

4a. Success path (webhook received):
    - Condition: Check if SESSION.payment_status = "completed"
    - Send confirmation email
    - Create or Update Lead with payment info

4b. Timeout path (webhook not received in 1 hour):
    - Send apology message
    - Escalate to live chat
External System Webhook Request:
curl -X POST \
  'https://app.example.com/api/v1/chatbot/workflow/events/wf-12345?conversationId=conv-abc123' \
  -H 'Content-Type: application/json' \
  -d '{
    "status": "completed",
    "transaction_id": "txn_987654321",
    "amount": 99.99
  }'
Carousel Platform Rendering
The Carousel node provides rich visual experiences, but rendering differs by platform.
Website Widget & Iframe:
- Full carousel UI with horizontal scrolling
- Images, videos, audio, files all rendered inline
- Buttons displayed as interactive CTAs
- Smooth, native-like user experience
Third-Party Integrations (WhatsApp, Messenger, Instagram, Telegram, Discord, Slack):
- We adapt the carousel content to platform capabilities
- May send media files separately
- Buttons may be converted to text links or platform-specific button formats
- Some platforms may not support all media types
Best Practice: Design carousels for the best experience on your primary platform, but test on all platforms you support to ensure graceful degradation.
Credit Consumption Summary
| Node Type | Credits Used | Notes |
|---|---|---|
| AI Conversation | Message credits | Same as main chatbot |
| AI Capture | Message credits | Per extraction, regardless of field count |
| AI Condition | Message credits | Per decision evaluation |
| Carousel (AI mode) | Message credits | AI generates cards from knowledge base or custom context |
| Send Email | Email credits | 1 credit per send; no error if credits depleted |
| Static Text, Image, Video, Audio, File | Free | No AI involved |
| Carousel (Manual mode) | Free | Fixed cards with dynamic variables |
| Form, Static Capture, Set, Validate, Wait | Free | No AI involved |
| API Call, Code | Free | Your own infrastructure |
| Create or Update Lead, Live Chat Escalation, Close Conversation | Free | System operations |
| Manual Condition | Free | Logic-based, no AI |
Monitoring Credits: After launching a workflow, monitor your chatbot's credit usage in the dashboard to ensure workflows are performing efficiently.
Import, Export & Workflow Management
Exporting Workflows
Click File → Export to download your workflow as a JSON file. This file contains:
- All nodes and their configurations
- All edges (connections between nodes)
- All custom variables (not default read-only variables)
Use Cases:
- Backup your workflow before major changes
- Share workflows with team members
- Copy workflows to other chatbots
- Version control (commit JSON files to git)
Importing Workflows
Click File → Import and select a workflow JSON file.
Behavior:
- All nodes and connections are recreated on the canvas
- Variables used in the workflow are automatically created
- Important: Imported variables default to
stringtype - The Start node is preserved (or created if missing)
Post-Import Checklist:
- Open Variable Manager
- Review all imported variables
- Correct variable types (string → number, boolean, date, JSON as needed)
- Set appropriate default values for testing
- Test the workflow thoroughly
Why Type Checking Matters: If a variable should be boolean but is imported as string, Manual Conditions may fail:
Wrong: SESSION.is_approved (type: string, value: "true")
Condition: {{SESSION.is_approved}} = true
Result: FAILS ("true" !== true)

Correct: SESSION.is_approved (type: boolean, value: true)
Condition: {{SESSION.is_approved}} = true
Result: SUCCEEDS (true === true)
Clearing Workflows
Click File → Clear Flow to remove all nodes except the Start node. This gives you a clean canvas to rebuild from scratch.
Warning: This action cannot be undone. Export your workflow first if you might need to restore it.
AI-Powered Workflow Generation
The Auto Prompt feature uses AI to generate or modify workflows based on natural language descriptions.
Generating New Workflows
Click Auto Prompt with an empty or minimal canvas to generate a new workflow from scratch.
Process:
Describe Your Workflow: Enter a detailed description of what you want the workflow to do
Example: "Create a loan application workflow. Start by greeting the user and collecting their name, email, income, and employment status through a form. Then calculate their eligibility score based on income (must be over $50k) and employment (must be employed full-time). If eligible, call our API to create an application and send a confirmation email. If not eligible, explain why and offer to schedule a call with a loan officer."Review Architecture: The AI generates a high-level blueprint showing the node flow and decision points
Example Output:
- Welcome user
- Show information form (name, email, income, employment)
- Validate inputs
- Calculate eligibility (code block)
- Condition: eligible or not eligible
  - If eligible: API call → Send confirmation email → Thank you message
  - If not eligible: Explanation message → Offer scheduler link
Refine if Needed: Provide feedback to adjust the architecture
Example Feedback: "Add a step to capture the user's phone number in the form. After the API call, wait for a webhook confirmation before sending the email."Generate Workflow: AI creates complete nodes with configurations, connections, and variables
Post-Generation Tasks:
- Review all node configurations (prompts, URLs, API endpoints)
- Verify variable types in Variable Manager
- Customize text, buttons, and messages to match your brand voice
- Add your actual API endpoints and credentials
- Test thoroughly
Modifying Existing Workflows
Click Auto Prompt with an existing workflow to request modifications.
Process:
Describe the Change: Enter what you want to modify
Example: "Add a fallback path when the payment API fails. Send an apology message and escalate to live chat."AI Updates Workflow: The system modifies the existing nodes and connections
Review Changes: Check the modified areas and ensure logic is correct
Best Practices:
- Make one change at a time for better results
- Be specific about where in the workflow the change should occur
- Review variable changes carefully
- Test after each modification
Limitations:
- AI-generated workflows may not be perfect
- Always double-check API configurations and credentials
- Verify conditional logic matches your business rules
- Test all paths thoroughly before publishing
Testing Workflows
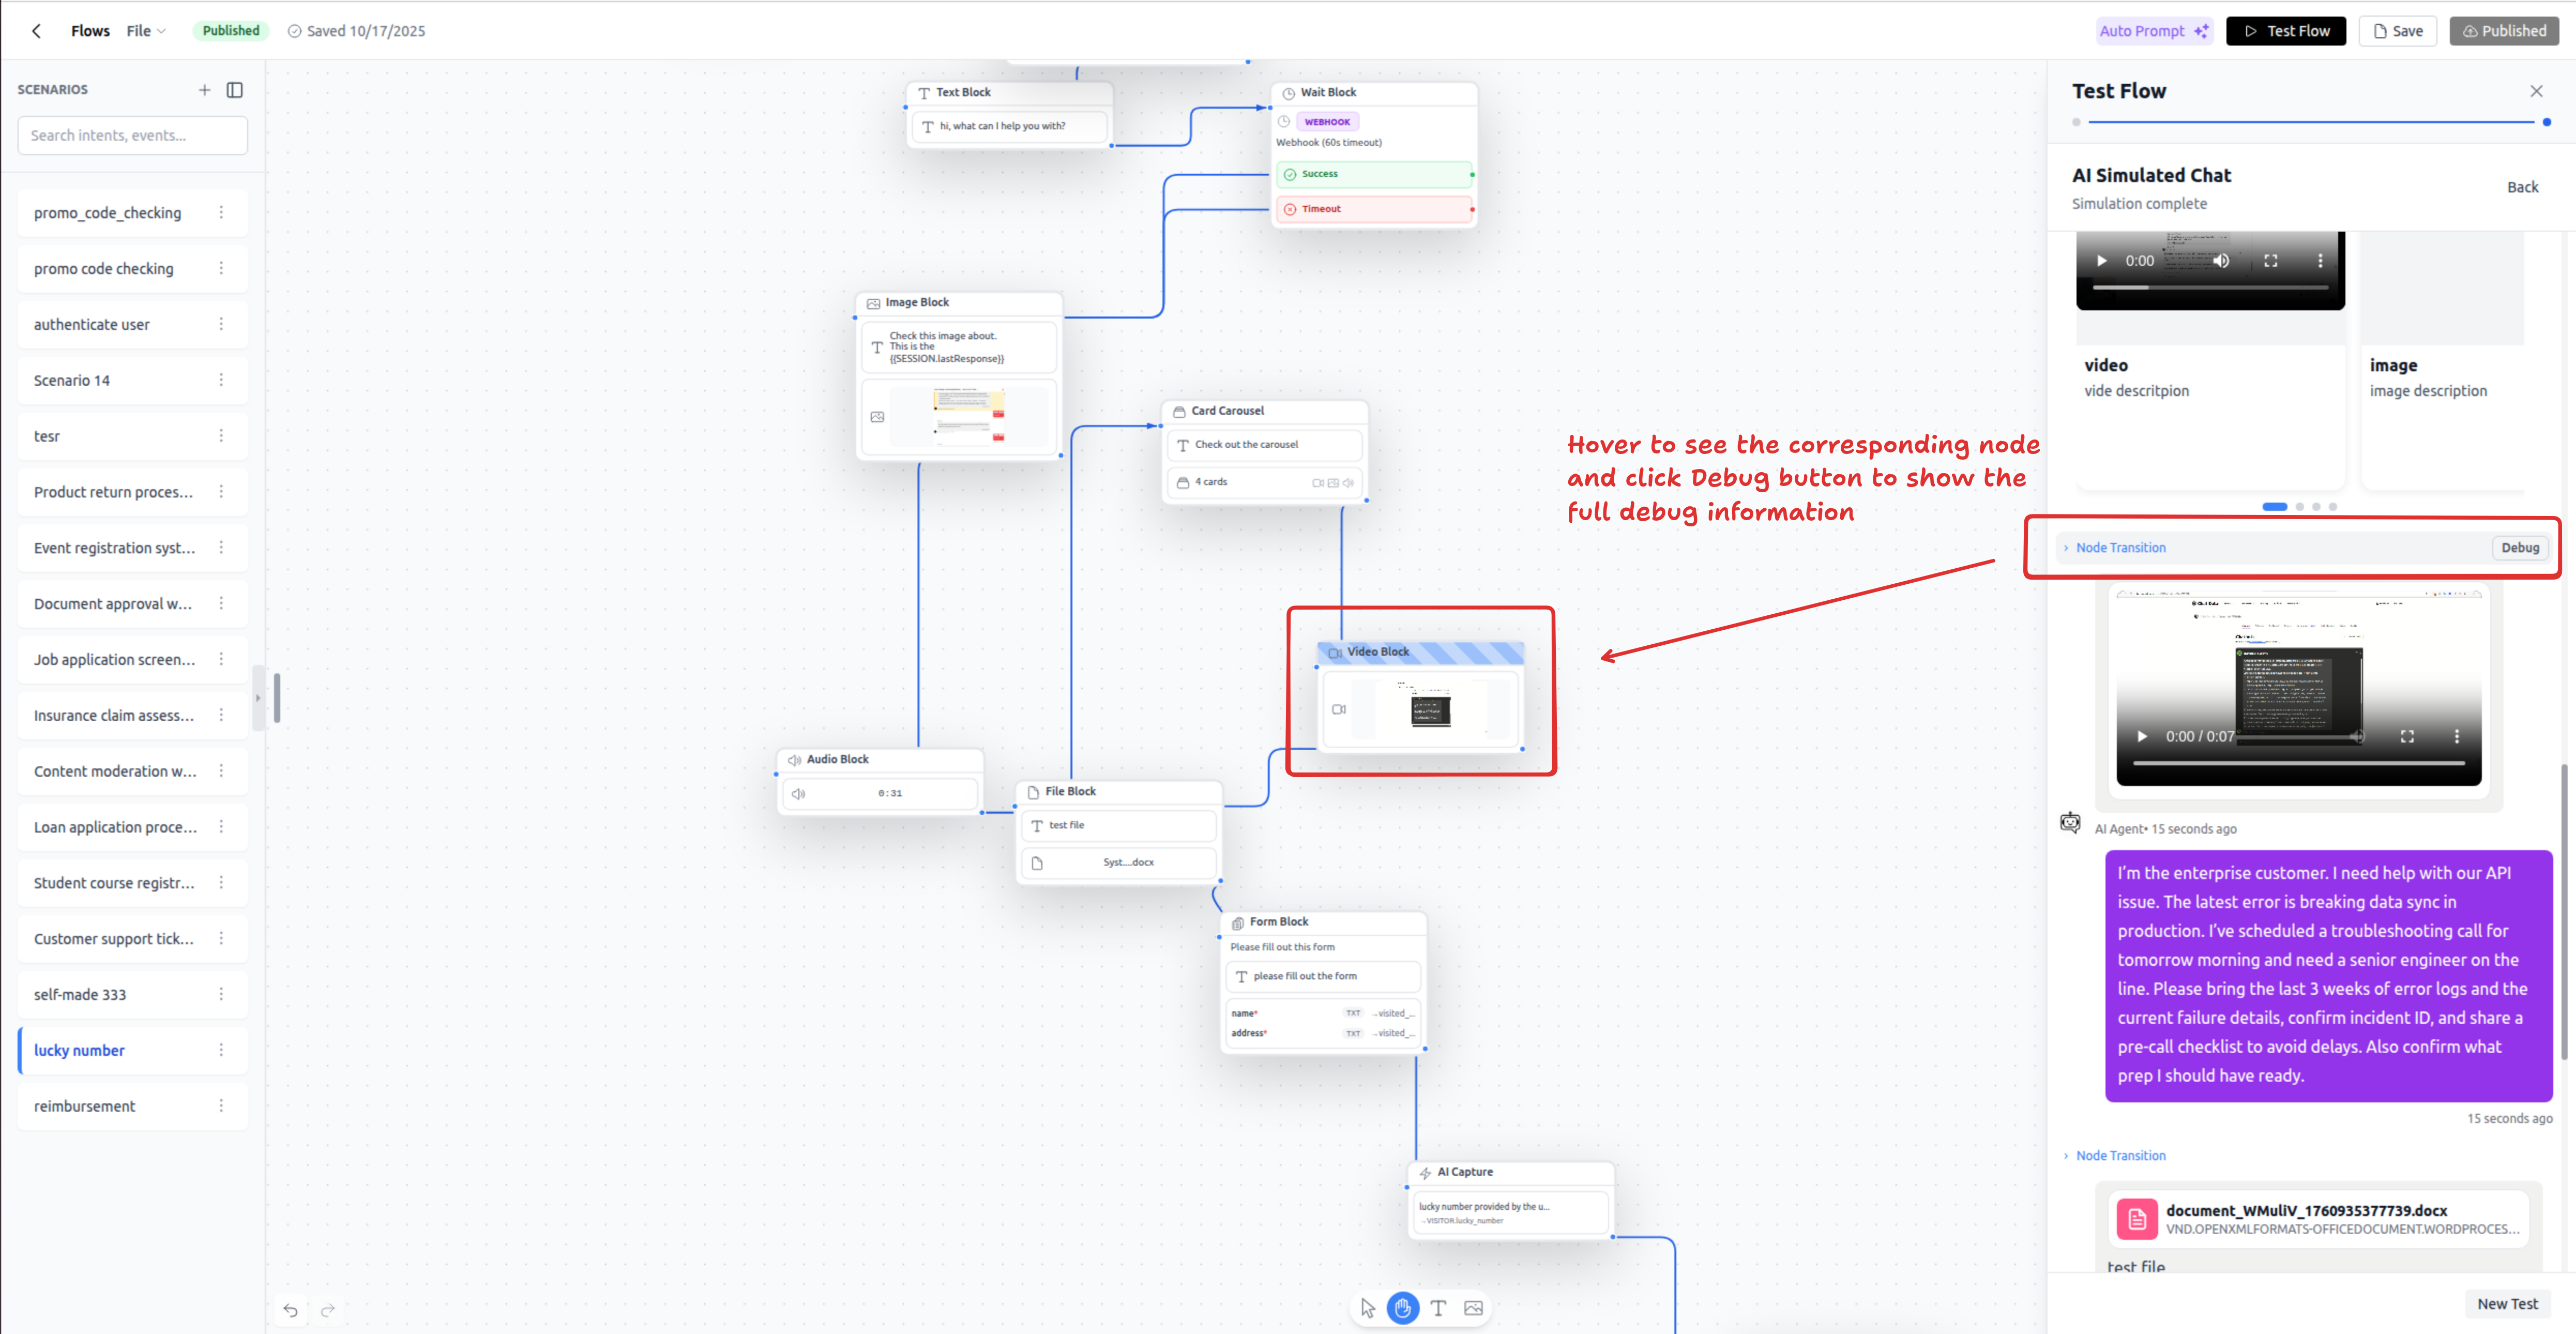
Thorough testing is essential before publishing workflows to production. The Test Flow interface provides two testing modes plus the ability to save test scenarios.
Manual Testing
Click Test Flow and select Manual mode to test the workflow yourself.
Features:
- Send Messages: Type messages as if you were the user
- Upload Files: Test file upload scenarios (images, documents, etc.)
- View Timeline: See the sequence of nodes that executed
- Hover Highlights: Hover over messages or transitions to highlight the responsible node on the canvas
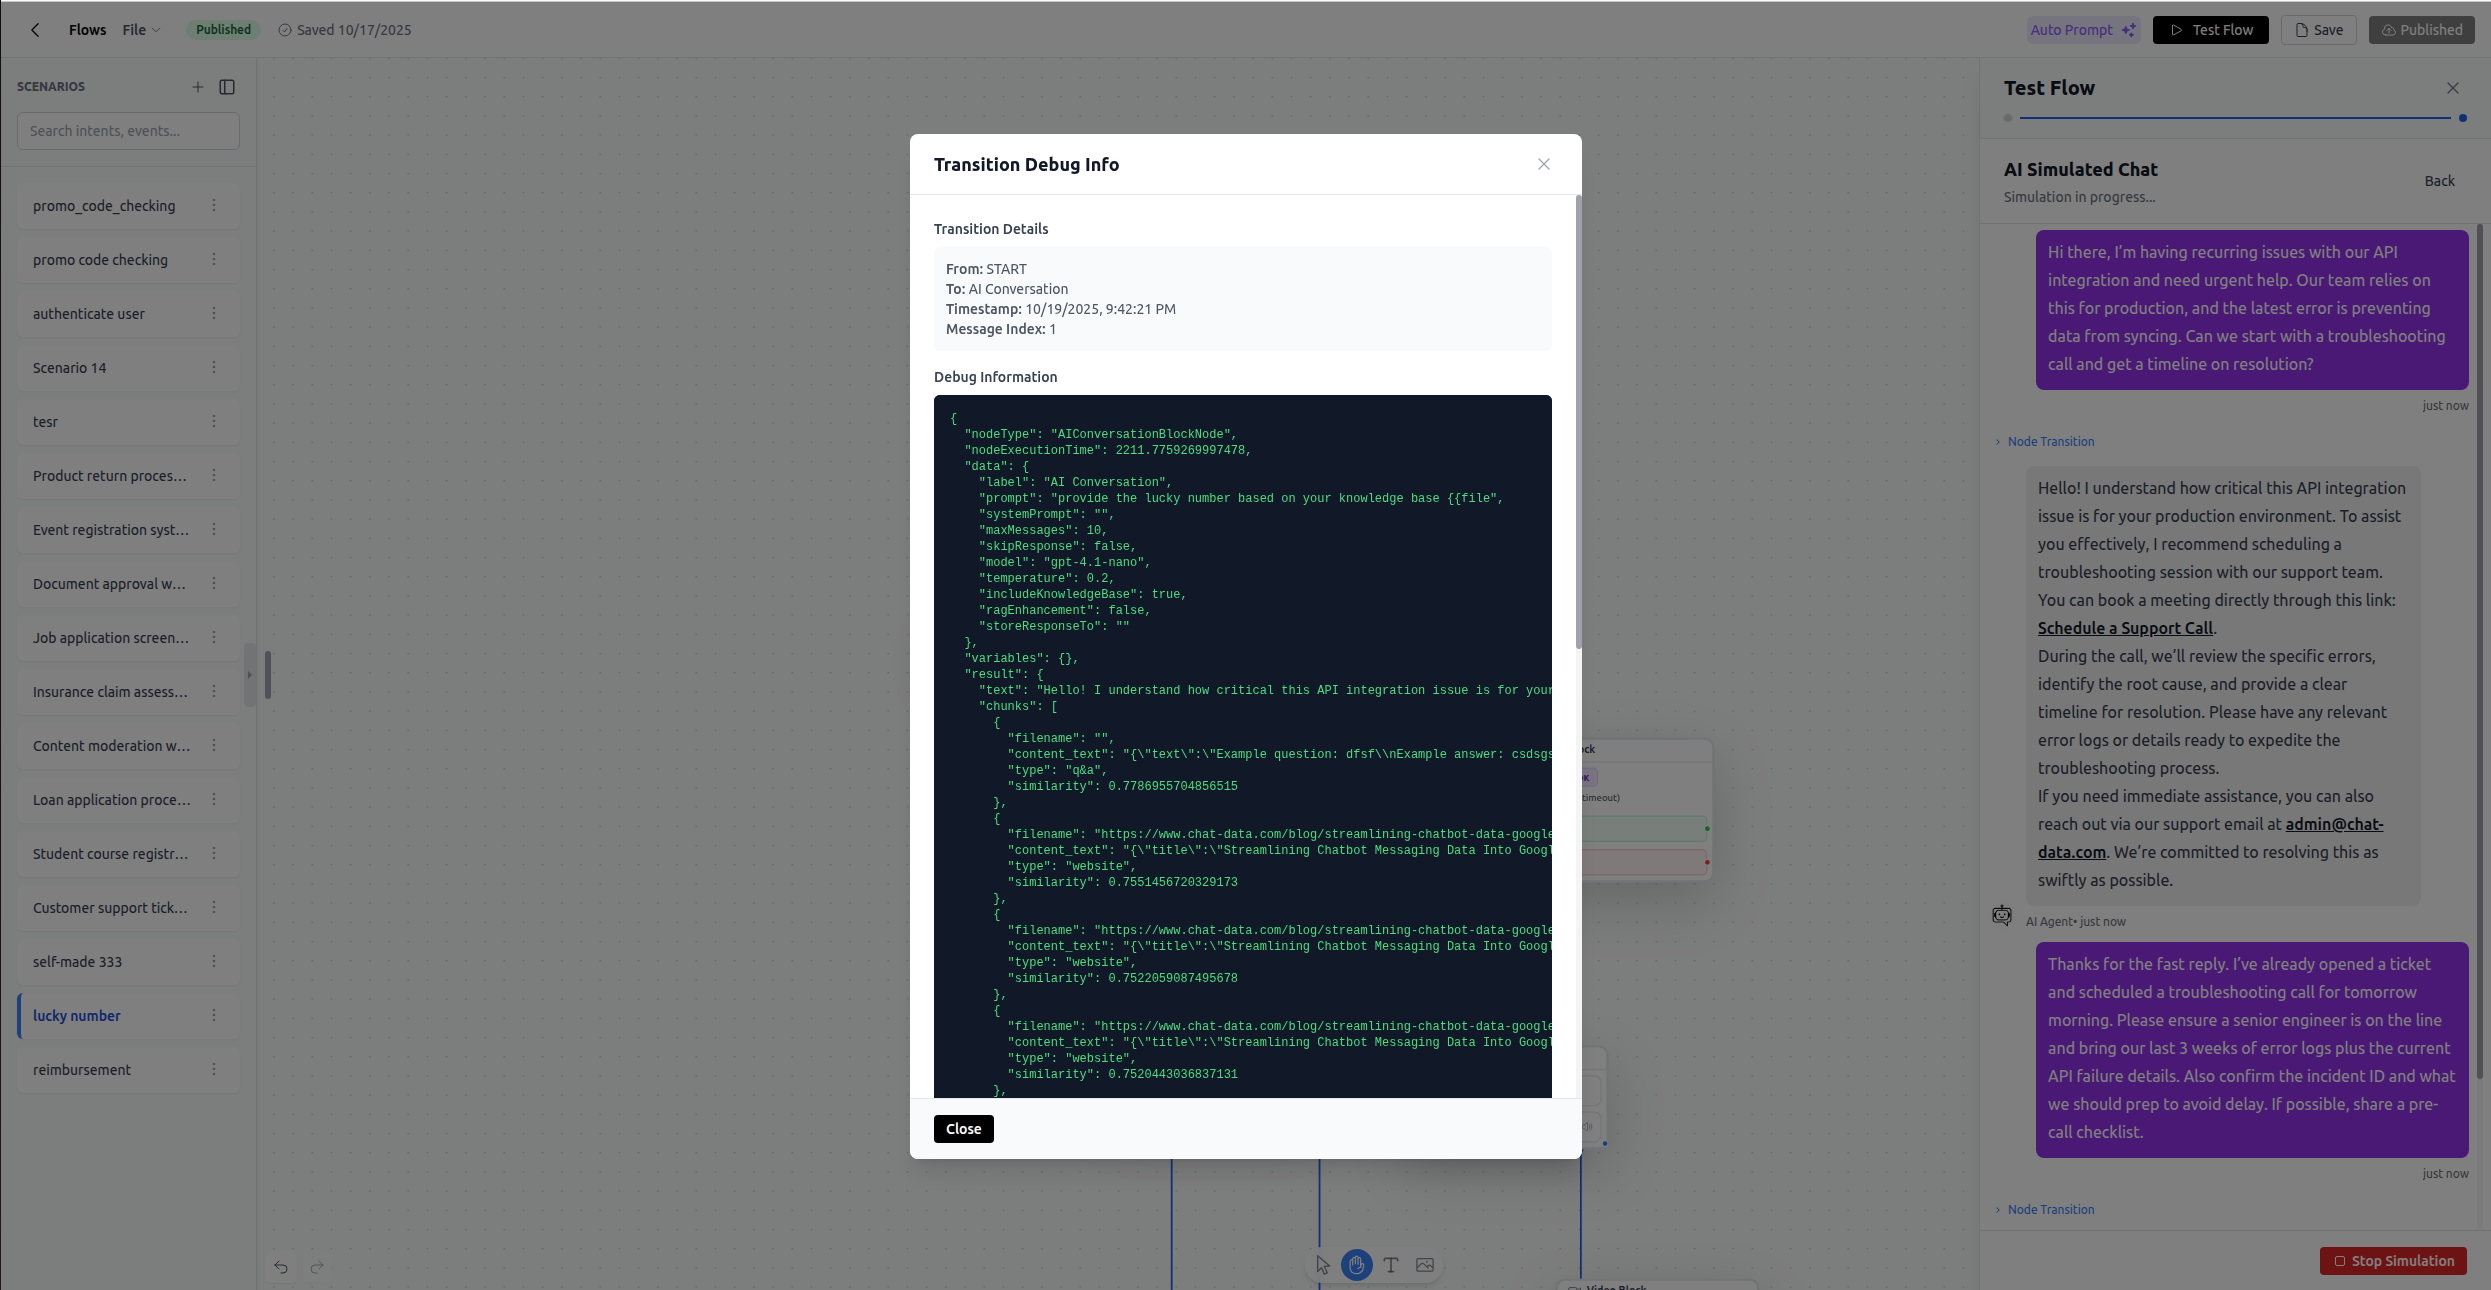
- Debug Details: Click any message or transition to view:
- Node configuration at execution time
- Variable values when the node ran
- API request/response details
- Condition evaluation logic
- Code execution output
Testing Workflow:
- Start the test with preset visitor data (name, email, phone) or leave blank
- Interact with the workflow by sending messages, filling forms, uploading files
- Watch the timeline to see node execution order
- Inspect debug details to verify:
- Variables are set correctly
- API calls return expected data
- Conditions route to the correct paths
- Code blocks execute without errors
What to Test:
- ✅ All conversation paths (happy path and error cases)
- ✅ Form submissions with valid and invalid data
- ✅ File uploads if your workflow handles them
- ✅ API calls with different response scenarios
- ✅ Conditional branches (ensure all paths are reachable)
- ✅ Variable persistence and data flow
- ✅ Email sending (use test email recipients)
Production Debugging
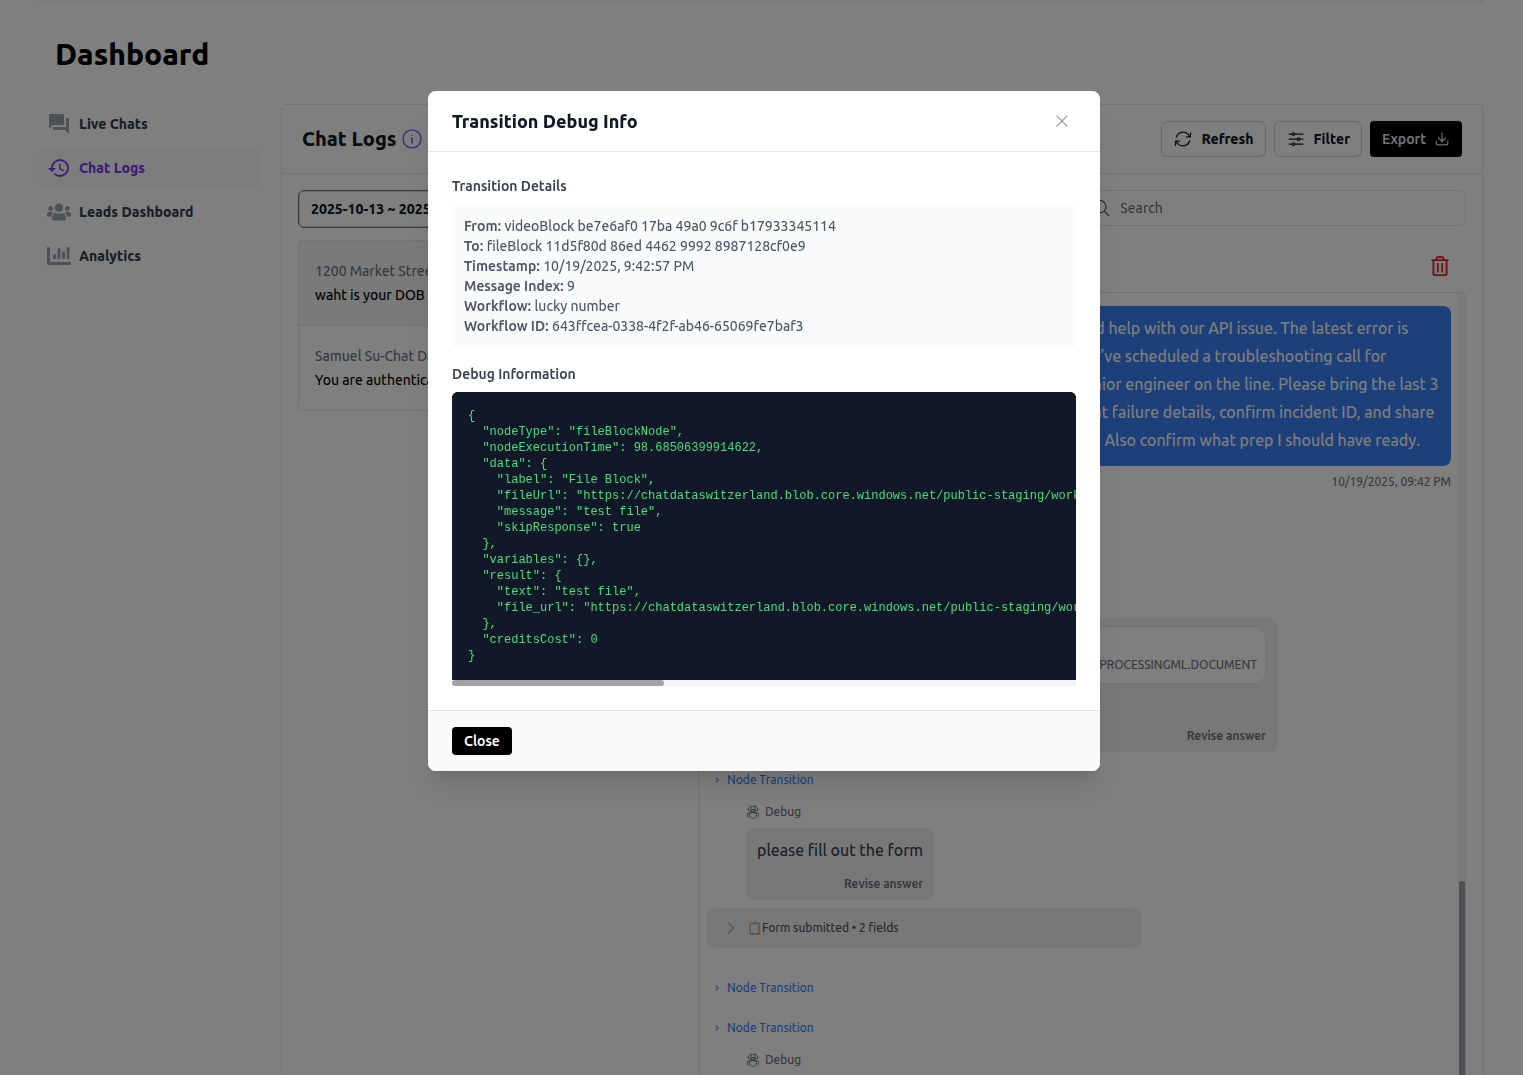
The same debug transition and details available during testing are also accessible in production. After your workflow is live, you can view executed nodes, variable values, API responses, and condition evaluations for real conversations in the Chatbot → Chat logs dashboard. This helps you monitor workflow performance and troubleshoot issues with actual user interactions.
AI Simulation
Click Test Flow and select AI Simulation to let AI automatically test your workflow.
Features:
Define Personas: Create user personas with specific behaviors
Example Persona 1: "A customer who wants to apply for a premium loan but has an income of $45,000 and is self-employed. They should fail the eligibility check."

Example Persona 2: "A customer who is employed full-time with an income of $75,000. They want to apply for a basic loan and should be approved."
Automated Conversation: AI simulates the user based on the persona
Loop Detection: Alerts you if the workflow starts repeating the same branch (infinite loop)
Review Results: See the full conversation and variable changes
Limitations:
- ❌ Cannot upload files (file upload testing requires manual mode)
- ✅ Can fill forms (AI can complete form fields)
- Works best for conversational flows
- May not perfectly simulate edge cases
When to Use AI Simulation:
- Testing multiple scenarios quickly
- Regression testing after workflow changes
- Validating conversational flows
- Simulating different user personalities
Test Presets
Save common test scenarios as Presets for quick re-testing.
What's Saved:
- Initial visitor data (name, email, phone)
- Pre-filled variable values
- AI simulation personas
Use Cases:
- Regression Testing: Re-run saved scenarios after every workflow change
- Team Collaboration: Share test cases with team members
- QA Process: Create preset scenarios for different test cases
Example Presets:
Preset 1: "Eligible Customer"
  VISITOR.NAME: John Smith
  VISITOR.EMAIL: [email protected]
  SESSION.annual_income: 75000
  SESSION.employment_status: full-time

Preset 2: "Ineligible Customer"
  VISITOR.NAME: Jane Doe
  VISITOR.EMAIL: [email protected]
  SESSION.annual_income: 35000
  SESSION.employment_status: part-time
Publishing & Production Integration
Once your workflow is tested and ready, follow these steps to make it available in your live chatbot.
Publishing Process
- Save your workflow to store the latest changes
- Test thoroughly using manual testing and AI simulation
- Fix validation warnings if the builder surfaces any issues
- Click Publish to make the workflow selectable in AI Actions
Publishing Status
Only published workflows appear in the AI Actions settings. Draft workflows are not available for production use.
Creating the AI Action
- Navigate to Chatbot → Settings → Actions
- Click Add Action or edit an existing action
- Select Workflow Action as the action type
- Choose your published workflow from the dropdown
- Configure the action name and description
Action Name: trigger_authentication_workflow Description: Trigger this when the user needs to verify their identity to access account features or make changes. - Save the AI Action
Configuring the Base Prompt
Your chatbot's base prompt needs to know when to trigger the workflow. Add clear instructions:
Example Base Prompt Addition:

You have access to specialized workflows for handling specific tasks:

- trigger_authentication_workflow: Use this when the user wants to view account details, make a payment, or access any feature that requires authentication. Only trigger this if the user is not already authenticated (check VISITOR.INFO for a valid auth token).

- trigger_payment_workflow: Use this when an authenticated user wants to make a payment. Only trigger this if the user is authenticated.

- trigger_ticket_workflow: Use this when the user has a complex issue that needs a support ticket created.

Always check VISITOR.INFO before triggering authentication to see if the user already has a valid session.
Workflow Execution Behavior
In Production:
- User chats with the base chatbot
- Base chatbot determines a workflow should be triggered based on your prompt instructions
- Control hands to the workflow
- Workflow executes exactly as designed:
- Follows node connections
- Maintains variable state throughout execution
- Can call APIs, wait for webhooks, send emails, etc.
- Workflow exits when:
- A node has no outgoing connection
- Close Conversation node is reached (and no connection)
- An error occurs that cannot be handled
- Control returns to base chatbot
- Any persisted data (VISITOR fields from Create or Update Lead) is available to the base chatbot
Multi-Workflow Coordination:
Users can enter and exit workflows multiple times in a single conversation:
Example Flow:
1. User: "I want to make a payment"
2. Base Chatbot: Checks VISITOR.INFO → user not authenticated
3. Triggers: authentication_workflow
4. Workflow: Collects credentials, validates, stores token in VISITOR.INFO, calls Create Lead
5. Workflow exits, control returns to base chatbot
6. Base Chatbot: Checks VISITOR.INFO → user now authenticated
7. Triggers: payment_workflow
8. Workflow: Processes payment using auth token from VISITOR.INFO
9. Workflow exits, control returns to base chatbot
10. Base Chatbot: Confirms payment and asks if user needs anything else
Deletion Protection
You cannot delete a workflow that is referenced by an AI Action. To delete:
- Remove or replace the AI Action that uses the workflow
- Then delete the workflow
This prevents breaking your live chatbot.
Best Practices
Workflow Design
Start Small, Expand Iteratively
- Build a minimal viable workflow first
- Test it thoroughly
- Add complexity one branch at a time
- Re-test after each addition
Clear Naming Conventions
- Node labels:
"API – Fetch User Profile","Condition – Check Eligibility" - Variables:
SESSION.eligibility_score,VISITOR.company_name - Avoid generic names like
"Node 1","data","result"
Always Wire Error Paths Nodes with multiple outputs must have all paths connected:
- API Call: Connect both
successanderrorpaths - Code Block: Connect both
successandfailpaths - Validate: Connect both
successandfailpaths - Wait (webhook): Connect both
successandtimeoutpaths - Condition: Connect all condition paths and the
elsepath
Example - Proper Error Handling:
API Call: "Fetch User Data"
  ↓ success → Continue with workflow
  ↓ error → Static Text: "Unable to fetch your data. Please try again later."
           → Live Chat Escalation
           → (exit)
Variable Management
Type Correctness is Critical
Wrong types cause condition failures:
❌ Problem:
Variable: SESSION.is_premium (type: string, value: "yes")
Condition: {{SESSION.is_premium}} = true
Result: FAILS
✅ Solution:
Variable: SESSION.is_premium (type: boolean, value: true)
Condition: {{SESSION.is_premium}} = true
Result: SUCCEEDS
Intentional Persistence
Only persist data you truly need across conversations:
Bad Practice: Storing every SESSION variable in VISITOR.INFO
- SESSION.temp_calculation → Don't persist
- SESSION.current_page → Don't persist
- SESSION.last_button_clicked → Don't persist

Good Practice: Store only essential state
- Authentication tokens and expiration → Persist in VISITOR.INFO
- User preferences and settings → Persist in VISITOR.INFO
- Lead qualification data → Persist in VISITOR.INFO
Accessing Uploaded Files
Use SESSION.LAST_USER_INPUT_FILES to access file metadata:
Example: User uploads a document

SESSION.LAST_USER_INPUT_FILES contains:
[
  {
    "name": "resume.pdf",
    "url": "https://cdn.chatdata.com/files/abc123/resume.pdf",
    "type": "application/pdf"
  }
]

In a Code node:
const files = JSON.parse(getVariable('SESSION.LAST_USER_INPUT_FILES') || '[]');
if (files.length > 0) {
  setVariable('SESSION.uploaded_file_url', files[0].url);
  returnValue({success: true, fileUrl: files[0].url});
} else {
  returnValue({success: false, message: 'No file uploaded'});
}
Platform-Specific Considerations
Respect Wait Time Limits
Platform          | Max Wait Time | Best Practice
------------------|---------------|----------------------------------
Website Widget    | 30 seconds    | Use for short waits or webhooks
WhatsApp Business | 1 day         | Design for 24-hour window
Other Integrations| 2 days        | Webhook mode for long processes
Test Across Platforms
If you support multiple platforms (Website, WhatsApp, Messenger, etc.):
- Test the workflow on each platform
- Verify carousels render acceptably
- Ensure wait times are within platform limits
- Check that Close Conversation doesn't break third-party integrations
Testing & Deployment
Pre-Launch Checklist
Before publishing a workflow:
- ✅ Test all paths manually (happy path + error cases)
- ✅ Test with AI simulation using different personas
- ✅ Verify variable types in Variable Manager
- ✅ Check that API endpoints are correct and credentials are valid
- ✅ Confirm email addresses for Send Email nodes
- ✅ Review wait times (within platform limits)
- ✅ Ensure all error paths are connected
- ✅ Test file upload scenarios if applicable
- ✅ Verify Create or Update Lead persistence strategy
- ✅ Review base prompt instructions for triggering the workflow
Post-Launch Monitoring
After deploying to production:
- Monitor the first 10-20 real conversations
- View debug details in Chatlogs dashboard: Access the same debug transitions and details from testing (node execution, variable values, API responses, condition evaluations) for production conversations in Chatbot → Chatlogs. Hover over messages to see which nodes executed them, and click to view full debug information.
- Watch credit usage (message credits, email credits)
- Check for unexpected error paths being taken
- Review live chat escalations (are they necessary or could the workflow handle it?)
- Gather user feedback
- Iterate and improve
Documentation & Collaboration
Use Annotations
Add Text and Image annotations to the canvas:
Example Annotations:
- "Payment Escalation Path – If API returns 4xx error, retry once before escalating"
- "Authentication Token Refresh – Tokens expire after 24 hours"
- [Screenshot of expected UI flow]
Export for Version Control
Export your workflow JSON and commit it to version control:
git add workflows/authentication-flow-v2.json
git commit -m "Add retry logic to payment API call"
Team Workflow Reviews
Before publishing:
- Export the workflow
- Share with team members
- Conduct a review session
- Import feedback and iterate
Platform-Specific Considerations
Website Widget & Iframe
Advantages:
- Full control over UI (carousels, close conversation, etc.)
- Best user experience
- Immediate message delivery
Constraints:
- 30-second maximum wait time
- HTTP request must complete within reasonable time
Best For:
- Short, interactive workflows
- Real-time data collection
- Immediate API responses
Third-Party Integrations
Platforms: WhatsApp Business, WhatsApp Web, Messenger, Instagram, Telegram, Discord, Slack
Advantages:
- Longer wait times (up to 2 days, 1 day for WhatsApp Business)
- Asynchronous message delivery
- Can send follow-up messages after initial request completes
Constraints:
- Limited UI control (no carousel UI, close conversation may not work)
- Platform-specific message type support
Adaptation:
- Carousels send media/buttons separately
- Close Conversation is ignored (users can always message)
- URLs in buttons may be converted to text links
Best For:
- Long-running workflows with webhook waits
- Workflows that need to follow up hours or days later
- Cross-platform workflows (design for lowest common denominator)
With Workflow AI Actions, you can pair your chatbot's conversational flexibility with the rigor of scripted procedures, ensuring complex tasks happen exactly the way you design them. Whether you're building authentication flows, payment collection, ticket creation, or any multi-step process, workflows give you the power to maintain state, coordinate APIs, and deliver precise, repeatable experiences.