Advanced Features
Chat Data SDK
The Chat Data SDK enables seamless real-time communication between your website and the chatbot, enhancing the user experience. This guide will cover bidirectional information flow: sending user data from your website to the chatbot and receiving user actions from the chatbot. To help you get started, we'll provide a live demo website and a GitHub repository containing an example implementation.
Chat Data SDK
The Chat Data SDK provides a simple and standardized way to communicate with your embedded chatbot. While both webhooks and the SDK can handle events in real-time, the SDK offers advantages like direct communication between your website and the chatbot, eliminating network request delays and allowing immediate responses to user activities. For example, you can display a customer's name on your website right after they enter it in the chatbot widget - something not possible with webhooks.
Video Demo
Watch our video tutorial that demonstrates how to implement and use the Chat Data SDK:
Installation and Initialization
There are two ways to initialize the Chat Data SDK:
Method 1: Auto-initialization with data attribute
<script src="https://www.chat-data.com/static/chatbotsdk.min.js" data-chatbot-id="YOUR_CHATBOT_ID"></script>
Method 2: Manual initialization
<script src="https://www.chat-data.com/static/chatbotsdk.min.js"></script>
<script>
  window.chatbot.initialize({
    chatbot_id: "YOUR_CHATBOT_ID"
  });
</script>
If you're using a custom domain, replace the URL accordingly:
<script src="https://your-domain.com/static/chatbotsdk.min.js" data-chatbot-id="YOUR_CHATBOT_ID"></script>
Send User Information From Website to Chatbot
Consider a scenario where your website implements user authentication. Upon successful login, you can leverage the SDK to transmit user information to the chatbot, eliminating the need for redundant data collection. Furthermore, if your website offers diagnostic tools that generate user-specific metrics, you may want the chatbot to address follow-up inquiries about these metrics.
The SDK makes this easy with the sendUserInfo method:
window.chatbot.sendUserInfo({
    name: "Customer",      // Max length: 100 characters
    email: "[email protected]",  // Max length: 254 characters
    phone: "1234567890",   // Max length: 50 characters
    info: "The user's lucky number is 654321",  // Max length: 4000 characters
    userId: "user_123456",  // Max length: 50 characters
    userHash: "aa97df...", // Max length: 100 characters
}).then(response => {
  console.log("User info sent successfully:", response);
}).catch(error => {
  console.error("Error sending user info:", error);
});
Success and Warning Behavior
When sending user information, you can assume the operation was successful if no error event is triggered. The SDK follows these rules:
Success: If no error or warning events are triggered, all user information was successfully sent and stored without any truncation.
Warning: If any fields exceed their length limits, the SDK will:
- Automatically truncate the affected fields
- Trigger a warning event with details about which fields were truncated
- Continue processing the request with the truncated values
Error: If an error event is triggered, the user information was not successfully stored and should be retried.
Example warning event for truncated fields:
// Warning event payload when fields are truncated
{
    "event": "warning",
    "from": "chatbot-iframe",
    "message": "The following fields were truncated due to length limits: name, email"
}
Verifying User Information in localStorage
After sending user information, you can verify the stored data in your browser's localStorage. The data is stored with the key chat-data-{{chatbot-id}}:lead, where {{chatbot-id}} is your specific chatbot ID.
Here's how to access and verify the stored information:
// Get the stored user information
const storedUserInfo = localStorage.getItem(`chat-data-${YOUR_CHATBOT_ID}:lead`);

// Parse the stored JSON data
const userInfo = JSON.parse(storedUserInfo);

// Example of verifying the stored fields
console.log("Stored user information:", {
    name: userInfo.name,
    email: userInfo.email,
    phone: userInfo.phone,
    info: userInfo.info,
    userId: userInfo.userId,
    userHash: userInfo.userHash
});
This can be particularly useful for:
- Debugging user information synchronization issues
- Verifying that data was properly truncated if it exceeded length limits
- Confirming that user information was successfully cleared after calling
clearUserInfo()
Authentication Parameters
The SDK supports two special parameters for authentication purposes:
- userId: A unique identifier for the user (limited to 30 characters)
- userHash: A security hash to validate the user's identity (limited to 100 characters)
These parameters can be used to securely identify and authenticate users across your website and chatbot integration, enabling personalized experiences while maintaining security.
If you want to remove the user's information from the chatbot, you can use the clearUserInfo method:
window.chatbot.clearUserInfo()
  .then(response => {
    console.log("User info cleared successfully:", response);
  })
  .catch(error => {
    console.error("Error clearing user info:", error);
  });
Website Demo
To experience this functionality, visit our Demo Website and input user information as shown below: 
In this demonstration, the website communicates to the chatbot that the user's lucky number is 934383 - a randomly chosen number. Subsequently, users can pose questions like What is my name and double of my lucky number?. This query necessitates the chatbot to access the user's information for an accurate response. As evidenced by the screenshot below, the chatbot successfully recognizes the user's lucky number and performs the calculation correctly.
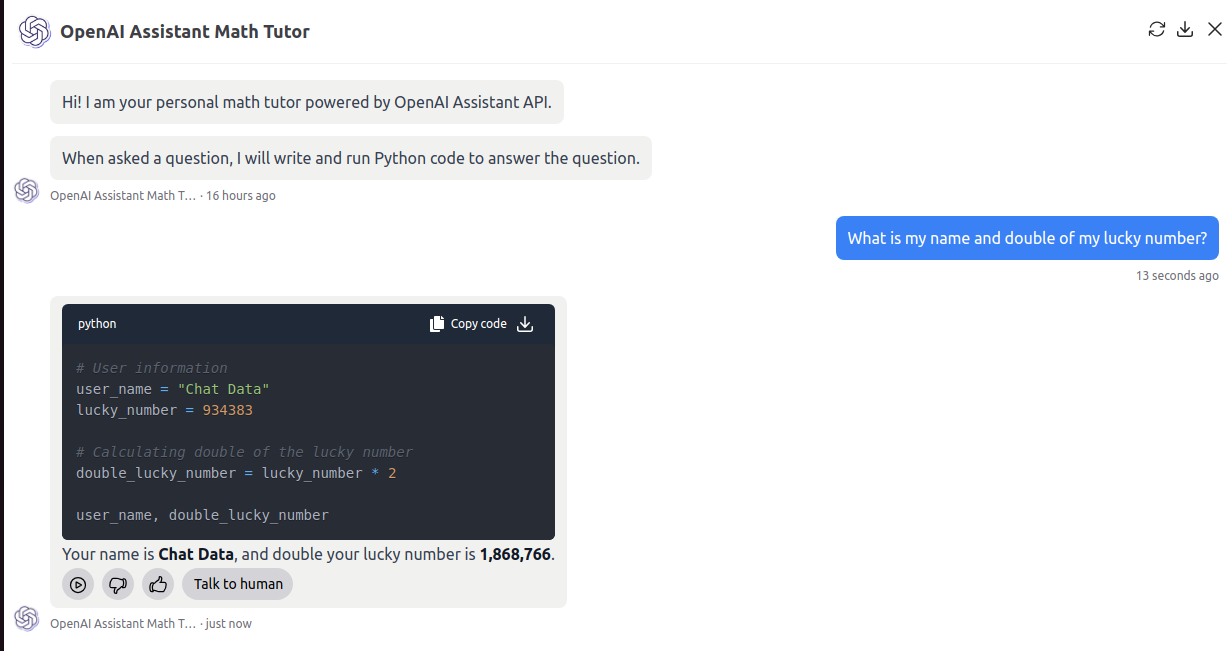
This example demonstrates that you can sync the user's information from your website to the chatbot to create a personalized experience.
Widget Controls
The Chat Data SDK provides methods to programmatically control the chatbot widget's visibility and state. These methods allow you to open, close, or toggle the widget based on user interactions or application logic.
Opening the Widget
Use the openWidget method to programmatically open the chatbot widget:
window.chatbot.openWidget()
  .then(response => {
    console.log("Widget opened:", response);
  })
  .catch(error => {
    console.error("Error opening widget:", error);
  });
Closing the Widget
Use the closeWidget method to programmatically close the chatbot widget:
window.chatbot.closeWidget()
  .then(response => {
    console.log("Widget closed:", response);
  })
  .catch(error => {
    console.error("Error closing widget:", error);
  });
Toggling the Widget
Use the toggleWidget method to toggle the widget's state - it will open if currently closed, or close if currently open:
window.chatbot.toggleWidget()
  .then(response => {
    console.log("Widget toggled:", response);
  })
  .catch(error => {
    console.error("Error toggling widget:", error);
  });
Practical Use Cases
These widget control methods can be particularly useful for:
- Custom triggers: Create custom buttons or links that open the chatbot
- Conditional display: Show the chatbot based on user behavior or page context
- Guided user flows: Open the chatbot at specific points in your user journey
- Integration with help systems: Coordinate the chatbot with other support tools
Example implementation with custom triggers:
// Open chatbot when user clicks a custom help button
document.getElementById('help-button').addEventListener('click', function() {
  window.chatbot.openWidget()
    .then(() => {
      console.log('Help chatbot opened');
    });
});

// Close chatbot when user completes a specific action
function onTaskCompleted() {
  window.chatbot.closeWidget()
    .then(() => {
      console.log('Task completed, chatbot closed');
    });
}

// Toggle chatbot with keyboard shortcut
document.addEventListener('keydown', function(e) {
  if (e.ctrlKey && e.key === 'h') {
    window.chatbot.toggleWidget();
  }
});
Receiving Events From Chatbot to Website
When embedding our chatbot as a widget bubble or an iframe on your website, you can receive four types of events through the SDK: chat, lead-submission, live-chat-escalation, and minimize-widget. These events allow for seamless communication between the chatbot and your website.
Event Types and Payloads
Chat
All chat conducted in the chatbot will trigger a chat event. Here is an example of the event's data payload:
{
    "chatbot_id": "654aee418bc9a33b0e50d0ad",
    "chatbot_name": "Chat Data AI assistant",
    "chatbot_display_name": "Chat Data",
    "conversation_id": "5d4e7c46-4c54-4bb2-9bc8-170a3fc647e2",
    "message": "How to resell the chatbot with my own domain?",
    "source": "widget",
    "lead": {
        "uuid": "90e8c9cc-017e-4876-882d-19efd88b10ba",
        "name": "Customer",
        "email": "[email protected]",
        "source": "widget"
    }
}
Live Chat Escalation
When the user clicks the live chat escalation button, a live-chat-escalation event will be triggered.
{
    "chatbot_id": "654aee418bc9a33b0e50d0ad",
    "chatbot_name": "Chat Data AI assistant",
    "chatbot_display_name": "Chat Data",
    "conversation_id": "5d4e7c46-4c54-4bb2-9bc8-170a3fc647e2",
    "messages": [
        {
            "role": "assistant",
            "content": "👋 Hello there! I'm Chat Data AI, your go-to source about Chat Data!",
            "timestamp": "2024-08-24T06:10:29.077Z",
            "_id": "66c97975a5f5d4ceebebb86e"
        },
        ...
    ],
    "source": "widget",
    "lead": {
        "uuid": "90e8c9cc-017e-4876-882d-19efd88b10ba"
    }
}
Lead Submission
The lead form submission will trigger a lead-submission event.
{
    "uuid": "90e8c9cc-017e-4876-882d-19efd88b10ba",
    "name": "Customer",
    "email": "[email protected]",
    "source": "widget"
}
Minimize Widget
A click on the close icon on the chatbot will trigger a minimize-widget event. The minimize-widget event doesn't have any specific payload.
Error
The SDK will trigger an error event when encountering issues that need attention. Common error scenarios include:
- Invalid event types
- Missing SDK privileges
- Unexpected event data
Example error event payload:
{
    "event": "error",
    "from": "chatbot-iframe",
    "message": "The SDK events privileges requires the Standard(above) or Webhook Delivery Plan"
}
Warning
The SDK will trigger a warning event for non-critical issues that don't prevent functionality but should be noted. Common warning scenarios include:
- Field truncation due to length limits
- Deprecated feature usage
- Non-optimal configurations
Example warning event payload:
{
    "event": "warning",
    "from": "chatbot-iframe",
    "message": "The following fields were truncated due to length limits: name, email"
}
How to handle Events with the SDK
The Chat Data SDK events are available in the Standard plan or above. Here's how to implement event listeners:
Event Listener Implementation
// 1. Chat messages
const chatHandler = function(data) {
  console.log("Chat event received:", data);
  // Handle new chat messages from the chatbot
};
window.chatbot.addEventListener("chat", chatHandler);

// 2. Lead submissions
const leadSubmissionHandler = function(data) {
  console.log("Lead submission received:", data);
  // Handle when a user submits a lead form in the chatbot
};
window.chatbot.addEventListener("lead-submission", leadSubmissionHandler);

// 3. Live chat escalation
const liveChatEscalationHandler = function(data) {
  console.log("Live chat escalation requested:", data);
  // Handle when user requests to speak with a human agent
};
window.chatbot.addEventListener("live-chat-escalation", liveChatEscalationHandler);

// 4. Widget minimization
const minimizeWidgetHandler = function(data) {
  console.log("Widget minimized:", data);
  // Handle when user minimizes the chat widget
};
window.chatbot.addEventListener("minimize-widget", minimizeWidgetHandler);

// 5. Error handling
const errorHandler = function(data) {
  console.error("SDK Error:", data.message);
  // Handle SDK errors appropriately
  // You might want to show a user-friendly error message
  // or notify your error tracking system
};
window.chatbot.addEventListener("error", errorHandler);

// 6. Warning handling
const warningHandler = function(data) {
  console.warn("SDK Warning:", data.message);
  // Handle SDK warnings appropriately
  // You might want to log these for monitoring
  // or notify your development team
};
window.chatbot.addEventListener("warning", warningHandler);
Removing Event Listeners
To remove event listeners when they're no longer needed:
// Remove a specific event listener
window.chatbot.removeEventListener("chat", chatHandler);

// You should remove event listeners when components unmount (React example)
useEffect(() => {
  window.chatbot.addEventListener("chat", chatHandler);

  return () => {
    window.chatbot.removeEventListener("chat", chatHandler);
  };
}, []);
Website Demo
To experience the SDK events in action, visit our Demo Website. If you've previously entered your information, start by clicking the Clear User Info button to reset. Then, initiate a conversation with the chatbot by sending a query. After responding to your initial question, the chatbot will prompt you to provide your contact information.
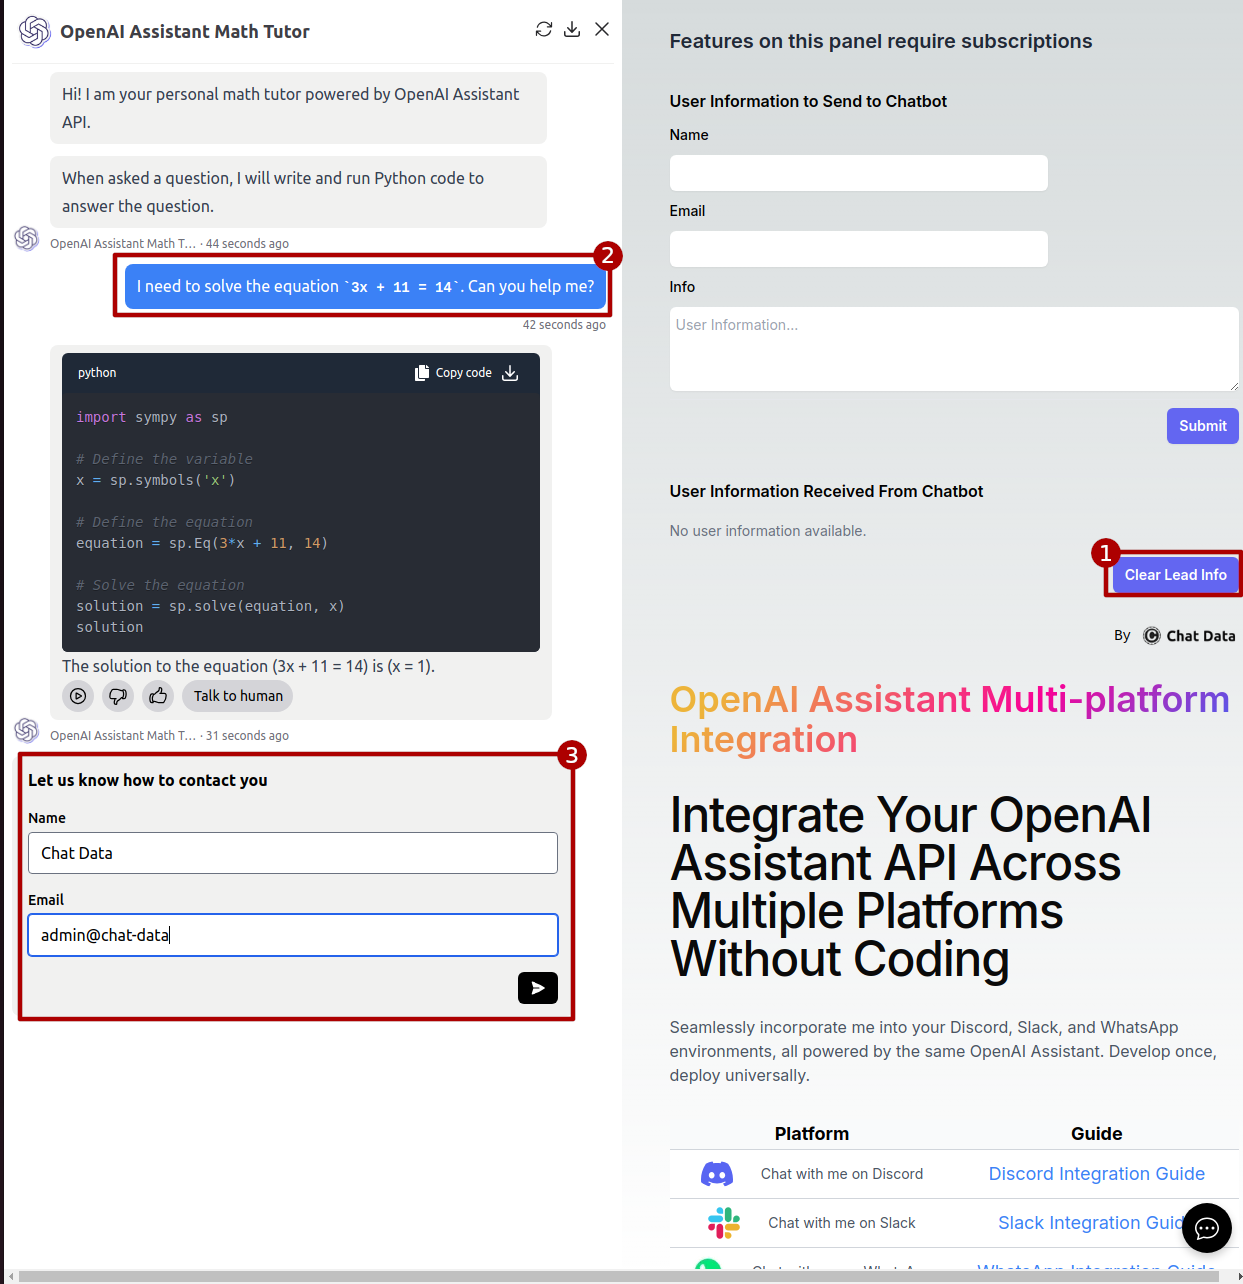
Upon submitting the lead form, you'll see the provided information displayed on the website, as shown in the screenshot below:
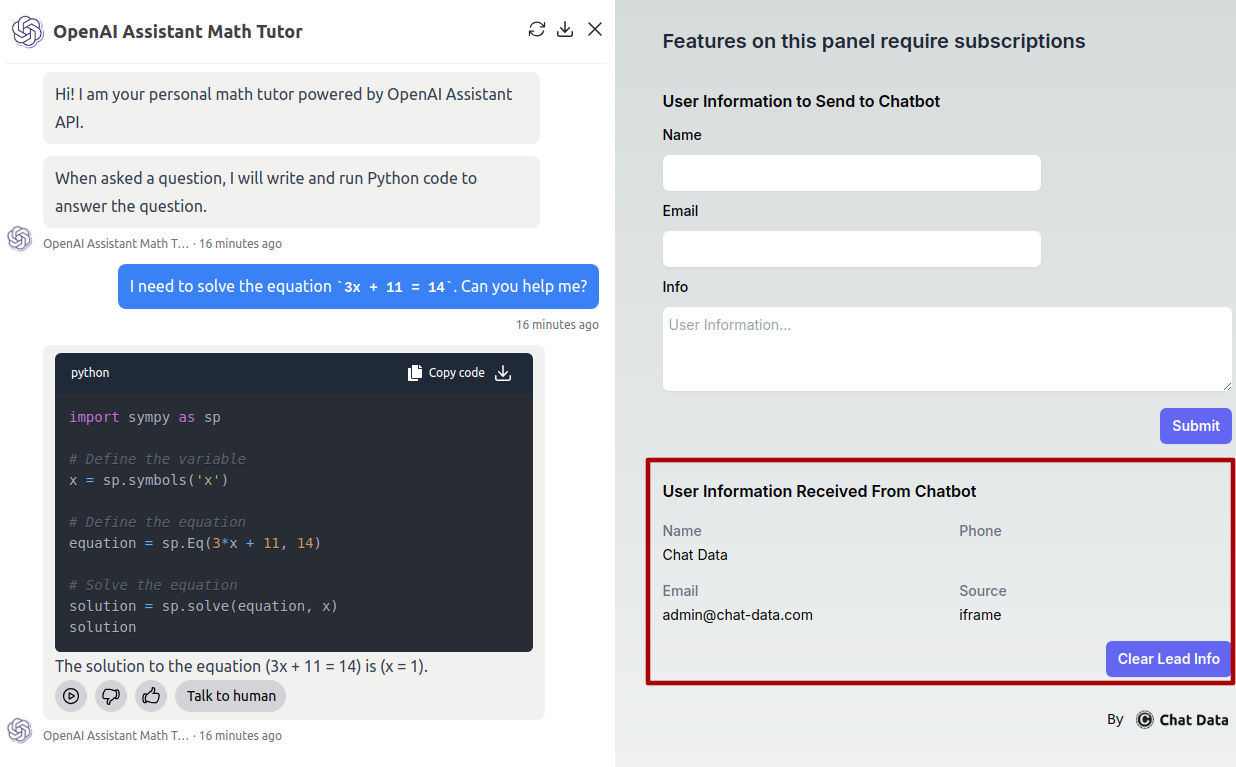
This demonstration illustrates how listening to events enables real-time responses to user actions on your website. For instance, you could create personalized pop-ups featuring the user's name, email, and conversation history. Such implementations can significantly enhance user experience and engagement on your platform.
Full Implementation Example
Below is a comprehensive example showing how to implement the Chat Data SDK in a typical application:
// Initialize the SDK (if not using auto-initialization)
if (window.chatbot) {
  // SDK is already loaded
  console.log("SDK initialized with config:", window.chatbot.getConfig());
} else {
  console.error("SDK failed to load");
}

// Setup event listeners
function setupEventListeners() {
  // Chat events
  window.chatbot.addEventListener("chat", function(data) {
    console.log("Chat message:", data);
    document.getElementById("lastMessage").textContent = data.message;
  });

  // Lead submission
  window.chatbot.addEventListener("lead-submission", function(data) {
    console.log("Lead submitted:", data);
    // Update UI with lead info
    document.getElementById("leadName").textContent = data.name || "Unknown";
    document.getElementById("leadEmail").textContent = data.email || "Unknown";
  });

  // Live chat escalation
  window.chatbot.addEventListener("live-chat-escalation", function(data) {
    console.log("Live chat requested:", data);
    // Maybe show a notification or alert customer service
    alert("Customer has requested live chat assistance!");
  });

  // Minimize widget
  window.chatbot.addEventListener("minimize-widget", function() {
    console.log("Widget minimized");
    // Maybe update UI state
    document.getElementById("chatStatus").textContent = "Chat minimized";
  });
}

// Send user info after login
function onUserLogin(userData) {
  window.chatbot.sendUserInfo({
    userId: userData.id,
    userHash: userData.securityHash,
    email: userData.email,
    name: userData.displayName,
    info: userData.accountType || "Standard user"
  }).then(() => {
    console.log("User info sent to chatbot after login");
  }).catch(error => {
    console.error("Failed to send user info:", error);
  });
}

// Example usage when page loads
document.addEventListener("DOMContentLoaded", function() {
  setupEventListeners();

  // Example: Send sample user data
  document.getElementById("loginButton").addEventListener("click", function() {
    const sampleUser = {
      id: "user123",
      securityHash: "a8f5f167f44f4964e6c998dee827110c",
      email: "[email protected]",
      displayName: "John Doe",
      accountType: "Premium member since 2023"
    };
    onUserLogin(sampleUser);
  });

  // Example: Clear user data
  document.getElementById("logoutButton").addEventListener("click", function() {
    window.chatbot.clearUserInfo()
      .then(() => {
        console.log("User info cleared");
      })
      .catch(error => {
        console.error("Failed to clear user info:", error);
      });
  });

  // Example: Widget controls
  document.getElementById("openChatButton").addEventListener("click", function() {
    window.chatbot.openWidget()
      .then(() => {
        console.log("Chatbot widget opened");
      })
      .catch(error => {
        console.error("Failed to open widget:", error);
      });
  });

  document.getElementById("closeChatButton").addEventListener("click", function() {
    window.chatbot.closeWidget()
      .then(() => {
        console.log("Chatbot widget closed");
      })
      .catch(error => {
        console.error("Failed to close widget:", error);
      });
  });

  document.getElementById("toggleChatButton").addEventListener("click", function() {
    window.chatbot.toggleWidget()
      .then(() => {
        console.log("Chatbot widget toggled");
      })
      .catch(error => {
        console.error("Failed to toggle widget:", error);
      });
  });
});
For more detailed implementation examples and to interact with a live demo, visit our SDK Demo Page.
Frequently Asked Questions
What is the Chat Data SDK used for?
The SDK is used for direct, real-time communication between your website and an embedded Chat Data chatbot. It is a faster alternative to webhooks for certain interactions because it lets the website and chatbot exchange information immediately without waiting for server round-trips.
How do I initialize the Chat Data SDK on my website?
The guide provides two initialization methods: auto-initialization by loading `chatbotsdk.min.js` with a `data-chatbot-id` attribute, or manual initialization by loading the SDK script and then calling `window.chatbot.initialize({ chatbot_id: "YOUR_CHATBOT_ID" })`.
What kinds of information can I send from my website to the chatbot?
Using `sendUserInfo`, the website can send fields such as name, email, phone, extra user information, `userId`, and `userHash` to the chatbot. This is useful for personalization, authenticated user experiences, and cases where the chatbot should answer questions based on website-side user data.
What events can my website receive from the chatbot through the SDK?
The main chatbot-to-website events are `chat`, `lead-submission`, `live-chat-escalation`, and `minimize-widget`. You can also listen for `error` and `warning` events for operational issues such as missing privileges or truncated fields.