Multi-platform Integrations
LINE Integration
Connect your Chat Data AI chatbot to LINE Official Account and reach over 200 million users across Japan, Taiwan, Thailand, and Indonesia. This integration combines 24/7 AI automation with seamless live chat handover, letting you handle routine inquiries automatically while escalating complex issues to human agents—all under your brand identity.
This guide covers the complete setup process, from creating your LINE Official Account to configuring advanced features like delayed messaging, AI re-engagement, and automatic chatbot pausing. You'll have your AI-powered LINE bot running in minutes.
Key Benefits
- Official LINE Messaging API: Build on LINE's secure, reliable infrastructure trusted by millions of users across Asia-Pacific
- Your Own Brand: Create a LINE Official Account with your business name, logo, and custom profile—customers interact directly with your brand
- Global Reach: Access LINE's massive user base across Japan, Taiwan, Thailand, Indonesia, and other markets
- Multi-language Support: Serve users in their preferred language with Chat Data's AI language detection and translation capabilities
- Rich Media Support: Handle text messages, images, stickers, audio, video, and file sharing seamlessly
- 24/7 Automation: AI handles conversations around the clock, answering questions instantly without human intervention
- Live Chat Handover: Seamlessly transition complex conversations to human agents when needed, with full conversation history
- No Infrastructure Required: Chat Data handles all backend complexity including webhook management, message routing, and API authentication
Prerequisites and Important Notes
Before starting the integration, ensure you have:
- LINE Account or Email: You'll need a personal LINE account or email address to register for a Business ID
- Chat Data Subscription: Entry plan or above is required to access LINE integration features
- Basic Understanding: Familiarity with messaging bots is helpful but not required—this guide covers everything step-by-step
Provider Assignment Cannot Be Changed
When enabling the Messaging API in Step 4, you'll be prompted to select a Provider (organization/company name). This is a permanent decision and cannot be changed after setup. Choose your provider name carefully and prepare your terms of service and privacy policy URLs before proceeding (you can use Chat Data's URLs if needed: https://www.chat-data.com/terms and https://www.chat-data.com/privacy).
Security Considerations:
- Keep your Channel secret secure and never share it publicly or commit it to version control
- Chat Data encrypts and securely stores your credentials using industry-standard encryption
- Only authorized team members should have access to your LINE Developers Console
Step-by-Step Integration Guide
Step 1: Create Your Chat Data Chatbot
Before connecting to LINE, set up your chatbot in Chat Data:
- Log into your Chat Data dashboard
- Create a new chatbot or select an existing one
- Train your chatbot by uploading documents, adding Q&A pairs, or connecting data sources
- Configure your AI's personality, response style, and behavior settings
- Test the chatbot in the Chat Data interface to ensure it responds appropriately
Your chatbot's knowledge base and configuration will power all responses on LINE, so take time to train it well.
Step 2: Access LINE Integration in Chat Data
Navigate to the LINE integration settings:
- Go to Dashboard > [Your Chatbot] > Integrations
- Locate and click the LINE integration card
- Click the Add to LINE button
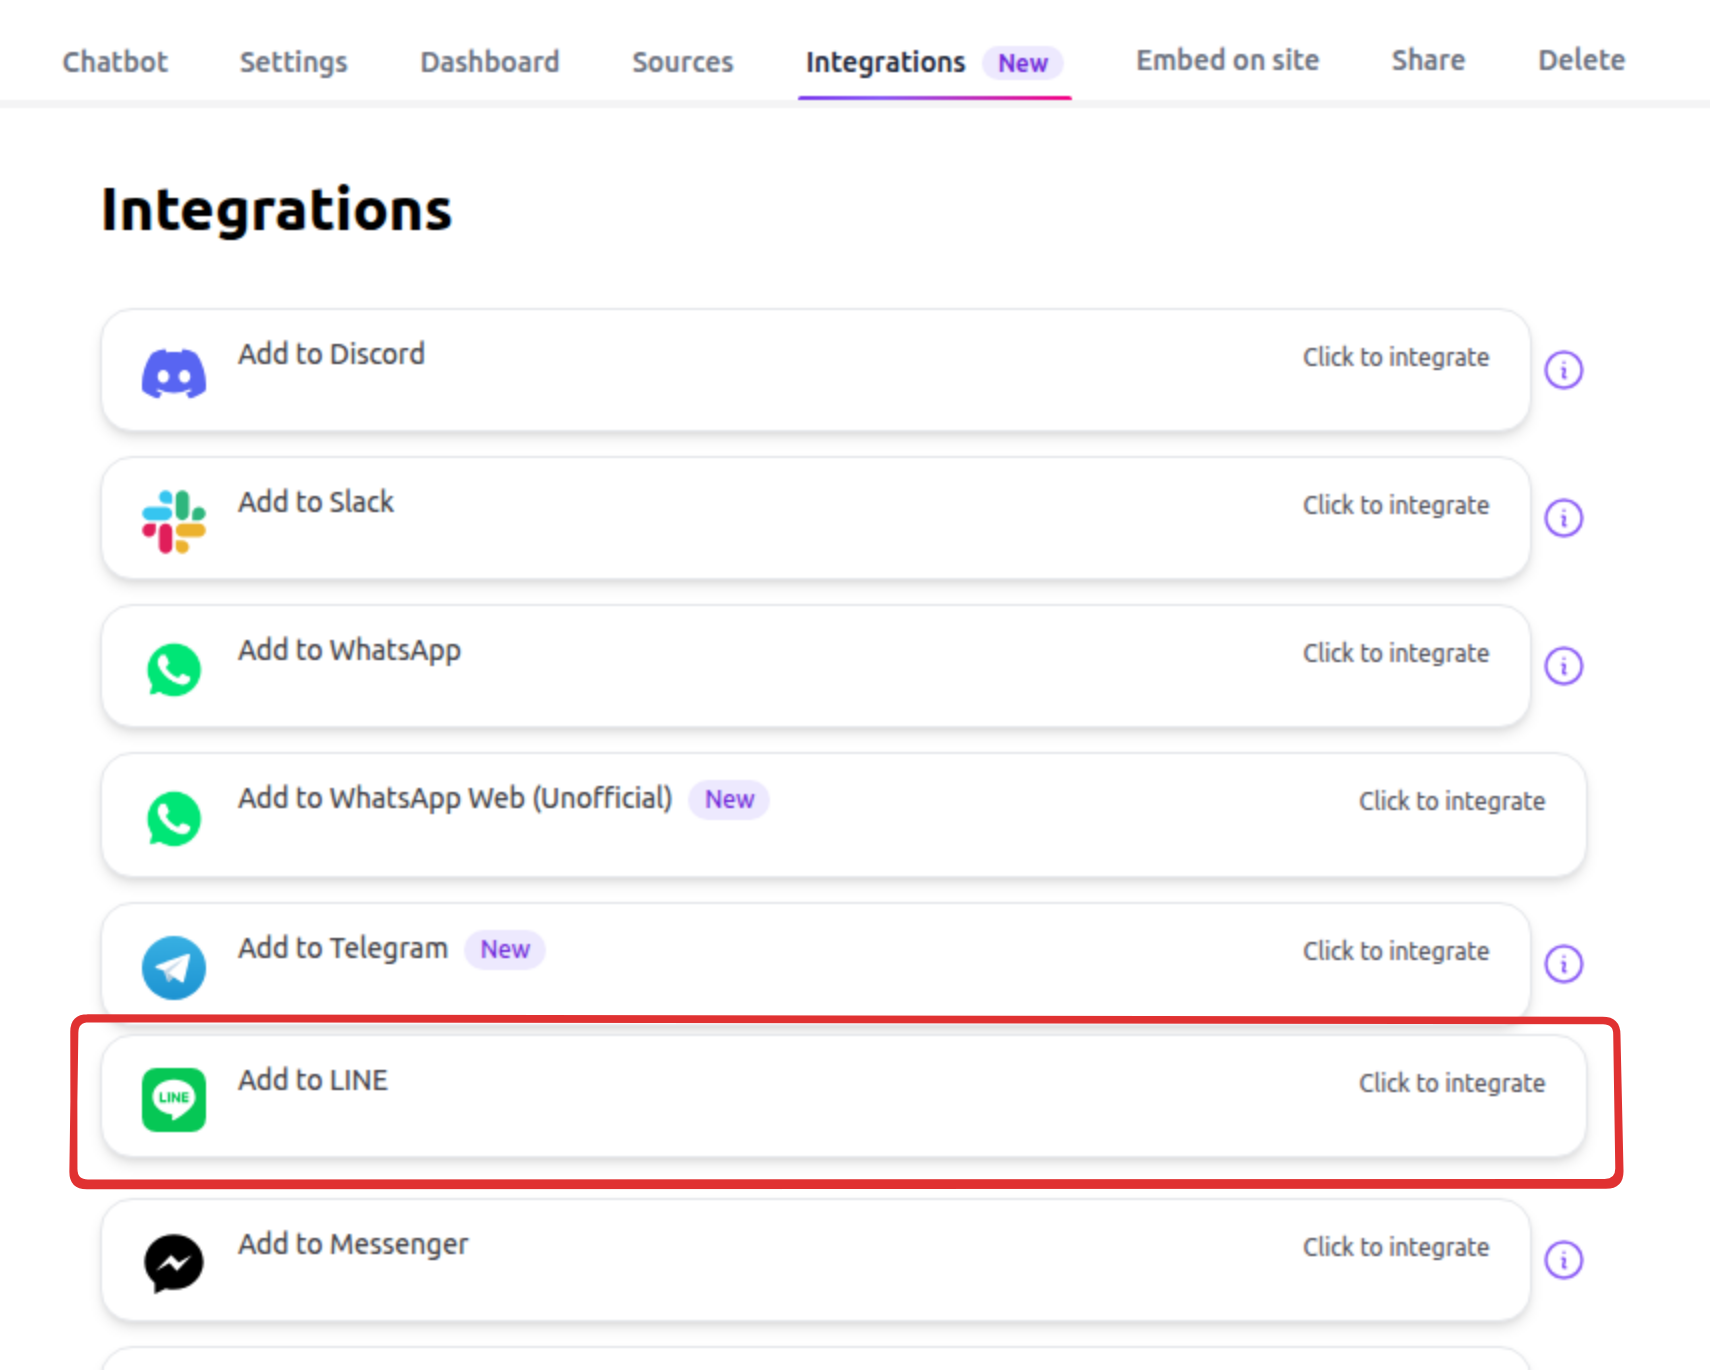
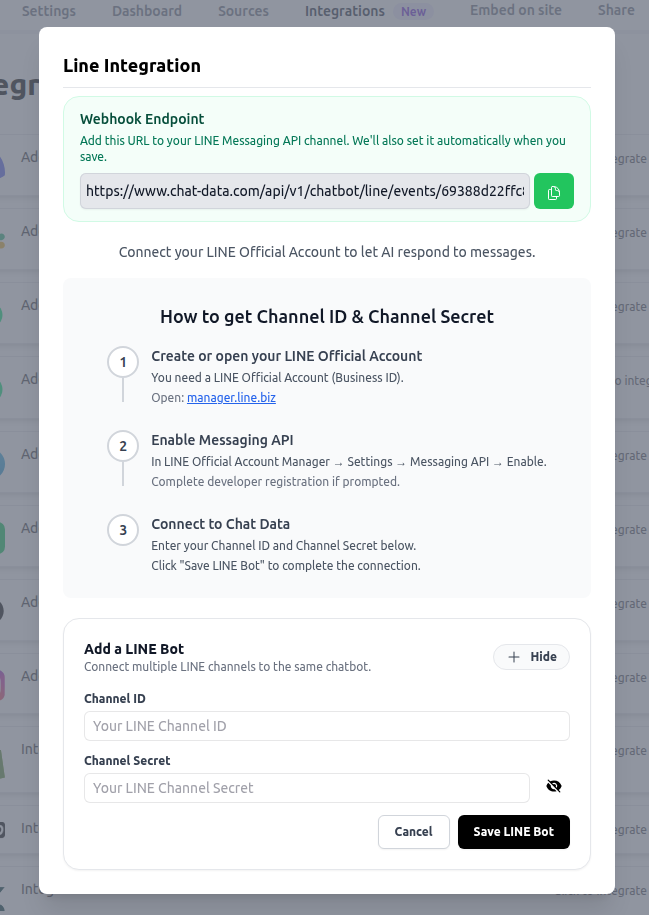
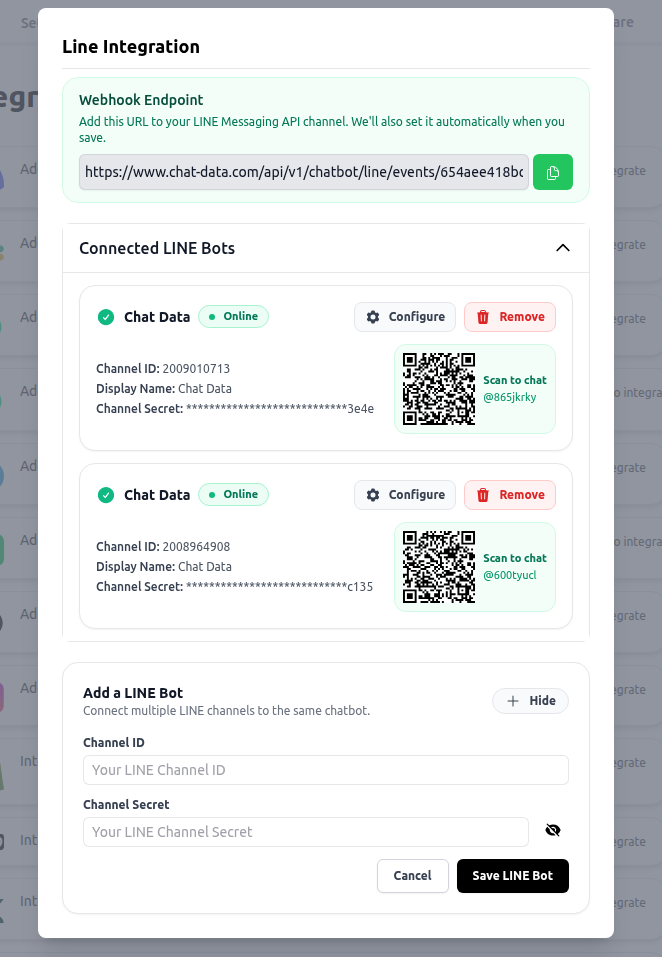
A modal window will appear displaying your unique webhook URL. Keep this modal open—you'll need the webhook URL in Step 5.
Step 3: Create LINE Official Account
Register for a LINE Official Account to represent your business:
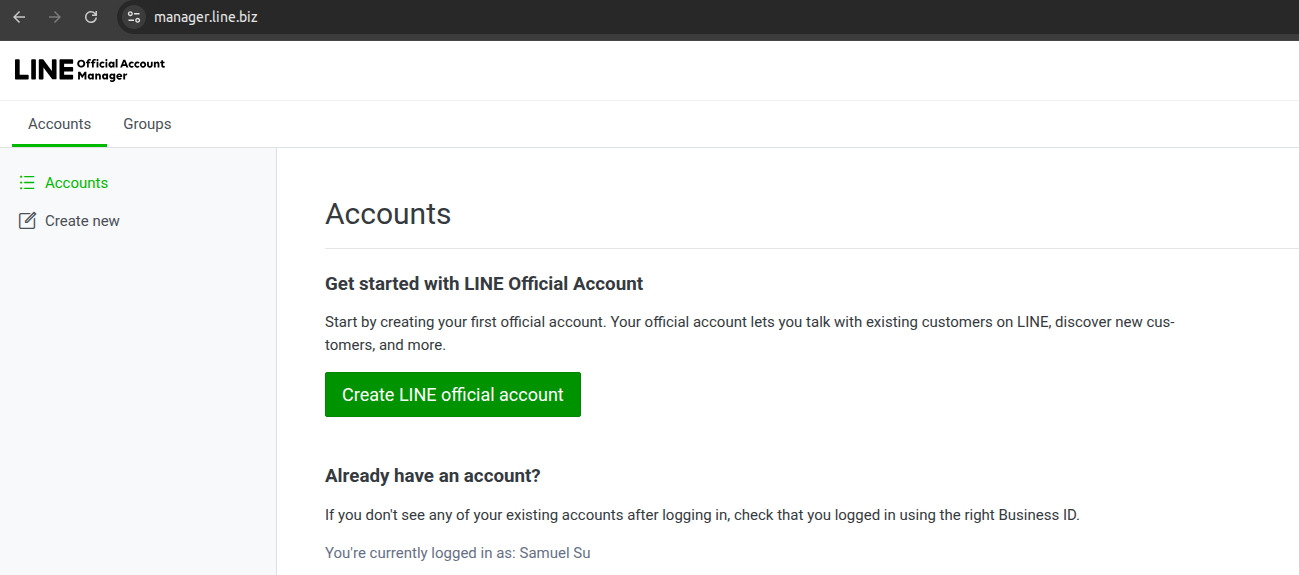
- Visit the LINE Official Account Manager
- Click Create a LINE Official Account
- Log in using your LINE account or email address
- Enter your business information including account name, category, and description
- Upload a profile photo (minimum 200×200 pixels) and cover photo (optional)
- Review and accept the LINE Official Account Terms of Use
- Click Create to complete registration
After creation, you'll be directed to the LINE Official Account Manager where you can further customize your profile.
Step 4: Enable Messaging API and Configure Provider
Activate the Messaging API feature and set up your provider credentials:
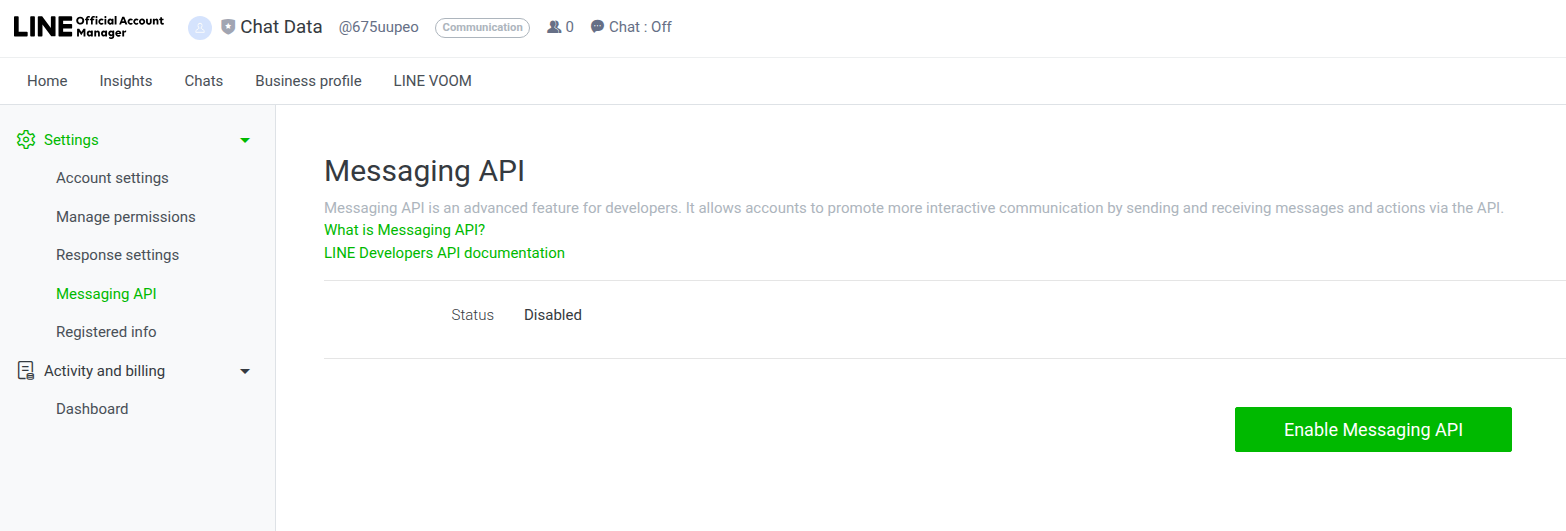
- In the LINE Official Account Manager, click Settings (located in the top right of the page)
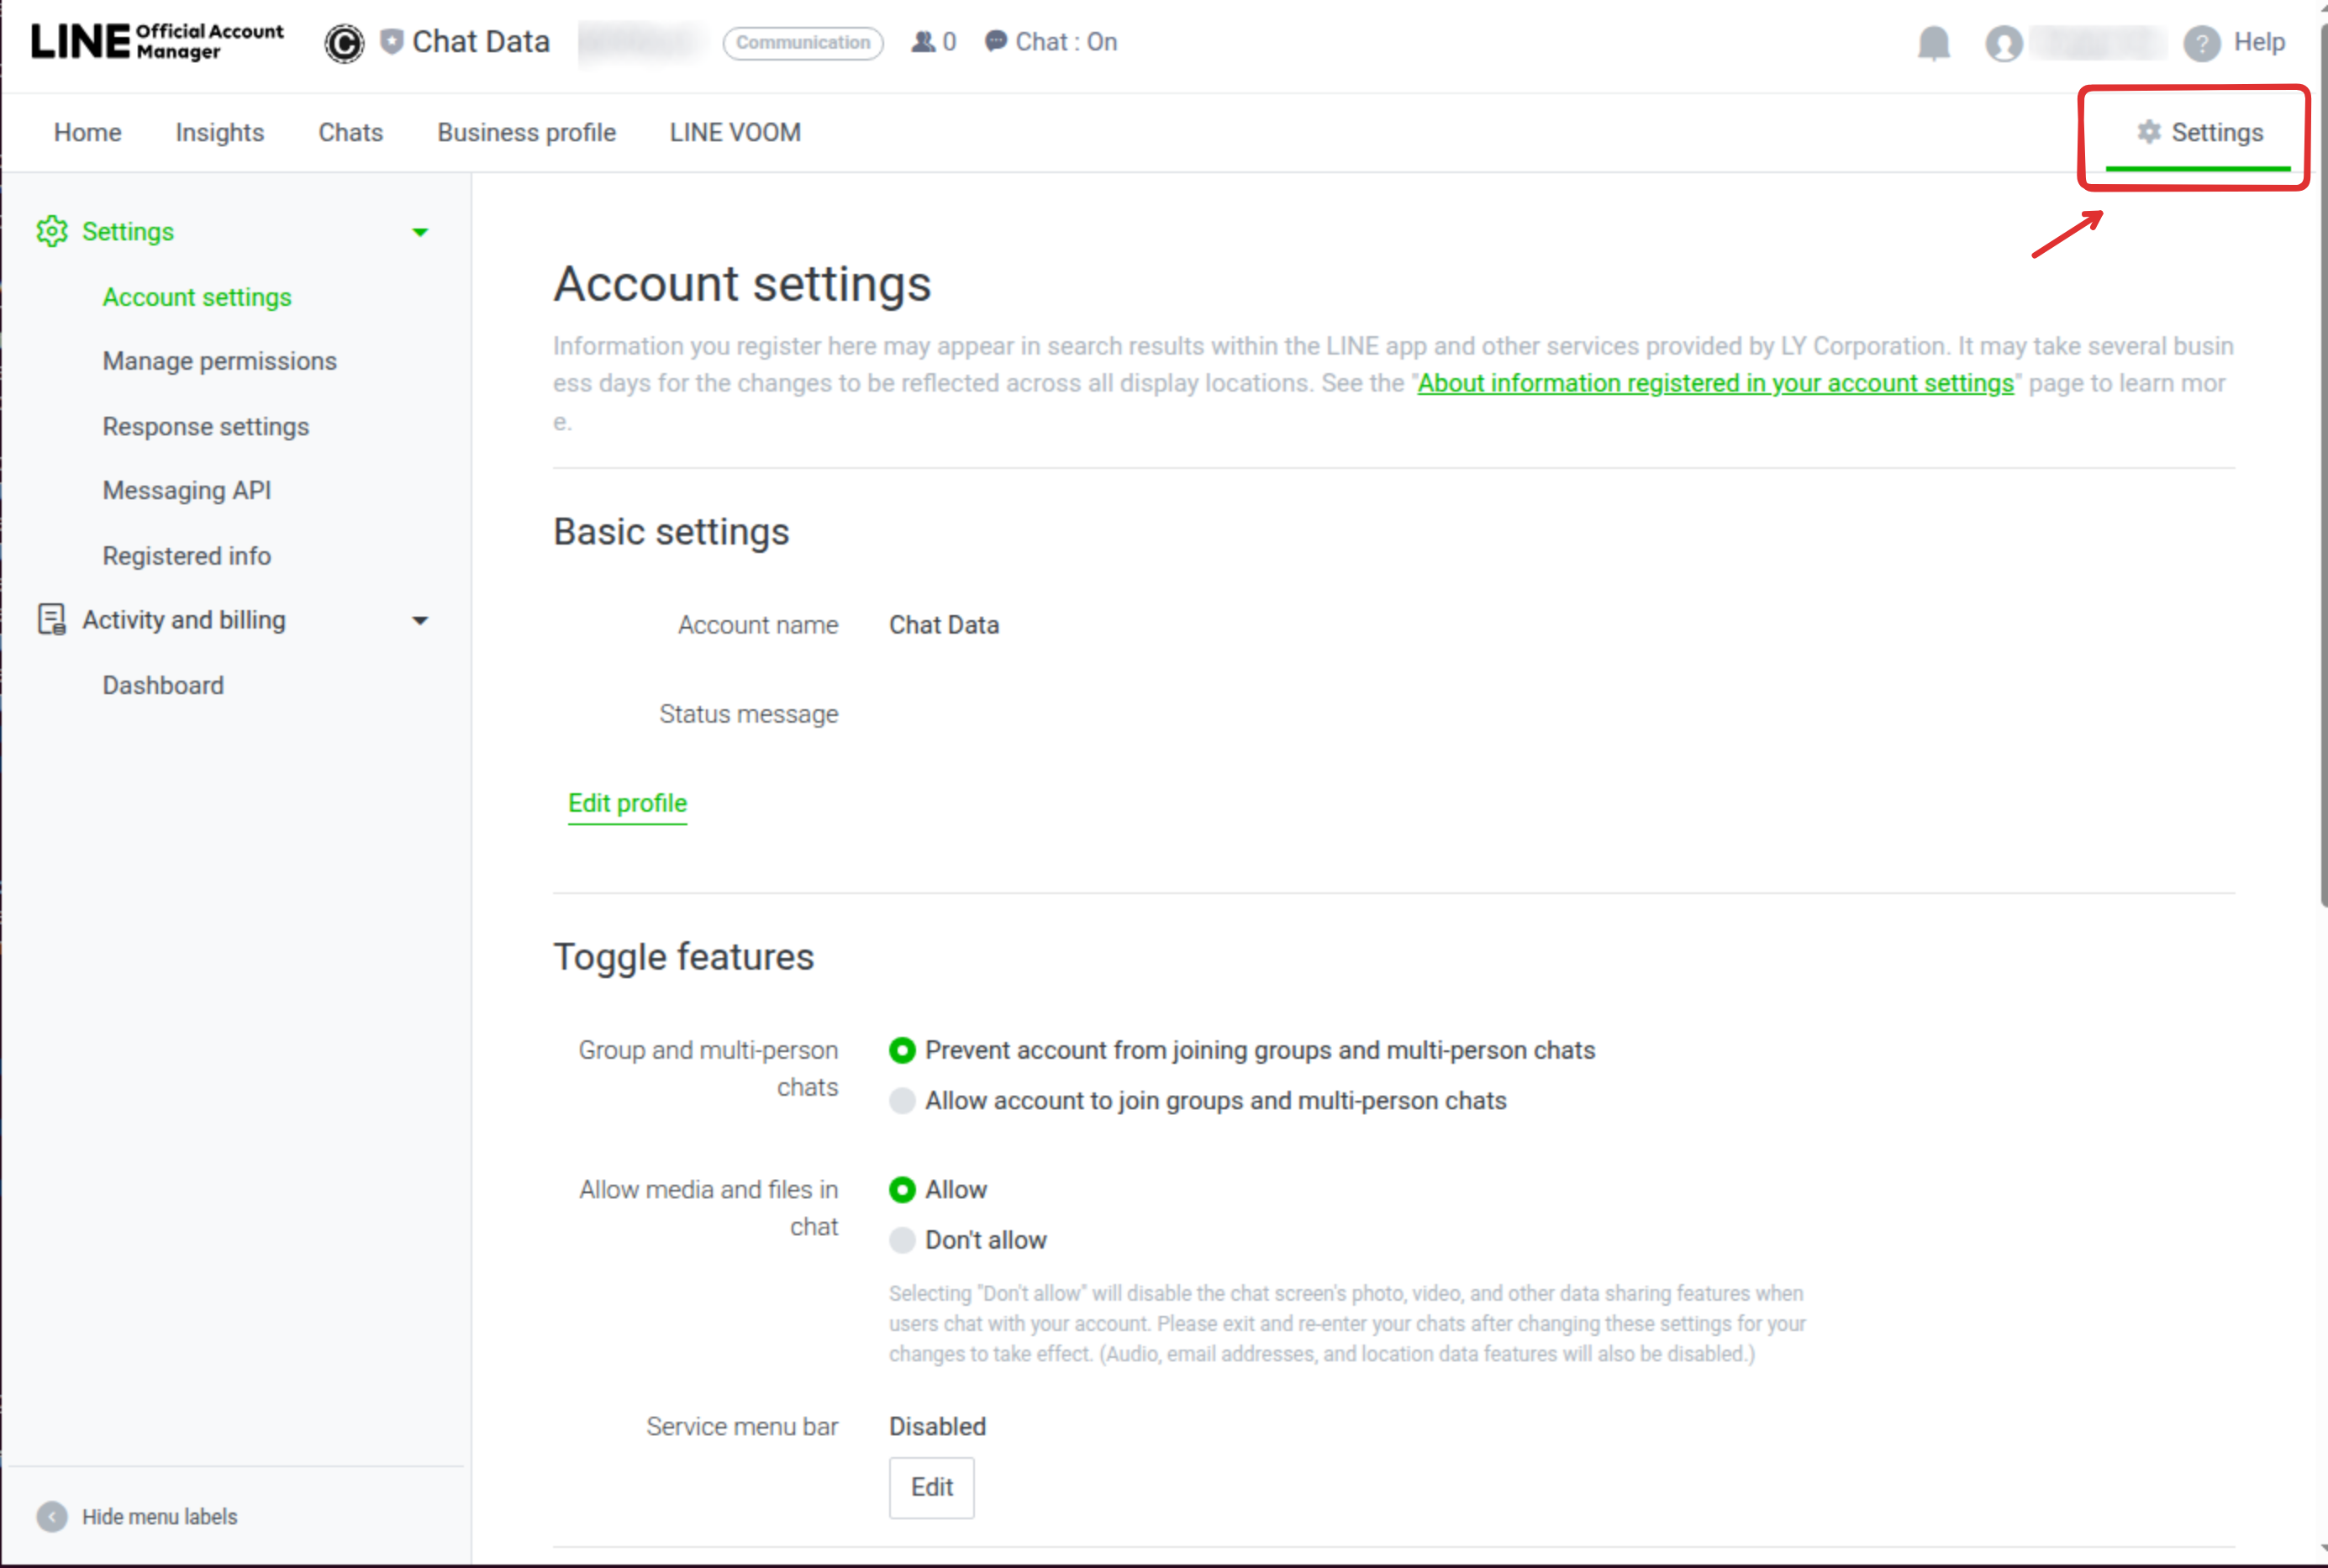
- Click the Messaging API tab
- Click Enable Messaging API button
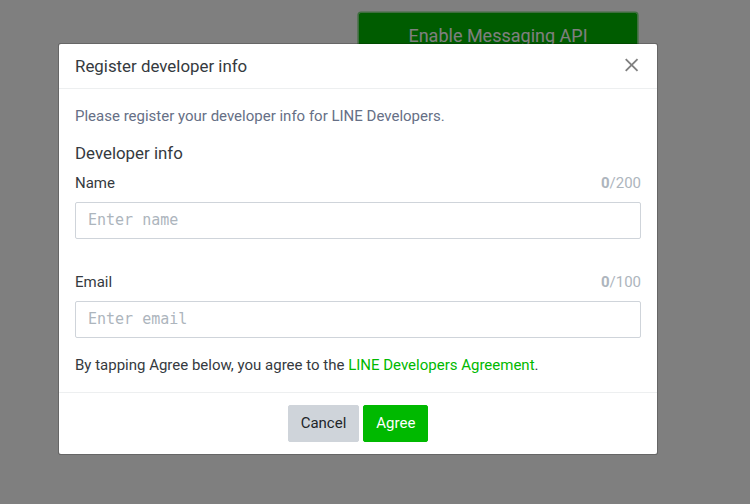
- A modal appears prompting Register developer info:
- Enter your email (the one registered for your LINE account)
- Click OK
- Next modal: Select a Provider
- Type your provider name (e.g., "Chat Data" or your company name)
- CRITICAL: This provider assignment CANNOT be changed later
- Add provider's Terms of Service URL (can use: https://www.chat-data.com/terms)
- Add provider's Privacy Policy URL (can use: https://www.chat-data.com/privacy)
- Click OK

- After provider setup, you'll see your Channel ID and Channel secret displayed immediately
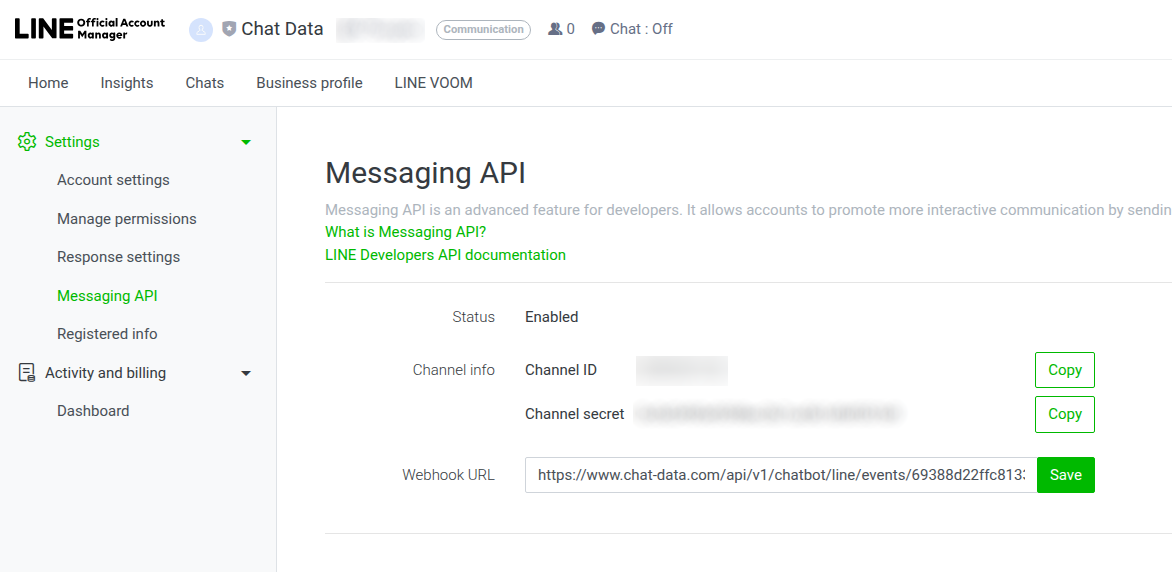
Keep this page open—you'll need these credentials in Step 6.
Step 5: Configure Webhook and Complete Integration
Set up the webhook to connect LINE to Chat Data:
Still in the Messaging API settings (from Step 4), locate the Webhook URL field
Enter the webhook URL from your Chat Data "Add to LINE" modal (from Step 2)
Click Save
The page now displays your Channel ID and Channel secret along with the saved webhook configuration
The webhook is now configured to forward messages from LINE to your Chat Data chatbot. Make note of your Channel ID and Channel secret—you'll need them in the next step.
Step 6: Complete Chat Data Integration
Connect Chat Data to your LINE Official Account using the credentials from Step 4:
- Return to the Chat Data LINE integration modal (from Step 2)
- Enter your Channel ID (from Step 4)
- Enter your Channel secret (from Step 4)
- The webhook URL should already be displayed/configured
- Click Connect or Save
- Wait for verification—Chat Data will test the connection
- Connection status shows green indicator when successful
Chat Data automatically handles Channel Access Token generation—you do NOT need to generate it manually. Keep your Channel secret secure and never share it publicly.
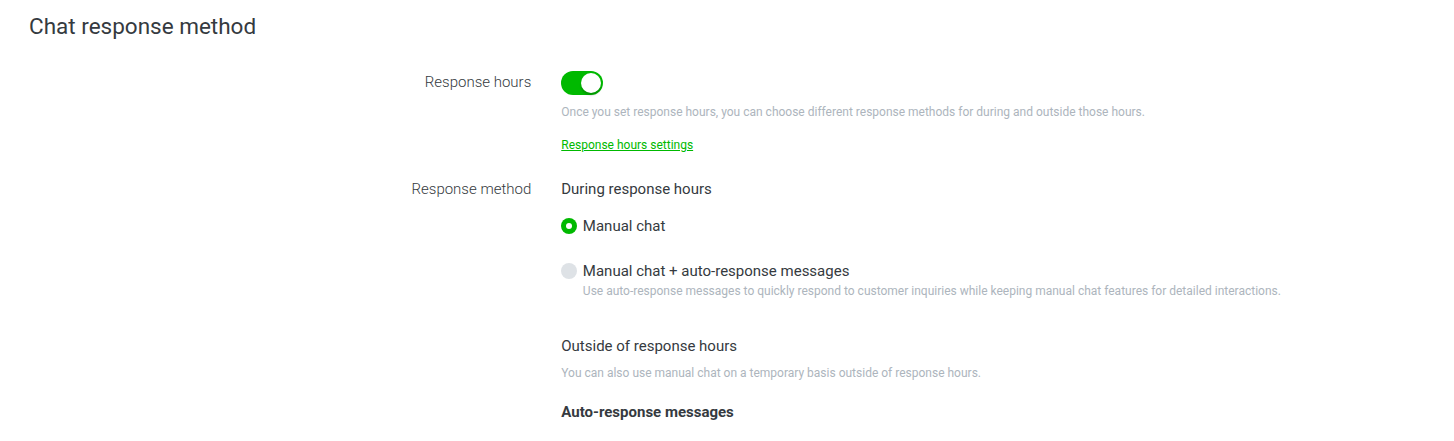
Step 7: Configure LINE Response Settings
Optimize your LINE Official Account settings for AI chatbot operation:
Return to the LINE Official Account Manager
Navigate to Settings > Response settings
Configure the following toggles:
- Chat: Turn ON (enables message handling)
- Webhooks: Turn ON (routes messages to Chat Data)
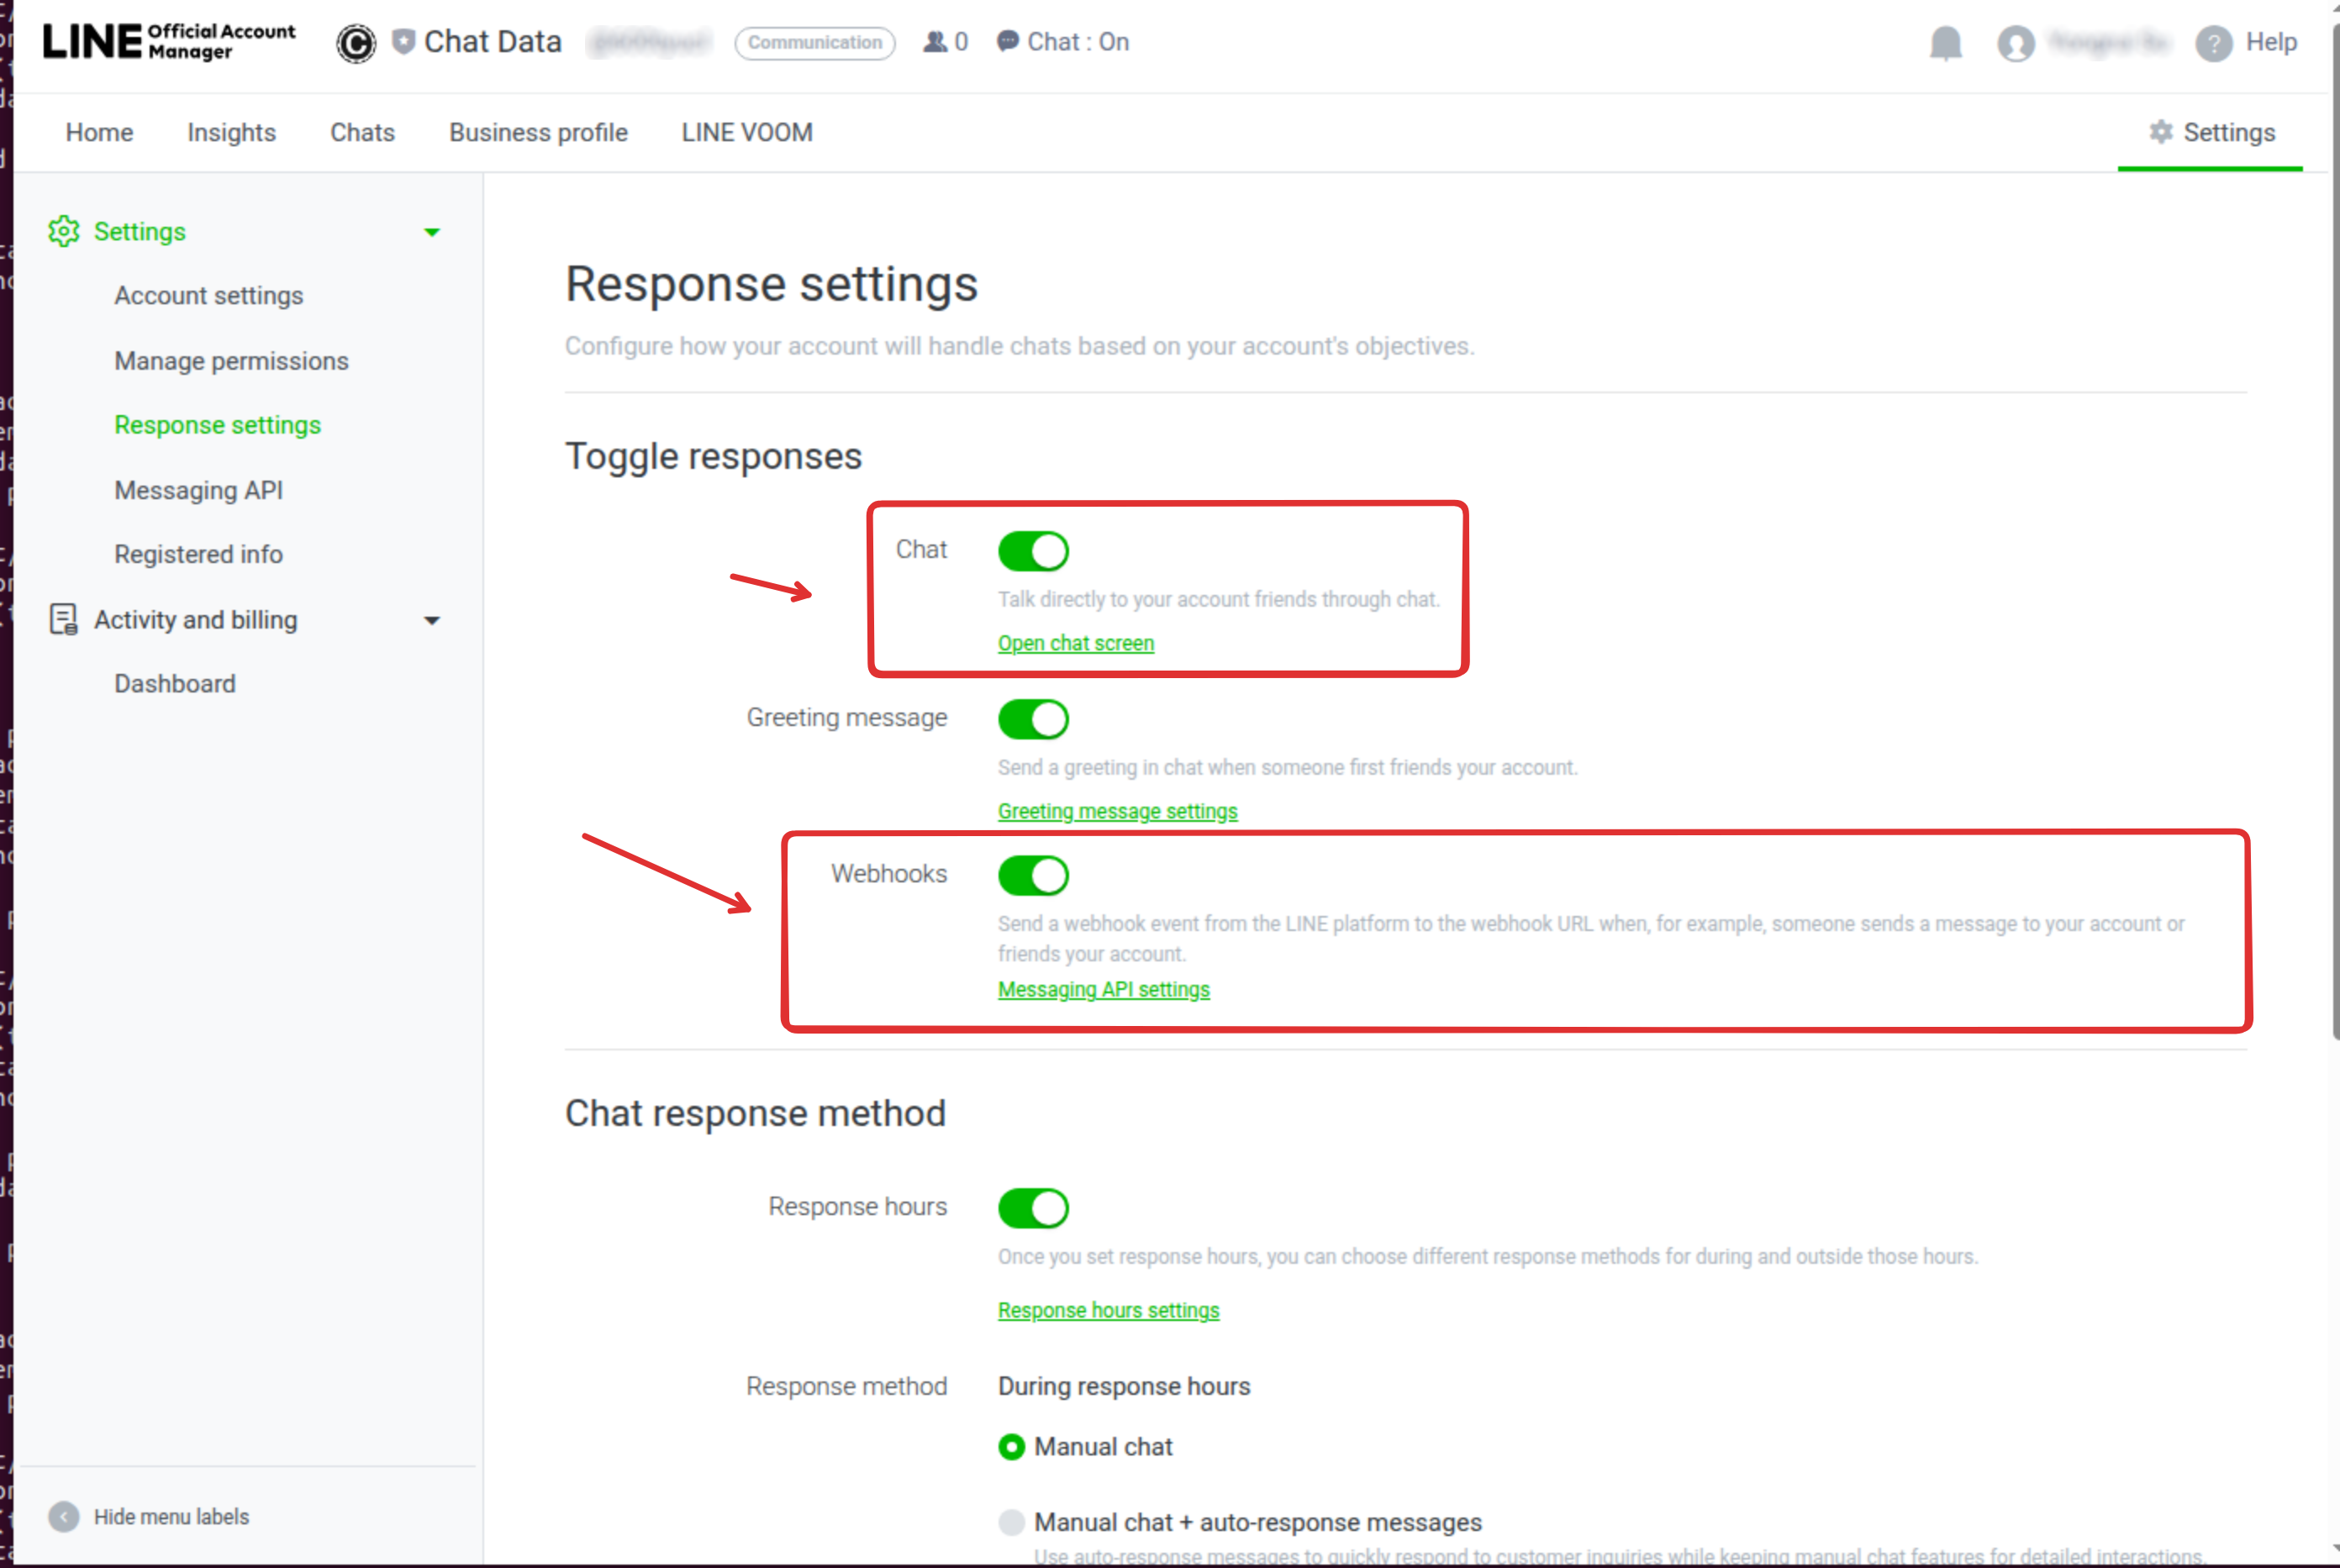
- Auto-response messages: Turn OFF (prevents conflicts with your AI chatbot)
Leaving auto-response messages enabled will cause both LINE's built-in responses and your AI chatbot to reply to the same message, creating a confusing user experience. Always disable this feature when using Chat Data.
OPTIONAL: Greeting message: Turn ON if you want to send an automated welcome message when users first add your account
Click Save at the bottom of the page
Your LINE Official Account is now fully configured to work with Chat Data's AI chatbot.
Step 8: Test Your Integration
Verify everything is working correctly:
- In the Chat Data LINE integration panel, locate the QR code for your LINE Official Account
- Open LINE on your mobile device
- Tap the Add friend icon and select QR code
- Scan the QR code from Chat Data
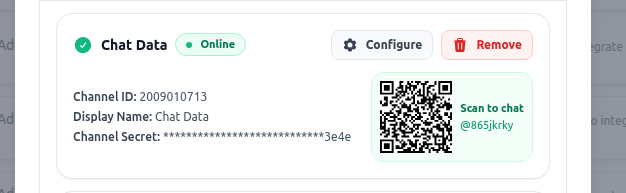
- Add the LINE Official Account as a friend
- Send a test message like "Hello" or "What can you help me with?"
- Verify that your AI chatbot responds appropriately based on your training
If you don't receive a response, double-check that webhooks are configured correctly (Step 5) and enabled in LINE Official Account Response settings (Step 7). Also verify that your Chat Data chatbot is trained and active.
Congratulations! Your LINE integration is now live and ready to engage with customers.
Advanced Configuration Options
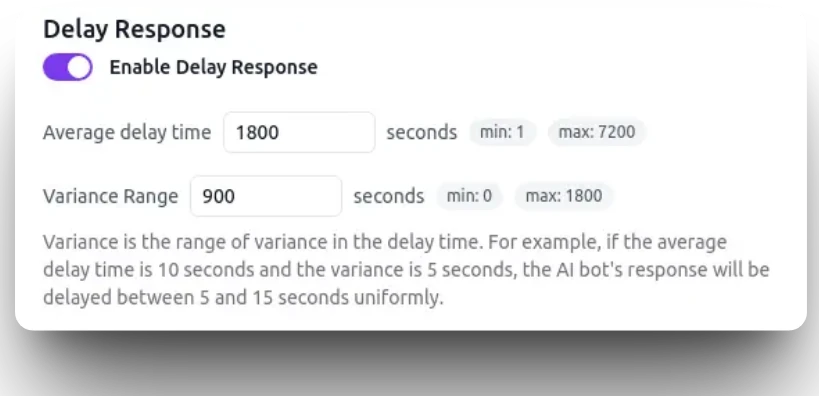
Delayed Message Sending
Create more natural, human-like conversations by adding a configurable delay before your AI chatbot responds. This feature makes interactions feel less robotic and gives users time to read previous messages.
To configure delayed messaging:
- In the Chat Data LINE integration modal, locate the Response Delay section
- Enter a delay value in seconds (e.g., 2-5 seconds for natural pacing)
- The AI will wait the specified duration before sending responses
- This applies to all messages sent through the LINE integration
Benefits:
- More natural conversation flow that mimics human response times
- Prevents overwhelming users with instant, rapid-fire responses
- Gives users time to process information before receiving the next message
- Improves overall user experience and engagement
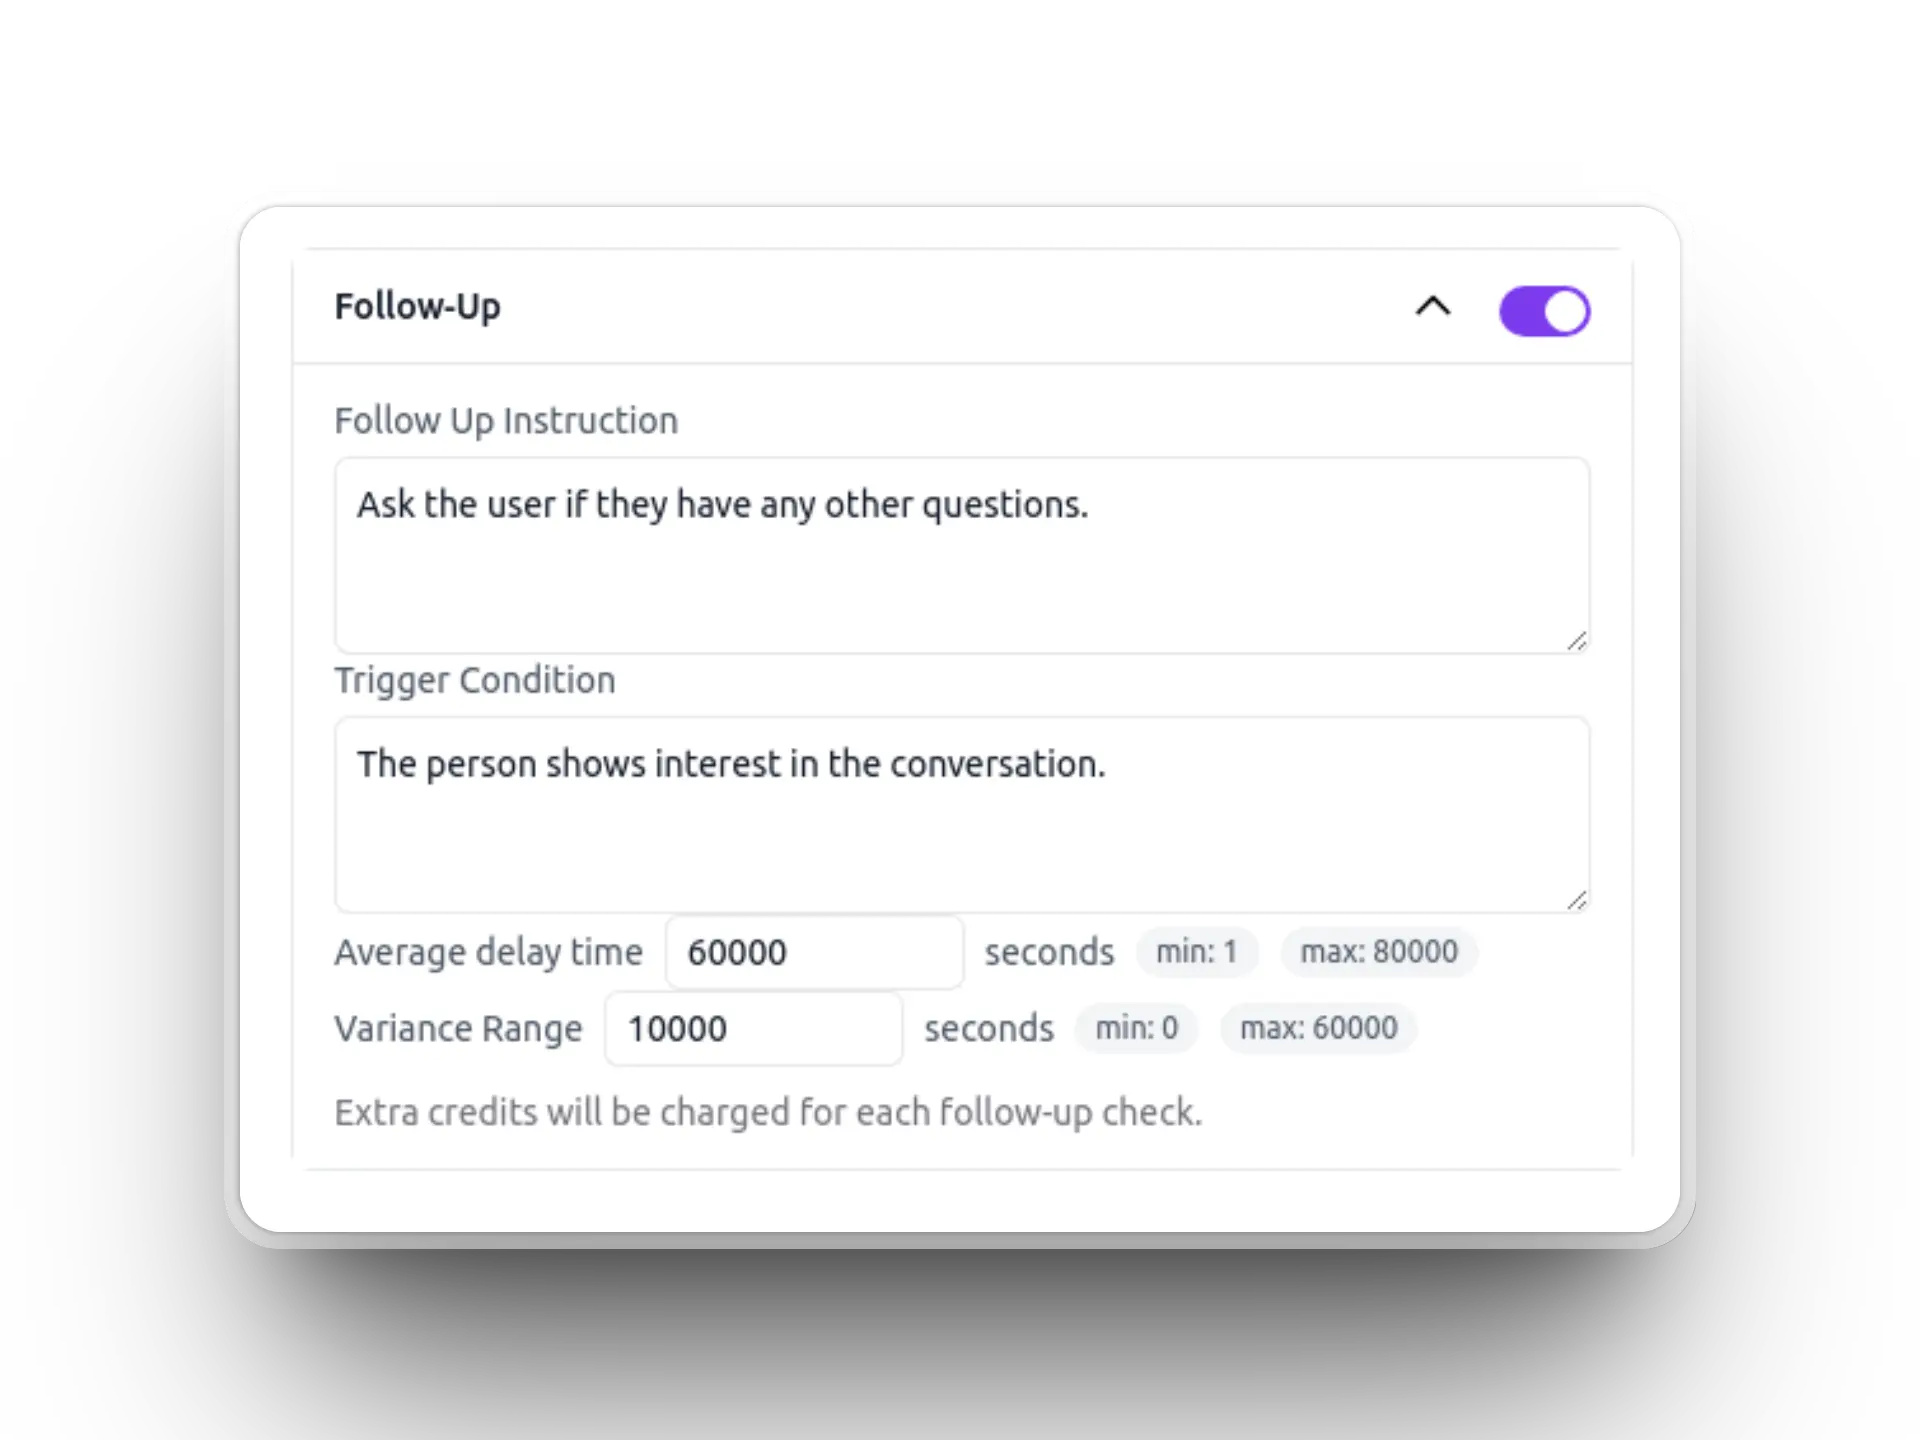
AI Re-engagement
Keep conversations active by automatically following up with users who haven't responded. Chat Data's AI can intelligently decide when to send contextual follow-up messages based on conversation history.
Configure AI re-engagement with three customization aspects:
- Time Window: Set how long to wait before sending a follow-up (e.g., 24 hours, 3 days, 1 week)
- Trigger Conditions: Define when follow-ups should be sent (after providing information, incomplete transactions, etc.)
- Message Style: Customize the tone and content of re-engagement messages to match your brand
The AI evaluates each conversation's context to determine:
- Whether a follow-up is appropriate based on the last interaction
- What information to include in the follow-up message
- The optimal tone (helpful reminder, new information, check-in, etc.)
Use Cases:
- Follow up on product inquiries that didn't convert to purchases
- Check if previous answers resolved the user's question
- Share new information relevant to previous conversations
- Re-engage users who started but didn't complete a process
Live Chat Handover
Seamlessly transition from AI automation to human support when conversations require personal attention, complex problem-solving, or empathetic communication.
To take over a conversation from the AI:
- Access your Live Chat dashboard in Chat Data
- Use filters to view LINE conversations specifically
- Select the conversation thread you want to handle
- Toggle the AI chatbot switch to OFF
- Begin responding as a human agent—the user sees your messages in LINE
Key Features:
- Full conversation history is preserved when transferring between AI and human agents
- Users continue chatting in LINE without switching platforms or creating tickets
- Email notifications alert you when customers respond during offline hours
- Re-enable the AI chatbot toggle when you're done to resume automation
When to Use Live Chat Handover:
- Customer requests to speak with a human agent
- Complex technical issues requiring expert knowledge
- Sales conversations that benefit from personal touch
- Situations requiring empathy or emotional intelligence
- Complaints or sensitive matters
To resume AI automation after resolving the issue, simply toggle the AI chatbot switch back to ON in the Live Chat dashboard.
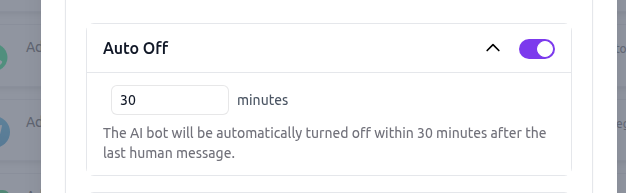
Automatic AI Chatbot Pause
Configure automatic pausing of AI responses when human agents take over conversations. This prevents the AI from interfering during human-led interactions and ensures a smooth handover experience.
To configure automatic pause:
- During the LINE integration setup, locate the Auto-Pause AI section
- Toggle the feature ON
- Set the pause duration (available options: 1 hour, 6 hours, 24 hours, 3 days, or 1 week)
- Save your configuration
How It Works:
- When you manually respond to a user in Live Chat, the AI automatically pauses
- All subsequent messages from that user bypass the AI and go directly to your Live Chat inbox
- You receive email notifications for each new message during the pause period
- After the configured duration, the AI automatically resumes handling that conversation
- Users experience no interruption—they continue chatting in LINE normally
Benefits:
- Prevents AI from responding while you're actively helping a customer
- Ensures consistent communication from a single source (human OR AI, not both)
- Gives you time to resolve issues without AI interference
- Automatically resumes AI support so you don't have to remember to turn it back on
- Ideal for overnight or weekend support—AI pauses during business hours, resumes after
This feature is especially useful for businesses with defined support hours who want AI to handle after-hours inquiries while humans manage daytime conversations.
Media File Support
Your Chat Data AI chatbot automatically handles rich media through the LINE integration, supporting multiple file types for enhanced communication.
Supported Media Types:
- Images: Automatically processed and analyzed by the AI chatbot with format conversion handled seamlessly
- Video: Automatically processed with format conversion handled by Chat Data
- Audio: Audio messages and voice notes are automatically processed with format conversion
- Files: Document files (PDFs, spreadsheets, etc.) are provided directly to users as downloadable URLs
How Media Handling Works:
Chat Data automatically handles all format conversion for images, video, and audio—you don't need to worry about specific formats or technical specifications. When users send these media types through LINE, your AI chatbot can analyze and respond contextually to the content.
For file attachments like PDFs or spreadsheets, Chat Data provides them as direct download URLs to users, ensuring seamless document sharing without additional processing.
The AI's ability to analyze and respond to visual or audio content depends on your Chat Data plan and AI model capabilities. Check your plan features for image understanding and advanced media processing. All format conversion happens automatically in the background.
Conclusion
You've successfully integrated Chat Data's AI chatbot with your LINE Official Account, creating a powerful automated customer engagement solution for one of Asia-Pacific's most popular messaging platforms. Your chatbot is now ready to handle conversations 24/7, respond to customer inquiries instantly, and seamlessly hand over to human agents when needed.
What You've Accomplished:
- Created and configured a LINE Official Account with Messaging API
- Connected Chat Data to LINE using secure webhook integration
- Configured advanced features like delayed messaging, AI re-engagement, and live chat handover
- Set up automatic AI pausing for smooth human takeover experiences
- Enabled rich media support for images, video, audio, and file sharing
Best Practices for Ongoing Success:
- Monitor Performance: Regularly review conversation logs and user feedback to identify areas for improvement
- Keep Training Current: Update your chatbot's knowledge base as your products, services, or policies change
- Test New Features: Before deploying new capabilities, test them thoroughly in the Chat Data interface
- Maintain Security: Keep your Channel secret secure and never share credentials publicly
- Review Settings: Periodically check your LINE Official Account Manager settings to ensure configurations remain optimal
Next Steps to Enhance Your Integration:
- Explore AI Actions to add custom workflows and integrations with external systems
- Configure your Business Profile in the LINE Official Account Manager for better branding
- Set up Notification Settings in Chat Data to receive alerts for important conversations
- Consider additional integrations with Zapier, Make, or n8n for advanced automation
Your LINE chatbot is live and ready to deliver exceptional customer experiences. As you gather insights from real conversations, continue refining your AI's training to make it even more effective at serving your customers.