Advanced Features
Company Sub-User Management
Sub-User Management lets you give your customers their own login accounts to access the chatbots you've built — without writing any code. You add users from your dashboard, assign them to chatbots, and Chat Data handles everything else: a branded login page on your domain, authentication, and a managed dashboard where your users can interact with their assigned chatbots.
This is an alternative to the SSO Redirect approach. If you don't want to build your own authentication system, Sub-User Management is the easier path.
Enterprise Plan Required
Sub-user management is available on the Enterprise plan. You must have your SSO Login page configured before setting up sub-users.
What You'll Set Up
Here's what the experience looks like end to end:
- You configure a login domain and add sub-users from your dashboard
- Your users visit your branded login page and sign in with magic link, password, or Google
- After login, they see a My Chatbots dashboard showing only the chatbots you've assigned to them
- They can view analytics, configure chatbot settings, and test in the playground — based on the permissions you set
Prerequisites
Before setting up sub-user management, make sure you have:
- An active Enterprise plan subscription
- Your company name and logo configured on the SSO Login page
- At least one chatbot created and trained
- A custom domain configured for white labeling (see White Label Your Chatbot) — this domain will serve as your login page
Step 1: Configure Your Login Domain
Navigate to Account > SSO Login in your Chat Data dashboard. Expand the Sub-User Management section.
Set your Login Domain — enter the custom domain where your users will log in (e.g.,
app.yourdomain.com). This must be a domain you've already pointed to your Chat Data deployment.After entering the domain, the Login URL appears below showing the full URL you'll share with your users (e.g.,
https://app.yourdomain.com/login). Use the copy button to grab it.Set Default Permissions — choose the default permission level for new sub-users. You can override this per user later.
Set Analytics Dashboard Sections — choose which analytics sections your sub-users can see by default.
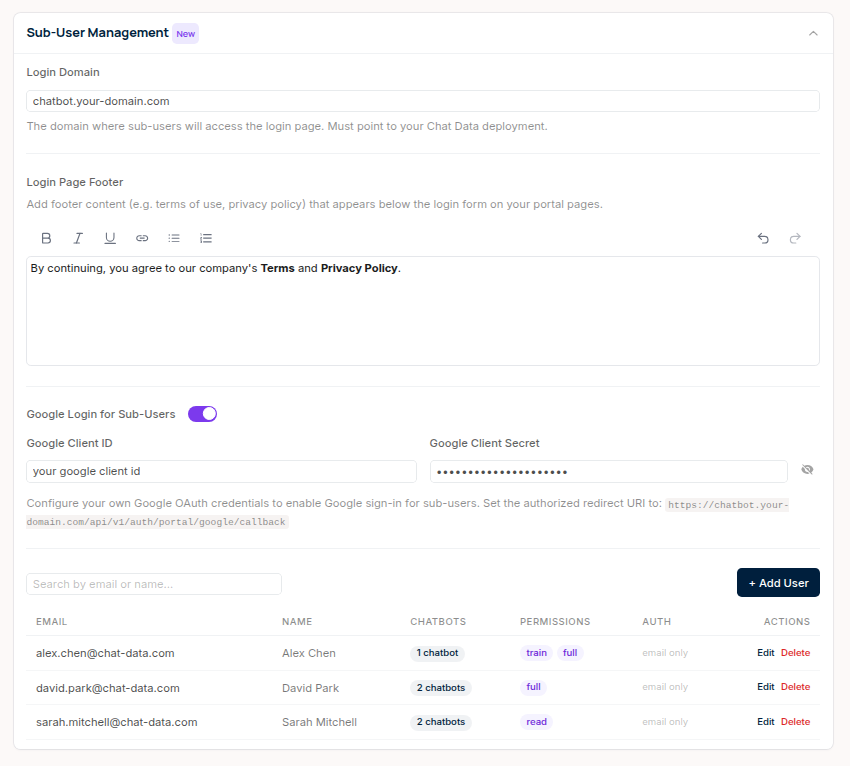
Optional: Add a Login Page Footer
You can add custom content below the login form — for example, your terms of service or privacy policy links. Use the rich text editor in the Login Page Footer section to add formatted text and links.
Optional: Enable Google Sign-In
If you want your users to sign in with their Google accounts:
- Toggle Google Login for Sub-Users on
- Enter your Google Client ID and Client Secret from Google Cloud Console
- In your Google Cloud Console, add this as an authorized redirect URI:
https://{your-login-domain}/api/v1/auth/portal/google/callback
Without Google configured, your users can still sign in via magic link (email) or password.
Step 2: Add Your Users
In the same Sub-User Management section, you'll see a user table. Click Add User to create a new sub-user.
Required Information
- Email — your user's email address. This is how they'll log in. Each email must be unique within your company.
- Assigned Chatbots — select one or more chatbots this user should have access to. At least one is required.
Optional Information
- Name — a display name shown in the dashboard header
- Password Login — toggle this on to let the user sign in with a password. If you leave it off, they'll use magic link (email) or Google instead.
- Permissions — defaults to your company-wide setting. You can customize per user:
| Permission | What the user can do |
|---|---|
| Read | View chatbot analytics and conversation history |
| Train | Upload training data and retrain the chatbot |
| Full | Change chatbot settings, manage data sources, and configure integrations |
| Admin | Everything, including member management and advanced settings |
- Analytics Sections — choose which parts of the analytics dashboard this user can see
Email Cannot Be Changed
A sub-user's email address cannot be modified after creation. If someone needs a different email, delete the account and create a new one.
Editing a User
Click Edit next to any user in the table to update their name, password, chatbot assignments, permissions, or analytics sections. Click Save when done.
Deleting a User
Click Delete next to a user, then confirm. This immediately revokes their access — any active sessions will end and pending sign-in links will stop working.
Searching Users
Use the search box above the table to filter by email or name.
Step 3: Share the Login Page with Your Users
Once you've added users, share your login URL with them. The login page displays your company branding and offers up to three sign-in methods:
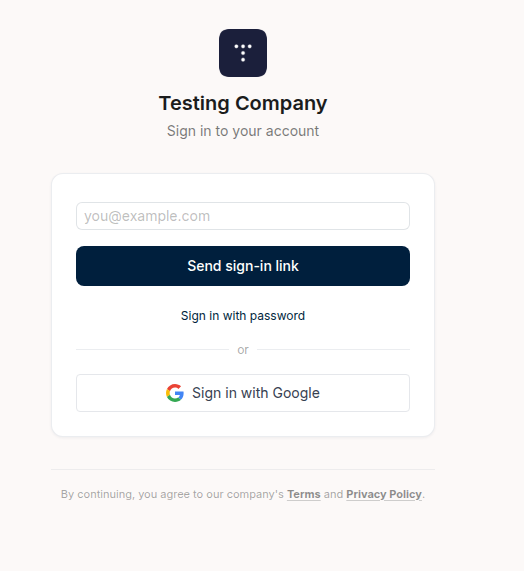
- Magic Link (always available) — the user enters their email and receives a one-time sign-in link. The link expires after 15 minutes.
- Password (if configured) — the user toggles to password mode and signs in with their email and password.
- Google (if configured) — a "Sign in with Google" button appears for one-click sign-in.
Your Domain Only
The login page is only available on your custom login domain. It will not appear on www.chat-data.com.
What Your Users See After Login
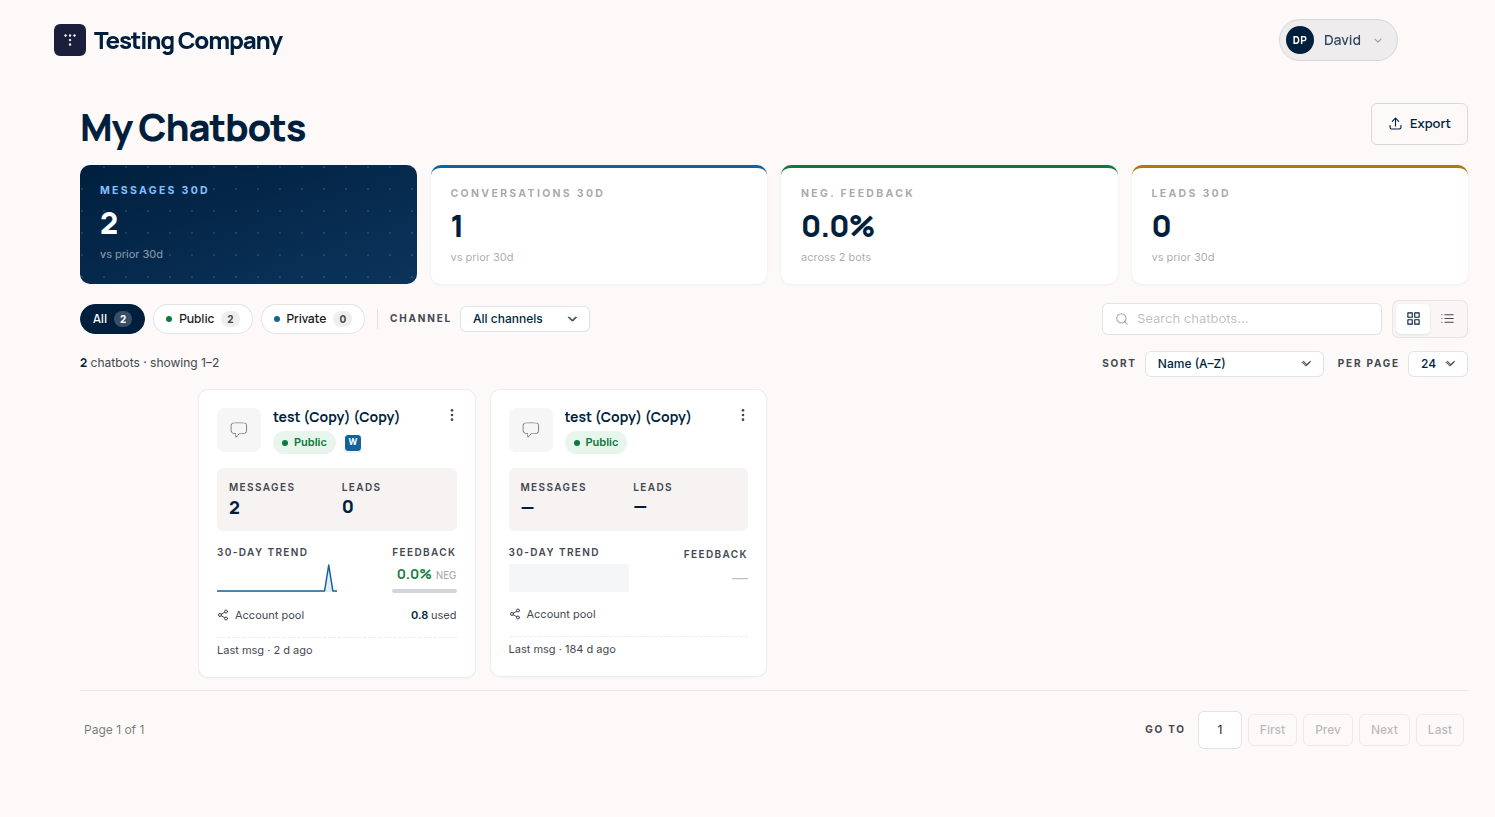
My Chatbots Dashboard
After signing in, your users land on a My Chatbots page that shows only the chatbots you've assigned to them. Each chatbot card displays key metrics — messages, conversations, feedback, and leads — so users can quickly see how their chatbots are performing.
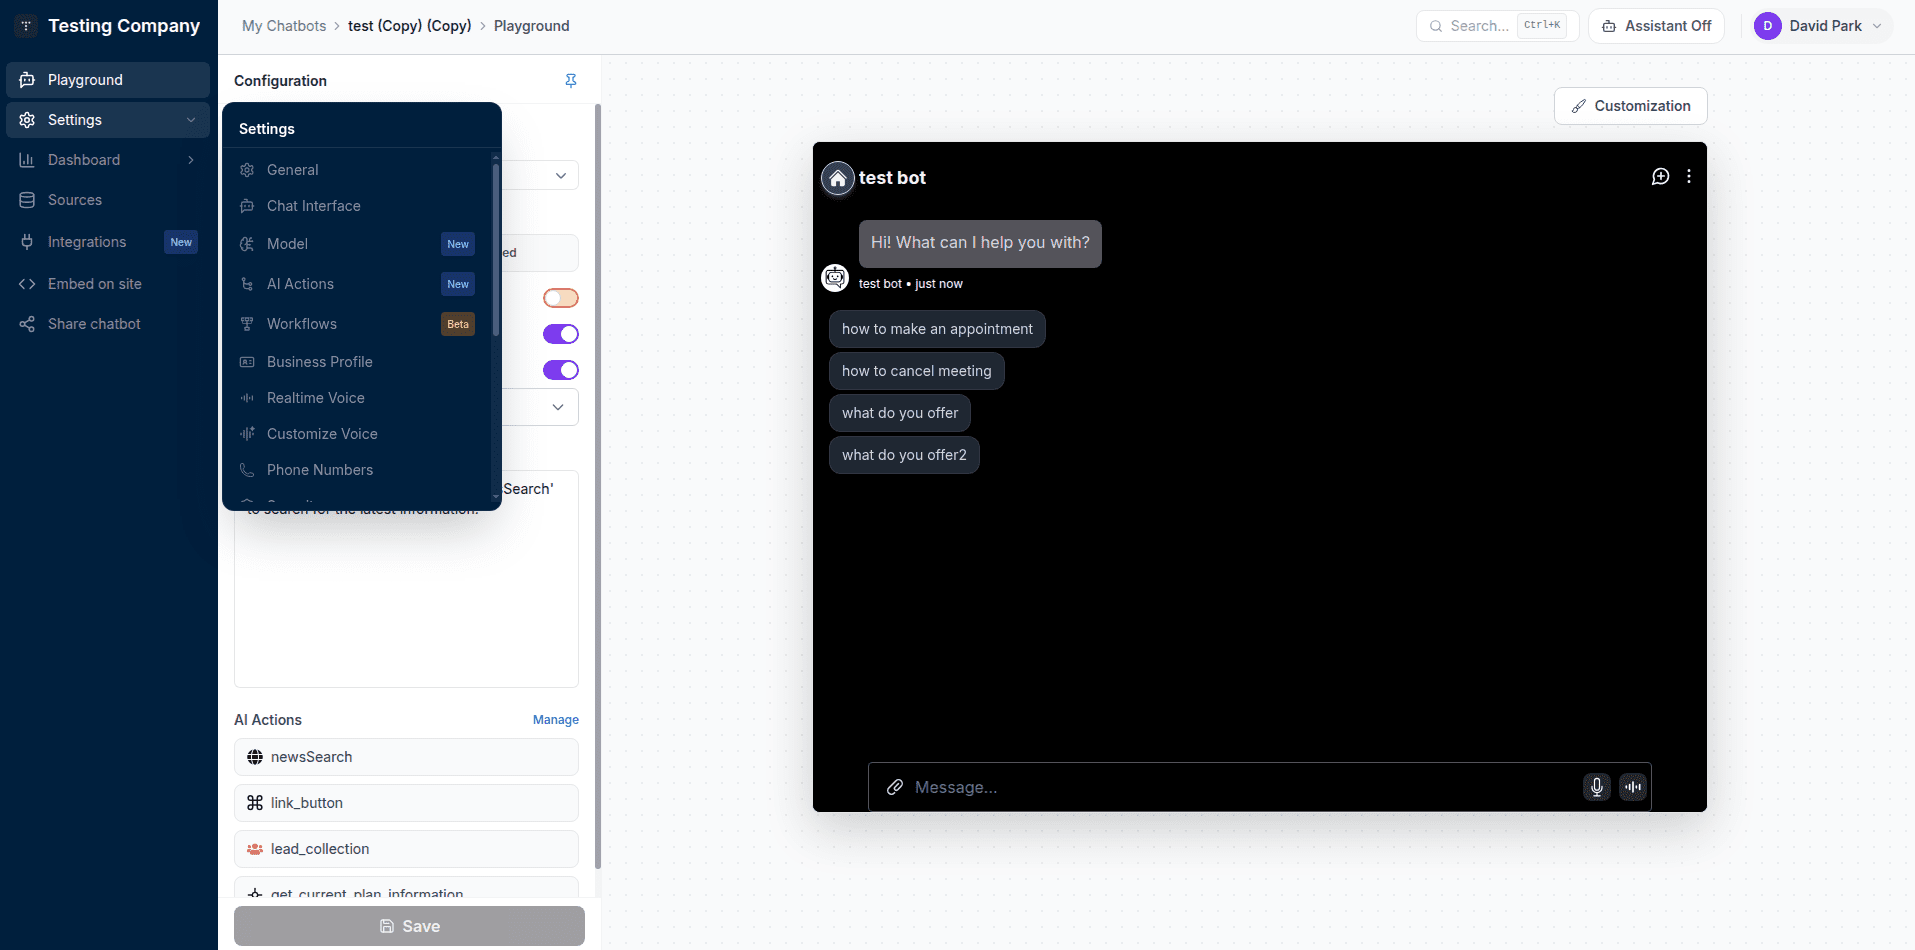
Chatbot Settings and Playground
Clicking into a chatbot opens the full settings panel. Depending on the permissions you've assigned, your users can:
- View and configure General settings, Chat Interface, Model, AI Actions, Workflows, Business Profile, and more
- Test the chatbot in the Playground with a live preview
- Review Analytics for message trends, topics, and user feedback
The sidebar and available options adjust automatically based on the user's permission level.
Profile Management
Users can update their own display name and avatar from the Account page. They cannot access billing, API keys, plan management, or any other company-level settings.
What Happens When You Delete a Chatbot
When you delete a chatbot, Chat Data automatically updates affected sub-users:
- Users with multiple chatbots — the deleted chatbot is removed from their list. They keep access to their remaining chatbots.
- Users with only that chatbot — since every user needs at least one chatbot, the account is automatically removed.
The delete confirmation dialog shows you which users will be affected, giving you a chance to reassign chatbots first.
Chatbot Assignment Rule
Every sub-user must be assigned to at least one chatbot. If a chatbot deletion would leave a user with no chatbots, that user account is automatically deleted.
Managing Users via API
If you need to add or manage users in bulk — for example, when onboarding a large batch of customers — you can use the Chat Data API instead of the dashboard.
All sub-user endpoints require a user-level API key, which you can create on your Account > API Keys page.
Create a User
curl -X POST https://api.chat-data.com/api/v2/sub-users \
-H "Content-Type: application/json" \
-H "Authorization: Bearer YOUR_API_KEY" \
-d '{
  "email": "[email protected]",
  "name": "John Doe",
  "chatbotIds": ["CHATBOT_ID_1", "CHATBOT_ID_2"],
  "permissions": ["read", "train"]
}'
emailandchatbotIds(at least one) are requiredname,password, andpermissionsare optional- If
passwordis omitted, the user signs in via magic link or Google
List All Users
curl https://api.chat-data.com/api/v2/sub-users \
-H "Authorization: Bearer YOUR_API_KEY"
Returns an array of all sub-users with their assigned chatbot names, permissions, and login status.
Update a User
curl -X PUT https://api.chat-data.com/api/v2/sub-users/SUB_USER_ID \
-H "Content-Type: application/json" \
-H "Authorization: Bearer YOUR_API_KEY" \
-d '{
  "chatbotIds": ["CHATBOT_ID_1"],
  "permissions": ["full"]
}'
Only include the fields you want to change. Email cannot be updated.
Delete a User
curl -X DELETE https://api.chat-data.com/api/v2/sub-users/SUB_USER_ID \
-H "Authorization: Bearer YOUR_API_KEY"
For the full API reference including request/response schemas, see the API documentation.
SSO Redirect vs Sub-User Management
Both features are available on the Enterprise plan. Choose the one that fits your workflow:
| SSO Redirect | Sub-User Management | |
|---|---|---|
| Best for | Companies with an existing auth system | Companies that want Chat Data to handle login |
| User management | You build and maintain it | Managed by Chat Data's dashboard or API |
| Login experience | Redirect through your app | Branded login page on your domain |
| Setup effort | Requires backend development | No code needed |
| User accounts | Session-based, no persistent profile | Persistent accounts with name and avatar |
You Can Use Both
SSO Redirect and Sub-User Management are not mutually exclusive. You can use SSO Redirect for users authenticated through your own system, and Sub-User Management for users who log in directly through your branded portal.
Try It Out
Want to see the sub-user experience before setting it up? Log into our live demo portal:
- Go to sso-test.chat-data.com/login
- Use [email protected] as the email and sso-test-chat-data-2025 as the password
- Explore the My Chatbots dashboard, chatbot settings, and playground as a sub-user
If you have any questions or need help setting up sub-user management, please reach out to our support team.